user manual dishwasher ESI 68050
We were thinking of you when we made this product
electrolux 3 Welcome to the world of Electrolux You’ve chosen a first class product from Electrolux, which hopefully will provide you with lots of pleasure in the future. Electrolux ambition is to offer a wide variety of quality products that would make your life even more comfortable. You can look at some examples on the cover in this manual. But now it’s time to study this manual and start using and enjoying the benefits from your new machine. We promise that it’ll make your life a little easier.
electrolux Contents Safety information Product description Control panel First use Set the water softener Use of rinse aid Daily use Load cutlery and dishes Use of detergent Multitab function Select and start a washing programme 5 7 8 13 13 14 16 17 21 22 Unloading the dishwasher Washing programmes Care and cleaning What to do if...
safety information electrolux 5 Safety information In the interest of your safety and to ensure the correct use, before installing and first using the appliance, read this user manual carefully, including its hints and warnings. To avoid unnecessary mistakes and accidents, it is important to ensure that all people using the appliance are thoroughly familiar with its operation and safety features.
electrolux safety information Child safety • This appliance is designed to be operated by adults. Do not allow children to use the dishwasher unsupervised. • Keep all packaging well away from children. There is a risk of suffocation. • Keep all detergents in a safe place out of children’s reach. • Keep children well away from the dishwasher when the door is open. Installation • Check your dishwasher for any transport damage. Never connect a damaged machine.
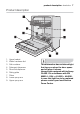
product description electrolux 7 Product description 1. 2. 3. 4. 5. 6. 7. 8. 9. Upper basket Water hardness dial Salt container Detergent dispenser Rinse aid dispenser Rating plate Filters Lower spray arm Upper spray arm This dishwasher has an internal light that turns on when the door opens and off when it closes. Internal light equipped with led lamp CLASS 1 in accordance with EN 60825-1: 1994 + A1:2002 + A2:2001. In case this light has to be replaced please contact your local Service Force Centre.
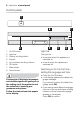
electrolux control panel Control panel 1. 2. 3. 4. 5. 6. 7. 8. On/Off button Light bar Display scrolling button Display Up and down scrolling buttons OK button Start button Home button A sequence of displayed messages and audible signals will guide you in the setting up of the appliance and the selection of washing programmes and options. Follow the instructions that appear in the display.
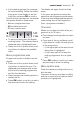
control panel electrolux 9 • In the display appears the message for the time setting. Follow the instructions given in the display to set the right time and press OK to confirm. Once the time has been set, the display will appear divided in three areas: – A menu programmes area – B time/delay start area – C menu options area • To select an area press the display scrolling button. The selected area is displayed with a highlighted frame.
electrolux control panel This area offers Menu options Submenu Extra rinse Adds another rinse phase to the set programme. Not available with all washing programmes (see "Washing programmes" chart). ON OFF Multitab Multitab function; allows the use of the combi detergent tablets (see "Multitab function"). ON OFF • Press OK to change the setting. • Press one of the up and down scrolling buttons to scroll the list for other options.
control panel electrolux 11 • Select Back and press OK to return to menu options. • Press Home button or wait a few seconds to come out from menu options. Demo mode • By default Demo mode is not active; press OK to activate it. The display will appear divided in three areas and in Menu options Settings Submenu the upper left-hand corner appears the message DEMO.
electrolux control panel Menu options Submenu Option description Rinse aid Allows you to activate/deactivate the rinse aid dispenser. Factory setting: activated ON OFF Key lock Allows you to lock the use of the buttons to avoid an incorrect use of the controls. ON OFF Back Press OK to return to menu options. • Scroll the menu options until Settings appears. • Press OK. • Scroll submenu until the desired option is displayed.
first use electrolux 13 First use Before using your dishwasher for the first time: • Ensure that the electrical and water connections comply with the installation instructions • Remove all packaging from inside the appliance • Set the water softener level • Pour 1 litre of water into the salt container and then fill with dishwasher salt • Fill the rinse aid dispenser If you want to use combi detergent tablets such as: ''3 in 1'', ''4 in 1'', ''5 in 1'' etc... set the Multitab function.
electrolux use of rinse aid Enter Menu options - Settings - Water hardness. Using the up and down scrolling buttons set the level of the water softener according to the hardness of the water in your area (see chart). Setting electronically The dishwasher is factory set at level 5.
use of rinse aid electrolux 15 Rinse aid ensures thorough rinsing, and spot and streak free drying. Rinse aid is automatically added during the last rinse. 1. Open the container by pressing the release button (A). 2. Add the rinse aid in the container. The maximum level for filling is indicated by "max". The dispenser holds about 110 ml of rinse aid, which is sufficient for be- tween 16 and 40 washing cycles, depending upon the dosage setting. 3. Ensure that the lid is closed after every refill.
electrolux daily use You are reminded of this by a displayed message. This occurs only at the start and at the end of the washing programme; during the running of the programme the indication for rinse aid refilling is not active. Daily use • Check if it’s necessary to refill with dishwasher salt or rinse aid. • Load cutlery and dishes into the dishwasher. • Fill with dishwasher detergent. • Select a wash programme suitable for the cutlery and dishes. • Start the wash programme.
load cutlery and dishes electrolux 17 For washing in the dishwasher the following cutlery and dishes are not suitable: are of limited suitability: • Cutlery with wooden, horn, china or • Only wash stoneware in the mother-of-pearls handles. dishwasher if it is specially marked as being dishwasher-safe by the • Plastic items that are not heat resistmanufacturer. ant. • Glazed patterns may fade if machine • Older cutlery with glued parts that are washed frequently. not temperature resistant.
electrolux load cutlery and dishes handles facing downwards and the knives with their handles facing upwards. The rows of prongs in the lower basket can lie flat to allow you to load pots, pans and bowls. If the handles protrude from the bottom of the basket, obstructing the lower spray arm, load the cutlery with the handles facing upwards. Mix spoons with other cutlery to prevent them from sticking together. To make loading of the cutlery basket easier, lower the cutlery basket handle.
load cutlery and dishes electrolux 19 The cutlery basket is in two parts which can be separated to give greater loading flexibility. To separate the two parts, slide them horizontally in opposite directions and pull them apart. To reassemble, reverse the procedure. The upper basket The upper basket is designed for saucers, salad bowls, cups, glasses, pots and lids. Arrange items on and underneath the cup racks so that water can reach all surfaces.
electrolux load cutlery and dishes For glasses with long stems (according to the size and dimensions), set the glass holder to the left or right position. Maximum height of the dishes in the lower basket With upper basket raised 31 cm With upper basket lowered 27 cm To move to the higher position proceed as follows: 1. Pull out the basket until it stops. 2. Carefully lift both sides upwards until the mechanism is engaged and the basket is stable.
use of detergent electrolux 21 After loading your machine always close the door, as an open door can be a hazard. Use of detergent Only use detergents specifically designed for use in dishwashers. Please observe the manufacturer’s dosing and storage recommendations as stated on the detergent packaging. 2. Fill the detergent dispenser (1) with detergent. The marking indicates the dosing levels: 20 = approximately 20 g of detergent 30 = approximately 30 g of detergent.
electrolux multitab function Detergent tablets from different manufacturers dissolve at different rates. For this reason, some detergent tablets do not attain their full cleaning power during short washing programmes. Therefore, please use long washing programmes when using detergent tablets, to ensure the complete removal of detergent residuals. 4. Close the lid and press until it locks in place.
select and start a washing programme electrolux 23 If the drying results are not satisfactory we suggest that you: 1. Fill up the rinse aid dispenser with rinse aid. 2. Activate the rinse aid dispenser. 3. Set the rinse aid dosage to position 2. If you decide to revert back to the use of individual detergents we advise that you: 1. Deactivate the Multitab function. 2. Fill up the dispensers for salt and rinse aid again. 3.
electrolux unloading the dishwasher • If the delay start has been selected, the display will show the time duration and the end time of the programme. Once the programme is running the display shows: – the phases of the programme progress, – updates the running and ending time of the programme. Cancel a delay start in progress • Press start button, follow the displayed instructions to cancel the delay start and return to menu programmes.
washing programmes electrolux 25 • Empty the lower basket first and then the upper one; this will avoid water dripping from the upper basket onto the dishes in the lower one. • Water may appear on the sides and the door of the dishwasher as the stainless steel will eventually become cooler than the dishes. When the washing programme has finished, it is recommended that the dishwasher is unplugged and the water tap turned off.
electrolux washing programmes Programme 45° Glass Degree of soil Type of load Normal soil Delicate crockery and glassware This is a programme both designed to heat plates bePlate Warmer fore serving or remove dust 4) from dishes which have not been used for a long time. Any. Partial load (to be completed later in the day). Prewash 4) Programme description Main wash up to 45°C 1 intermediate rinse Final rinse Drying 1 hot rinse This programme does not require the use of detergent.
care and cleaning electrolux 27 Consumption values Programme Programme duration (in minutes) Energy consumption (in kWh) Water consumption (in litres) 12 0,1 4 Prewash 1) Test programme for test institutes The consumption values are intended as a guide and depends on the pressure and the temperature of the water and also by the variations of the power supply and the amount of dishes. Care and cleaning Cleaning the filters The filters must be checked and cleaned from time to time.
electrolux care and cleaning NEVER use the dishwasher without filters. Incorrect repositioning and fitting of the filters will produce poor washing results and will result in damage to the appliance 4. Take hold of the coarse filter (A) by the handle with the hole and remove from the microfilter (B). 5. Clean all filters thoroughly under running water. 6. Remove the flat filter from the base of the washing compartment and clean both faces thoroughly. NEVER try to remove the spray arms.
what to do if... electrolux 29 1. Unplug the appliance and then turn off the water. 2. Leave the door ajar to prevent the formation of any unpleasant smells. 3. Leave the inside of the machine clean. Frost precautions Avoid placing the machine in a location where the temperature is below 0°C. If this is unavoidable, empty the machine, close the appliance door, disconnect the water inlet pipe and empty it. Moving the machine If you have to move the machine (moving house etc...): 1. Unplug it. 2.
electrolux what to do if... Display message and malfunction Possible cause and solution A displayed message informs you that the dishwasher does not drain • The sink spigot is blocked. Clean out the sink spigot. • The water drain hose has not been correctly laid or it is kinked or squashed. Check the water drain hose connection. A displayed message informs you that the anti-flood device is activated • Close the water tap and contact your local Service Force Centre.
what to do if... electrolux 31 S.N. : . . . . . . . . . . . . . . . . . . . . . . . . . . . . . . The wash results are not satisfactory The dishes are not clean • The wrong programme has been selected. • The dishes are arranged in such a way as to stop water reaching all parts of a surface. The baskets must not be overloaded. • The spray arms do not rotate freely due to incorrect arrangement of the load. • The filters in the base of the washing compartment are dirty or incorrectly positioned.
electrolux technical data Technical data Dimensions Width Height Depth 59,6 cm 81,8 - 89,8 cm 57,5 cm Electrical connection Voltage - Overall power Fuse Information on the electrical connection is given on the rating plate on the inner edge of the dishwasher door.
installation electrolux 33 Cup racks: position 2 Arrangement upper basket (take off the glass holder) Arrangement lower basket Arrangement cutlery basket Installation Any electrical and/or plumbing work required to install this appliance should be carried out by a qualified electrician and/or plumber or competent person.
electrolux water connection Remove all packaging before positioning the machine. If possible, position the machine next to a water tap and a drain. This dishwasher is designed to be fitted under a kitchen counter or work surface. Attention! Carefully follow the instructions on the enclosed template for building in the dishwasher and fitting the furniture panel.
water connection electrolux 35 Attention! NOT all models of dishwashers have fill and drain hoses provided with a locknut. In this case, this facility is not available. If the machine is connected to new pipes or pipes which have not been used for a long time, you should run the water for a few minutes before connecting the inlet hose. DO NOT use connection hoses which have previously been used for an old appliance.
electrolux water connection When connecting the drain hose to an under sink trap spigot, the entire plastic membrane (A) must be removed. Failure to remove all the membrane will result in food particles building up over time eventually blocking the dishwasher drain hose spigot The drain hose can face either to the right or left of the dishwasher Ensure the hose is not bent or squashed as this could prevent or slow down the discharge of water.
electrical connection electrolux 37 Electrical connection Safety standards require the appliance to be earthed. Prior to using the appliance for the first time, ensure that the rated voltage and type of supply on the rating plate match that of the supply where the appliance is to be installed. The fuse rating is also to be found on the rating plate Always plug the mains plug into a correctly installed shockproof socket. Multi-way plugs, connectors and extension cables must not be used.
electrolux environment concerns When a unit is no longer being used: • Pull the plug out of the socket. • Cut off the cable and plug and dispose of them. • Dispose of the door catch. This prevents children from trapping themselves inside and endangering their lives.
www.electrolux.com www.electrolux.co.