ESI 8710RAX EN DISHWASHER USER MANUAL
www.electrolux.com CONTENTS 1. SAFETY INFORMATION...................................................................................... 3 2. SAFETY INSTRUCTIONS.....................................................................................4 3. PRODUCT DESCRIPTION................................................................................... 6 4. CONTROL PANEL............................................................................................... 7 5. PROGRAMMES..........................
ENGLISH 1. 3 SAFETY INFORMATION Before the installation and use of the appliance, carefully read the supplied instructions. The manufacturer is not responsible for any injuries or damages that are the result of incorrect installation or usage. Always keep the instructions in a safe and accessible location for future reference. 1.
www.electrolux.com • • • • • Do not keep the appliance door open without supervision to prevent to fall on it. Before any maintenance operation, deactivate the appliance and disconnect the mains plug from the socket. Do not use high pressure water sprays and/or steam to clean the appliance. The ventilation openings in the base (if applicable) must not be obstructed by a carpet. The appliance is to be connected to the water mains using the new supplied hose-sets. Old hose sets must not be reused. 2.
ENGLISH • Do not put flammable products or items that are wet with flammable products in, near or on the appliance. 2.5 Internal light WARNING! Risk of injury. WARNING! Dangerous voltage. • If the water inlet hose is damaged, immediately disconnect the mains plug from the mains socket. Contact the Authorised Service Centre to replace the water inlet hose. 2.4 Use • Do not sit or stand on the open door. • Dishwasher detergents are dangerous. Obey the safety instructions on the detergent packaging.
www.electrolux.com 3.
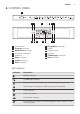
ENGLISH 4. CONTROL PANEL 1 2 33 14 13 13 12 12 1 2 3 4 5 6 7 8 On/off button Program touchpad MyFavourite touchpad Programme indicators Indicators Delay touchpad Option touchpad Start touchpad 4 55 11 10 9 10 11 12 13 14 6 7 9 8 EnergySaver touchpad Display Programme bar Indicators TimeManager touchpad Reset touchpad 4.1 Indicators Indicator Description Multitab indicator. TimeManager indicator. Rinse aid indicator. It is always off while the programme operates. Salt indicator.
www.electrolux.com Indicator Description Turbidity Sensor indicator. It comes on when the sensor for the programme operates. When the sensor operates, only this indicator is on. All the other indicators, the display and the programme bar go off. They come on again when the Turbidity Sensor indicator goes off. 4.2 Programme bar The programme bar shows information related to the programme and to the option TimeManager.
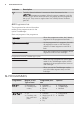
ENGLISH Programme Degree of soil Type of load Programme phases Options 3) • Mixed soil • Crockery, cutlery, pots and pans • Prewash • Wash 50 °C and 65 °C • Rinses • Dry • EnergySaver • TimeManager • Multitab 4) • Heavy soil • Crockery, cutlery, pots and pans • • • • • • • • 5) Prewash Wash 70 °C Rinses Dry 9 EnergySaver XtraPower TimeManager Multitab • Normal or light • Wash 45 °C soil • Rinses • Delicate crockery • Dry and glassware • EnergySaver • Multitab • Light soil • Crockery and c
www.electrolux.com Programme 1) Water (l) Energy (kWh) Duration (min) 9.5 - 10.5 1.10 - 1.30 55 - 65 10 0.9 30 1) The pressure and the temperature of the water, the variations of the mains supply, the options and the quantity of dishes can change the values. 5.2 Information for test institutes For all the necessary information for test performance, send an email to: Write down the product number (PNC) that is on the rating plate. info.test@dishwasher-production.com 6. SETTINGS 6.
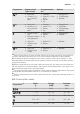
ENGLISH German degrees (°dH) French degrees (°fH) mmol/l Clarke degrees Water softener level 43 - 46 76 - 83 7.6 - 8.3 53 - 57 9 37 - 42 65 - 75 6.5 - 7.5 46 - 52 8 29 - 36 51 - 64 5.1 - 6.4 36 - 45 7 23 - 28 40 - 50 4.0 - 5.0 28 - 35 6 19 - 22 33 - 39 3.3 - 3.9 23 - 27 5 1) 15 - 18 26 - 32 2.6 - 3.2 18 - 22 4 11 - 14 19 - 25 1.9 - 2.5 13 - 17 3 4 - 10 7 - 18 0.7 - 1.8 5 - 12 2 <4 <7 <0.7 <5 1 2) 11 1) Factory setting. 2) Do not use salt at this level.
www.electrolux.com • The indicator continues to flash. • The display shows the current = level 4. setting: e.g. – The levels of rinse aid are from 0A to 6A. – Level 0 = no rinse aid is released. 3. Press Delay again and again to change the setting. 4. Press the on/off button to confirm the setting. 6.4 Use of rinse aid and multitablets The factory setting of the rinse aid dispenser is with the dispenser activated. This means that the rinse aid dispenser always releases rinse aid.
ENGLISH You can only save 1 programme. A new setting cancels the previous one. How to save the MyFavourite programme 1. Set the programme that you want to save You can also set applicable options together with the programme. 2. Press and hold MyFavourite until the segments of the programme bar flash quickly. 13 How to set the MyFavourite programme Press MyFavourite. • The indicators that are related to the MyFavourite programme and options come on. • The display shows the duration of the programme. 7.
www.electrolux.com also the energy consumption (approximately -25%). Dishes can still be wet once the programme is completed. The duration of the programme will be shorter. How to activate EnergySaver Press EnergySaver, the related indicator comes on. If the option is not applicable to the programme, the related indicator does not come on or it flashes quickly for a few seconds and then goes off. The display shows the updated programme duration. 7.
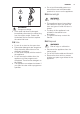
ENGLISH Water and salt can come out from the salt container when you fill it. Risk of corrosion. To prevent it, after you fill the salt container, start a programme. 8.2 How to fill the rinse aid dispenser A B CAUTION! Only use rinse aid specifically designed for dishwashers. 1. Open the lid (C). 2. Fill the dispenser (B) until the rinse aid reaches the marking ''MAX''. 3. Remove the spilled rinse aid with an absorbent cloth to prevent too much foam. 4. Close the lid.
www.electrolux.com 2. Put the detergent, in powder or tablets, in the compartment (B). 3. If the programme has a prewash phase, put a small quantity of detergent on the inner part of the appliance door. 4. Close the lid. Make sure that the lid locks into position. 9.2 Setting and starting a programme The Auto Off function This function decreases energy consumption by deactivating automatically the appliance when it is not operating.
ENGLISH 17 Cancelling the programme All buttons are inactive except for the on/off button. 1. Open the appliance door. 2. Press and hold Reset until the appliance is in programme selection mode. Make sure that there is detergent in the detergent dispenser before you start a new programme. 1. Press the on/off button or wait for the Auto Off function to automatically deactivate the appliance. If you open the door before the activation of Auto Off, the appliance is automatically deactivated. 2.
www.electrolux.com 10.3 What to do if you want to stop using multi-tablets Before you start to use separately detergent, salt and rinse aid do the following procedure. 1. Set the highest level of the water softener. 2. Make sure that the salt and rinse aid containers are full. 3. Start the shortest programme with a rinsing phase. Do not add detergent and do not load the baskets. 4. When the programme is completed, adjust the water softener according to the water hardness in your area. 5.
ENGLISH 19 C B A 1. Turn the filter (B) counterclockwise and remove it. 2. Remove the filter (C) out of filter (B). 3. Remove the flat filter (A). 5. Make sure that there are no residues of food or soil in or around the edge of the sump. 6. Put back in place the flat filter (A). Make sure that it is correctly positioned under the 2 guides. 7. Reassemble the filters (B) and (C). 8. Put back the filter (B) in the flat filter (A). Turn it clockwise until it locks. 4. Wash the filters.
www.electrolux.com 11.2 Cleaning the upper spray arm We recommend to clean regularly the upper spray arm to avoid soil to clog the holes. 4. To engage again the spray arm to the basket, press the spray arm upwards in the direction indicated by the lower arrow and simultaneously turn it counterclockwise until it locks into place. Clogged holes can cause unsatisfactory washing results. 1. Pull out the upper basket. 2.
ENGLISH With some problems, the display shows an alarm code. 21 to contact an Authorised Service Centre. The majority of problems that can occur can be solved without the need Problem and alarm code Possible cause and solution You cannot activate the ap- • Make sure that the mains plug is connected to the pliance. mains socket. • Make sure that there is no damaged fuse in the fuse box. The program does not start. • Make sure that the appliance door is closed. • Press Start.
www.electrolux.com Problem and alarm code Possible cause and solution The options of the program • To save your favourite configuration use option MyFahave to be set again every vourite. time. Small leak from the appliance door. • The appliance is not levelled. Loosen or tighten the adjustable feet (if applicable). • The appliance door is not centred on the tub. Adjust the rear foot (if applicable). The appliance door is difficult to close. • The appliance is not levelled.
ENGLISH 23 Problem Possible cause and solution There are whitish streaks or bluish layers on glasses and dishes. • The release quantity of rinse aid is too much. Adjust the rinse aid level to a lower level. • The quantity of detergent is too much. There are stains and dry water drops on glasses and dishes. • The released quantity of rinse aid is not sufficient. Adjust the rinse aid level to a higher level. • The quality of the rinse aid can be the cause. The dishes are wet.
www.electrolux.com Refer to "Before first use", "Daily use" or "Hints and tips" for other possible causes. 13. TECHNICAL INFORMATION Dimensions Width / height / depth (mm) 596 / 818 - 898 / 575 Electrical connection 1) Voltage (V) 220 - 240 Frequency (Hz) 50 bar (minimum and maximum) 0.5 - 8 MPa (minimum and maximum) 0.05 - 0.8 Water supply Cold water or hot water 2) max 60 °C Capacity Place settings 15 Power consumption Left-on mode (W) 5.0 Power consumption Off-mode (W) 0.
ENGLISH 25
www.electrolux.
ENGLISH 27
117894781-A-532015 www.electrolux.