ESL 6250RA ................................................ .............................................
www.electrolux.com INHOUD 1. 2. 3. 4. 5. 6. 7. 8. 9. 10. 11. VEILIGHEIDSVOORSCHRIFTEN . . . . . . . . . . . . . . . . . . . . . . . . . . . . . . . . . . . . . . . . . . . . . 3 BESCHRIJVING VAN HET PRODUCT . . . . . . . . . . . . . . . . . . . . . . . . . . . . . . . . . . . . . . . . . 5 BEDIENINGSPANEEL . . . . . . . . . . . . . . . . . . . . . . . . . . . . . . . . . . . . . . . . . . . . . . . . . . . . . 5 PROGRAMMA’S . . . . . . . . . . . . . . . . . . . . . . . . . . . . . . . . . . . . . . . .
NEDERLANDS 1. 3 VEILIGHEIDSVOORSCHRIFTEN Lees zorgvuldig de meegeleverde instructies voor installatie en gebruik van het apparaat. De fabrikant is niet verantwoordelijk voor letsel en schade veroorzaakt door een foutieve installatie. Bewaar de instructies van het apparaat voor toekomstig gebruik. 1.1 Veiligheid van kinderen en kwetsbare mensen WAARSCHUWING! Gevaar voor verstikking, letsel of permanente invaliditeit.
www.electrolux.com WAARSCHUWING! Gevaarlijke spanning. • Als de watertoevoerslang beschadigd is, haal dan onmiddellijk de stekker uit het stopcontact. Neem contact op met de service-afdeling om de watertoevoerslang te vervangen. 1.
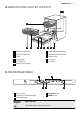
NEDERLANDS 2. BESCHRIJVING VAN HET PRODUCT 1 2 11 10 9 8 6 7 3 5 4 1 Bovenste sproeiarm 7 Glansmiddeldoseerbakje 2 Onderste sproeiarm 8 Afwasmiddeldoseerbakje 3 Filters 4 Typeplaatje 9 Bestekmand 10 Onderkorf 5 Zoutreservoir 11 Bovenkorf 6 Waterhardheidsknop 3. BEDIENINGSPANEEL 2 1 5 4 1 Aan/uit-toets 4 Program-toets 2 Programma-indicatielampjes 3 Indicatielampjes 5 Delay-toets Indicatielampjes Beschrijving Indicatielampje einde programma.
www.electrolux.com Indicatielampjes Beschrijving Glansmiddelindicatielampje. Dit indicatielampje is altijd uit als het programma in werking is. Zoutindicatielampje. Dit indicatielampje is altijd uit als het programma in werking is. 4. PROGRAMMA’S Programma1) Mate van vervuiling Type lading Programma fasen Bereidingsduur (min) Normaal bevuild Serviesgoed en bestek Voorspoelen Afwassen 50 °C Spoelgangen Drogen 130 - 140 1.0 1.
NEDERLANDS 7 Aanwijzingen voor testinstituten Stuur voor alle benodigde informatie over testprestaties een e-mail naar: info.test@dishwasher-production.com Schrijf het productnummer (PNC) op dat u op het typeplaatje vindt. 5. OPTIES 5.1 Geluidssignalen Het geluidsignaal klinkt als het apparaat een storing heeft en niet kan worden geactiveerd. Na het beëindigen van het programma klinkt er tevens een geluidssignaal. Dit geluidssignaal is standaard uitgeschakeld, maar kan worden geactiveerd.
www.electrolux.com 6.
NEDERLANDS 9 7. Druk op de aan-/uittoets om het apparaat te deactiveren en om de instelling te bevestigen. 6.3 Het zoutreservoir vullen 1. 2. 3. 4. 5. Draai de dop linksom om het zoutreservoir te openen. Doe een liter water in het zoutreservoir (alleen de eerste keer). Vul het zoutreservoir met regenereerzout. Verwijder het zout rond de opening van het zoutreservoir. Draai de dop rechtsom om het zoutreservoir te sluiten. LET OP! Water en zout kunnen uit het zoutreservoir stromen als u het bijvult.
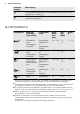
www.electrolux.com 5. U dient het juiste programma in te stellen en te starten voor het type lading en de mate van vervuiling. 7.1 Vaatwasmiddel gebruiken A 1. B 2. 30 3. 4 MAX + 32 - 1 20 C 4. 5. 7.2 Gebruik van gecombineerde afwastabletten Als u tabletten gebruikt die zout en glansmiddel bevatten, is het niet nodig om de doseerbakjes voor zout en glansmiddel te vullen. De glansmiddelindicatie gaat altijd aan als het glansmiddel op is. 1. Stel de waterontharder op het laagste niveau in.
NEDERLANDS 2. Druk op Delay om de start van het programma met drie uur uit te stellen. • Het indicatielampje Delay gaat branden. 3. Sluit de deur van het apparaat. Het aftellen start. • Als het aftelproces voltooid is, wordt het programma gestart. De deur openen als het apparaat in werking is Als u de deur opent, stopt het apparaat. Als u de deur weer sluit, gaat het apparaat verder vanaf het punt van onderbreking. De uitgestelde start annuleren tijdens het aftellen Voer de Reset-functie uit.
www.electrolux.com de instructies van de vaatwasmiddelfabrikant. 8.3 De korven inruimen Zie de meegeleverde folder voor voorbeelden van het inruimen van de korven. • Gebruik het apparaat alleen om voorwerpen af te wassen die vaatwasbestendig zijn. • Doe geen voorwerpen in het apparaat die gemaakt zijn van hout, hoorn, aluminium, tin en koper. • Plaats geen voorwerpen in het apparaat die water kunnen absorberen (sponzen, keukenhanddoeken). • Verwijder alle voedselresten van de voorwerpen.
NEDERLANDS 13 9.1 De filters reinigen C 1. Draai het filter (A) linksom en verwijder het. 2. Haal om het filter (A) te demonteren, (A1) en (A2) uit elkaar. Verwijder het filter (B). Reinig de filters met water. Zorg er voordat u het filter (B) terugplaatst voor dat er geen etensresten of vuil in en rond de rand van de opvangbak zit. C A B A1 3. 4. 5. A2 6. 7. Zorg ervoor dat het filter (B) juist wordt geplaatst onder de 2 geleiders (C). Monteer het filter (A) en zet het terug in filter (B).
www.electrolux.com Foutcode Probleem • Het eindlampje knippert 1 keer onderbroken. • Geluidssignaal klinkt 1 keer. Het apparaat wordt niet met water gevuld. • Het eindlampje knippert 2 keer onderbroken. • Geluidssignaal klinkt 2 keer. Het apparaat pompt geen water weg. • Het eindlampje knippert 3 keer onderbroken. • Geluidssignaal klinkt 3 keer. Het beschermingssysteem tegen lekkage is aan. WAARSCHUWING! Schakel het apparaat uit voordat u controles uitvoert.
NEDERLANDS 10.1 De was- en droogresultaten zijn niet naar tevredenheid Witte strepen of een blauwe waas op glazen en serviesgoed • De vrijgegeven hoeveelheid glansmiddel is te hoog. Zet de dosering van het glansmiddel op een lagere stand. • Er is te veel vaatwasmiddel gebruikt. 15 • De kwaliteit van het vaatwasmiddel kan de oorzaak zijn. Het serviesgoed is nat • Het programma heeft geen droogfase of een te lage droogtemperatuur. • Het glansmiddeldoseerbakje is leeg.
www.electrolux.com CONTENTS 1. 2. 3. 4. 5. 6. 7. 8. 9. 10. 11. SAFETY INSTRUCTIONS . . . . . . . . . . . . . . . . . . . . . . . . . . . . . . . . . . . . . . . . . . . . . . . . . PRODUCT DESCRIPTION . . . . . . . . . . . . . . . . . . . . . . . . . . . . . . . . . . . . . . . . . . . . . . . . CONTROL PANEL . . . . . . . . . . . . . . . . . . . . . . . . . . . . . . . . . . . . . . . . . . . . . . . . . . . . . . PROGRAMMES . . . . . . . . . . . . . . . . . . . . . . . . . . . . . . . . . . . . . . .
ENGLISH 1. 17 SAFETY INSTRUCTIONS Before the installation and use of the appliance, carefully read the supplied instructions. The manufacturer is not responsible if an incorrect installation and use causes injuries and damages. Always keep the instructions with the appliance for future reference. 1.1 Children and vulnerable people safety WARNING! Risk of suffocation, injury or permanent disability.
www.electrolux.com 1.3 Use • This appliance is intended to be used in household and similar applications such as: – Staff kitchen areas in shops, offices and other working environments – Farm houses – By clients in hotels, motels and other residential type environments – Bed and breakfast type environments. WARNING! Risk of injury, burns, electrical shock or fire. • Do not change the specification of this appliance.
ENGLISH 2. PRODUCT DESCRIPTION 1 2 11 10 9 8 6 7 3 5 4 1 Upper spray arm 7 Rinse aid dispenser 2 Lower spray arm 8 Detergent dispenser 3 Filters 4 Rating plate 9 Cutlery basket 10 Lower basket 5 Salt container 11 Upper basket 6 Water hardness dial 3. CONTROL PANEL 2 1 5 4 1 On/off button 4 Program button 2 Programme indicators 3 Indicators 5 Delay button Indicators Description End indicator.
www.electrolux.com Indicators Description Rinse aid indicator. It is always off while the programme operates. Salt indicator. It is always off while the programme operates. 4. PROGRAMMES Programme1) Degree of soil Type of load Programme phases Duration Energy Water (min) (kWh) (l) Normal soil Crockery and cutlery Prewash Wash 50 °C Rinses Dry 130 - 140 1.0 1.1 13 - 14 Normal soil Crockery and cutlery Wash 65 °C Rinses Dry 105 - 115 1.6 1.
ENGLISH 21 5. OPTIONS 5.1 Acoustic signals The acoustic signals operate when the appliance has a malfunction and it is not possible to deactivate them. There is also an acoustic signal that operates when the programme is completed. By default, this acoustic signal is off, but it is possible to activate it. How to activate the acoustic signal for the end of programme 1. Press the on/off button to activate the appliance. 2. If necessary, do the Reset function. 3.
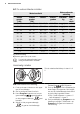
www.electrolux.com Water softener adjustment Water hardness German degrees (°dH) French degrees (°fH) mmol/l Clarke degrees Manual Electronic 29 - 36 51 - 64 5.1 - 6.4 36 - 45 21) 7 23 - 28 40 - 50 4.0 - 5.0 28 - 35 21) 6 19 - 22 33 - 39 3.3 - 3.9 23 - 27 21) 51) 15 - 18 26 - 32 2.6 - 3.2 18 - 22 1 4 11 - 14 19 - 25 1.9 - 2.5 13 - 17 1 3 4 - 10 7 - 18 0.7 - 1.8 5 - 12 1 2 <4 <7 < 0.7 <5 12) 12) 1) Factory position. 2) Do not use salt at this level.
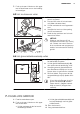
ENGLISH 23 6.3 Filling the salt container 1. 2. 3. 4. 5. Turn the cap counterclockwise and open the salt container. Put 1 litre of water in the salt container (only for the first time). Fill the salt container with dishwasher salt. Remove the salt around the opening of the salt container. Turn the cap clockwise to close the salt container. CAUTION! Water and salt can come out from the salt container when you fill it. Risk of corrosion. To prevent it, after you fill the salt container, start a programme.
www.electrolux.com 7.1 Using the detergent A 1. B 2. 30 3. 4 MAX + 32 - 1 20 C 4. 5. 7.2 Using the combi detergent tablets When you use tablets, that contain salt and rinse aid, do not fill the salt container and the rinse aid dispenser. The rinse aid indicator always comes on if the rinse aid dispenser is empty. 1. Adjust the water softener to the lowest level. 2. Set the rinse aid dispenser to the lowest position.
ENGLISH • When the countdown is completed, the programme starts. Opening the door while the appliance operates If you open the door, the appliance stops. When you close the door, the appliance continues from the point of interruption. Cancelling the delay start while the countdown operates Do the Reset function. When you cancel the delay start, you have to set the programme again. Cancelling the programme 25 At the end of the programme When the programme is completed, the end indicator is on. 1.
www.electrolux.com • Do not put in the appliance items that can absorb water (sponges, household cloths). • Remove remaining food from the items. • To remove easily remaining burned food, soak pots and pans in water before you put them in the appliance. • Put hollow items (cups, glasses and pans) with the opening down. • Make sure that cutlery and dishes do not bond together. Mix spoons with other cutlery. • Make sure that glasses do not touch other glasses. • Put the small items in the cutlery basket.
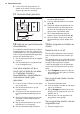
ENGLISH 2. A1 3. 4. 5. A2 6. 7. 27 To disassemble the filter (A), pull apart (A1) and (A2). Remove the filter (B). Wash the filters with water. Before you put the filter (B) back, make sure that there are no residues of food or soil in or around the edge of the sump. Make sure that the filter (B) is correctly positioned under the 2 guides (C). Assemble the filter (A) and put it back in filter (B). Turn it clockwise until it locks.
www.electrolux.com Alarm code Problem • The end indicator flashes 3 times intermittently. • Acoustic signal sounds 3 times intermittently. The anti-flood device is on. WARNING! Deactivate the appliance before you do the checks. Problem Possible solution You cannot activate the appliance. Make sure that the mains plug is connected to the mains socket. Make sure that there is not a damaged fuse in the fuse box. The programme does not start. Make sure that the appliance door is closed.
ENGLISH • The quality of the detergent can be the cause. Dishes are wet • The programme is without a drying phase or with a low temperature drying phase. 29 • The rinse aid dispenser is empty. • The quality of the rinse aid can be the cause. Refer to ‘HINTS AND TIPS’ for other possible causes. 11. TECHNICAL INFORMATION Dimensions Width / Height / Depth (mm) Electrical connection Refer to the rating plate. Voltage 596 / 818 - 898 / 550 220-240 V Frequency 50 Hz Water supply pressure Min. / max.
www.electrolux.
ENGLISH 31
117909330-A-512012 www.electrolux.