ESL 6610RO ................................................ .............................................
www.electrolux.com CONTENTS 1. 2. 3. 4. 5. 6. 7. 8. 9. 10. 11. 12. 13. SAFETY INSTRUCTIONS . . . . . . . . . . . . . . . . . . . . . . . . . . . . . . . . . . . . . . . . . . . . . . . . . . 3 PRODUCT DESCRIPTION . . . . . . . . . . . . . . . . . . . . . . . . . . . . . . . . . . . . . . . . . . . . . . . . . 5 CONTROL PANEL . . . . . . . . . . . . . . . . . . . . . . . . . . . . . . . . . . . . . . . . . . . . . . . . . . . . . . . 6 PROGRAMS . . . . . . . . . . . . . . . . . . . . . . . . . . . . . .
ENGLISH 1. 3 SAFETY INSTRUCTIONS Before the installation and use of the appliance, carefully read the supplied instructions. The manufacturer is not responsible if an incorrect installation and use causes injuries and damages. Always keep the instructions with the appliance for future reference. 1.1 Children and vulnerable people safety WARNING! Risk of suffocation, injury or permanent disability.
www.electrolux.com WARNING! Dangerous voltage. • If the water inlet hose is damaged, immediately disconnect the mains plug from the mains socket. Contact the Service to replace the water inlet hose. 1.3 Use • This appliance is intended to be used in household and similar applications such as: – Farm houses. – By clients in hotels, motels and other residential type environments. – Bed and breakfast type environments. WARNING! Risk of injury, burns, electrical shock or fire.
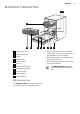
ENGLISH 5 2. PRODUCT DESCRIPTION 1 2 11 10 9 8 7 1 Upper spray arm 2 Lower spray arm 3 Filters 4 Rating plate 5 Salt container 6 Air vent 7 Rinse aid dispenser 8 Detergent dispenser 9 Cutlery basket 10 Lower basket 11 Upper basket 2.1 Beam-on-Floor The Beam-on-Floor is a light that shows on the floor below the appliance door. 6 5 4 3 • When the program starts to operate, the red light comes on and stays on for all the duration of the program.
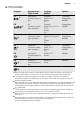
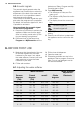
www.electrolux.com 3. CONTROL PANEL 1 2 3 4 5 6 7 8 9 1 On/off button 6 TimeSaver touchpad 2 Display 3 Delay touchpad 7 Multitab touchpad 4 Program touchpad 9 Indicators 8 EnergySaver touchpad 5 MyFavourite touchpad Indicators Description Salt indicator. It is always off while the program operates. Rinse aid indicator. It is always off while the program operates.
ENGLISH 7 4.
www.electrolux.com Consumption values Program1) Duration (min) Energy (kWh) Water (l) P1 147 - 161 0.79 - 0.96 10.4 - 12.6 P2 40 - 150 0.7 - 1.5 7 - 14 P3 130 - 140 1.3 - 1.5 14 - 15 P4 150 - 160 1.4 - 1.6 13 - 14 P5 55 - 65 1.0 - 1.2 9 - 10 P6 30 0.9 9 P7 14 0.1 4 1) The pressure and the temperature of the water, the variations of the mains supply, the options and the quantity of dishes can change the values.
ENGLISH 9 5. OPTIONS Activate or deactivate the options before the start of a program. You cannot activate or deactivate the options while a program operates. If one or more options are set, make sure that the related indicators are on before the program starts. 5.1 MyFavourite With this option you can set and save the program that you use more frequently. You can only save 1 program at a time. A new setting cancels the previous one. How to save a program 1.
www.electrolux.com 5.5 Acoustic signals The acoustic signals operate when the appliance has a malfunction or when the adjustment of the level of the water softener occurs. It is not possible to deactivate these acoustic signals. There is also an acoustic signal that operates when the programme is completed. By default, this acoustic signal is off, but it is possible to activate it. How to activate the acoustic signal for the end of programme 1. Press the on/off button to activate the appliance.
ENGLISH 11 Water softener adjustment Water hardness German degrees (°dH) French degrees (°fH) mmol/l Clarke degrees Electronic <4 <7 < 0.7 <5 12) 1) Factory setting. 2) Do not use salt at this level. Electronic adjustment 1. Press the on/off button to activate the appliance. Make sure that the appliance is in setting mode, refer to “Setting and starting a program”. 2.
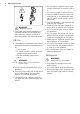
www.electrolux.com 6.3 Filling the rinse aid dispenser 1. B A 2. 3. M AX 4 3 2 1 + - 4. C D Press the release button (D) to open the lid (C). Fill the rinse aid dispenser (A), no more than the mark 'max'. Remove the spilled rinse aid with an absorbent cloth to prevent too much foam. Close the lid. Make sure that the release button locks into position. You can turn the selector of the released quantity (B) between position 1 (lowest quantity) and position 4 (highest quantity). 7. DAILY USE 1.
ENGLISH 7.2 Setting and starting a program The Auto Off function To decrease the energy consumption, this function automatically deactivates the appliance a few minutes after: • You have not closed the door to start the program. • The program is completed. Setting mode For some settings it is necessary that the appliance is in setting mode. Press the on/off button to activate the appliance. The appliance is in setting mode when the display shows programme P1.
www.electrolux.com 8. HINTS AND TIPS 8.1 The water softener Hard water contains a high quantity of minerals that can cause damage to the appliance and bad washing results. The water softener neutralises these minerals. The dishwasher salt keeps the water softener clean and in good conditions. It is important to set the right level of the water softener. This makes sure that the water softener uses the correct quantity of dishwasher salt and water. 8.
ENGLISH 15 9. CARE AND CLEANING WARNING! Before maintenance, deactivate the appliance and disconnect the mains plug from the mains socket. Dirty filters and clogged spray arms decrease the washing results. Make a check regularly and, if necessary, clean them. 9.1 Cleaning the filters C 1. Turn the filter (A) counterclockwise and remove it. 2. To disassemble the filter (A), pull apart (A1) and (A2). Remove the filter (B). Wash the filters with water.
www.electrolux.com 10. TROUBLESHOOTING The appliance does not start or it stops during operation. Before you contact the Service, refer to the information that follows for a solution to the problem. With some problems, the display shows an alarm code: • - The appliance does not fill with water. • - The appliance does not drain the water. • - The anti-flood device is on. Problem Possible solution You cannot activate the appliance. Make sure that the mains plug is connected to the mains socket.
ENGLISH • The quality of the detergent can be the cause. Dishes are wet • The program is without a drying phase or with a low temperature drying phase. Leave the door ajar for some minutes before you remove the dishes. • The rinse aid dispenser is empty. • The quality of the rinse aid can be the cause. • The quality of the multi-tablets can be the cause. Try a different brand or activate the rinse aid dispenser and use rinse aid together with multi-tablets.
www.electrolux.com 12. INSTALLATION There should be a minimum 2mm gap between the top of the dishwasher and underside of bench top The hose s hould not be extended by more than 2 metres or water pumpout problems ma y occu r Remove entire plastic membrane from sink trap spigot & fit drain hose to spigot with clamp Secure dishwasher with brackets and screws provided 600 mm max. 300 mm min. Gap on both sides should be equal, & no greater than 5 mm per side.
ENGLISH 19 In order to pass the safety valve through the kitchen cabinets, an opening of at least 45 mm x 90 mm is needed. Water drain hose The highest point of the drain hose must be no more than 600 mm from the floor and must have a continuous fall to the plumbing connection. The drain hose can be lengthened using additional lengths and connectors. These must be purchased from Electrolux Spare Parts. The extension length must not exceed 2 metres.
www.electrolux.com 13. WARRANTY FOR SALES IN AUSTRALIA AND NEW ZEALAND APPLIANCE: DISHWASHER This document sets out the terms and conditions of the product warranties for Electrolux Appliances. It is an important document. Please keep it with your proof of purchase documents in a safe place for future reference should you require service for your Appliance. 1.
ENGLISH 6. 7. 8. 9. owner’s cost and risk while in transit to and from Electrolux or its ASC. Proof of purchase is required before you can make a claim under this warranty. You may not make a claim under this warranty unless the defect claimed is due to faulty or defective parts or workmanship.
www.electrolux.com Before calling for service, please ensure that the steps listed in point 13 above have been followed. FOR SERVICE or to find the address of your nearest state service centre in Australia Please call 13 13 4 9 For the cost of a local call (Aus- SERVICE AUSTRALIA ELECTROLUX HOME PRODUCTS www.electrolux.com.
ENGLISH 23
117910961-A-202013 www.electrolux.