ESL7550RO EN Dishwasher User Manual
www.electrolux.com CONTENTS 1. SAFETY INFORMATION....................................................................................3 2. SAFETY INSTRUCTIONS..................................................................................4 3. PRODUCT DESCRIPTION................................................................................ 6 4. CONTROL PANEL............................................................................................. 7 5. PROGRAMMES.....................................
ENGLISH 1. 3 SAFETY INFORMATION Before the installation and use of the appliance, carefully read the supplied instructions. The manufacturer is not responsible for any injuries or damages that are the result of incorrect installation or usage. Always keep the instructions in a safe and accessible location for future reference. 1.
www.electrolux.com • • • • • • • • • The operating water pressure (minimum and maximum) must be between 0.5 (0.05) / 8 (0.8) bar (MPa) Obey the maximum number of 13 place settings. If the supply cord is damaged, it must be replaced by the manufacturer, its Authorised Service Centre or similarly qualified persons in order to avoid a hazard. Put the cutlery in the cutlery basket with the sharp ends pointing down or put them in the cutlery drawer in a horizontal position with the sharp edges down.
ENGLISH • • • • Connect the mains plug to the mains socket only at the end of the installation. Make sure that there is access to the mains plug after the installation. Do not pull the mains cable to disconnect the appliance. Always pull the mains plug. This appliance complies with the E.E.C. Directives. UK and Ireland only. This appliance is fitted with a 13 A mains plug. If it is necessary to change the mains plug fuse, use only a 13 A ASTA (BS 1362) fuse. 2.
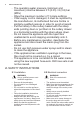
www.electrolux.com 3. PRODUCT DESCRIPTION 1 2 3 12 11 1 2 3 4 5 6 7 10 9 8 Top spray arm Upper spray arm Lower spray arm Filters Rating plate Salt container Air vent 3.1 Beam-on-Floor The Beam-on-Floor is a light that is displayed on the floor below the appliance door. • • • When the programme starts, a red light comes on and stays on for the duration of the programme. When the programme is completed, a green light comes on. When the appliance has a malfunction, the red light flashes.
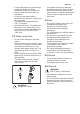
ENGLISH 7 4. CONTROL PANEL 1 1 2 3 4 5 3 2 On/off button Display Delay button Program button MyFavourite button 4 6 7 8 9 5 6 7 8 9 TimeManager button XtraDry button Reset button Indicators 4.1 Indicators Indicator Description Salt indicator. It is on when the salt container needs refilling. Rinse aid indicator. It is on when the rinse aid dispenser needs refill‐ ing. 5. PROGRAMMES The numbering of the programmes in the table (P1, P2, etc.) reflects their sequence on the control panel.
www.electrolux.
ENGLISH Programme 1) P6 Water (l) Energy (kWh) Duration (min) 10 0.9 30 9 1) The pressure and the temperature of the water, the variations of the mains supply, the options and the quantity of dishes can change the values. 5.2 Information for test institutes To receive the necessary information for conducting performance tests (e.g. according to EN60436), send an email to: In your request please include the product number code (PNC) found on the rating plate.
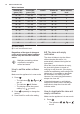
www.electrolux.com Water hardness German de‐ grees (°dH) French de‐ grees (°fH) mmol/l Clarke de‐ grees Water softener level 47 - 50 84 - 90 8.4 - 9.0 58 - 63 10 43 - 46 76 - 83 7.6 - 8.3 53 - 57 9 37 - 42 65 - 75 6.5 - 7.5 46 - 52 8 29 - 36 51 - 64 5.1 - 6.4 36 - 45 7 23 - 28 40 - 50 4.0 - 5.0 28 - 35 6 19 - 22 33 - 39 3.3 - 3.9 23 - 27 5 1) 15 - 18 26 - 32 2.6 - 3.2 18 - 22 4 11 - 14 19 - 25 1.9 - 2.5 13 - 17 3 4 - 10 7 - 18 0.7 - 1.
ENGLISH • • The indicator still flashes. The display shows the current setting. – = the rinse aid empty notification is deactivated. – = the rinse aid empty notification is activated. 2. Press to change the setting. 3. Press on/off to confirm the setting. 6.4 The rinse aid level It is possible to set the released quantity of rinse aid between level 1 (minimum quantity) and level 6 (maximum quantity). Level 0 deactivates the rinse aid dispenser and no rinse aid is released.
www.electrolux.com AirDry is automatically activated with all programmes excluding applicable). (if To improve the drying performance refer to the XtraDry option or activate AirDry. CAUTION! If children have access to the appliance, it is advised to deactivate AirDry as opening the door may pose a danger. How to deactivate AirDry Make sure the appliance is in user mode. 1. Press . • The indicators are off. • • still flashes. The indicator The display shows the current setting.
ENGLISH automatically activated in next cycles. This configuration can be changed at any time. Every time is activated, XtraDry is off and needs to be chosen manually. 13 The washing results are the same as with the normal programme duration. The drying results can decrease. This option increases the pressure and the temperature of the water. The washing and the drying phases are shorter. Activating XtraDry deactivates TimeManager and vice versa.
www.electrolux.com 8.2 How to fill the rinse aid dispenser A B 4. Carefully shake the funnel by its handle to get the last granules inside. 5. Remove the salt around the opening of the salt container. C CAUTION! Only use rinse aid designed specifically for dishwashers. 6. Turn the cap of the salt container clockwise to close the salt container. CAUTION! Water and salt can come out of the salt container when you fill it.
ENGLISH 9.1 Using the detergent A B 15 4. Set the applicable options. 5. Close the appliance door to start the programme. Starting a programme with delay start 1. Set a programme. 2. Press repeatedly until the display shows the desired delay time (from 1 to 24 hours). C CAUTION! Only use detergent specifically designed for dishwashers. 1. Press the release button (A) to open the lid (C). 2. Put the detergent, in powder or tablets, in the compartment (B). 3.
www.electrolux.com Make sure that there is detergent in the detergent dispenser before you start a new programme. 2. Close the water tap. End of the programme This function decreases energy consumption by deactivating automatically the appliance when it is not operating. When the programme is complete, the display shows 0:00. All buttons are inactive except for the on/off button. 1. Press the on/off button or wait for the Auto Off function to automatically deactivate the appliance.
ENGLISH 4. When the programme is completed, adjust the water softener according to the water hardness in your area. 5. Adjust the released quantity of rinse aid. 6. Activate the rinse aid empty notification. 10.5 Before starting a programme 10.4 Loading the baskets • • • • • • • • • • • • • Use the appliance to wash dishwasher-safe items only. Do not wash in the appliance items made of wood, horn, aluminium, pewter and copper.
www.electrolux.com 1. Turn the filter (B) counterclockwise and remove it. 7. Reassemble the filters (B) and (C). 8. Put back the filter (B) in the flat filter (A). Turn it clockwise until it locks. 2. Remove the filter (C) out of filter (B). 3. Remove the flat filter (A). 4. Wash the filters. CAUTION! An incorrect position of the filters can cause bad washing results and damage to the appliance. 11.
ENGLISH 19 11.3 External cleaning • • • Clean the appliance with a moist soft cloth. Only use neutral detergents. Do not use abrasive products, abrasive cleaning pads or solvents. 11.4 Internal cleaning • 3. Wash the spray arm under running water. Use a thin pointed tool, e.g. a toothpick, to remove particles of soil from the holes. • • • 4. To install the spray arm back, press the spray arm upwards and simultaneously turn it counterclockwise until it locks into place.
www.electrolux.com 12. TROUBLESHOOTING WARNING! Improper repair of the appliance may pose a danger to the safety of the user. Any repairs must be performed by qualified personnel. to contact an Authorised Service Centre. Refer to the below table for information on possible problems. With some problems, the display shows an alarm code. The majority of problems that may occur can be solved without the need Problem and alarm code Possible cause and solution You cannot activate the appliance.
ENGLISH Problem and alarm code Possible cause and solution The programme lasts too long. • 21 If the delay start option is set, cancel the delay set‐ ting or wait for the end of the countdown. Activate the TimeManager option to reduce the pro‐ gramme duration. Activating options can increase the programme dura‐ tion. • • The remaining time in the display increases and skips nearly to the end of the programme duration. • This is not a defect. The appliance is working cor‐ rectly.
www.electrolux.com Problem Possible cause and solution Poor drying results. • • • • • Tableware has been left for too long inside the closed appliance. There is no rinse aid or the dosage of rinse aid is not sufficient. Adjust the rinse aid level to a higher level. Plastic items may need to be towel dried. For the best drying performance, activate XtraDry and AirDry. We recommend to always use rinse aid, even in combination with multi-tablets.
ENGLISH Problem Possible cause and solution Limescale deposits on the • tableware, on the tub and on • the inside of the door. • • • • • Dull, discoloured or chipped tableware. 23 • • • • The level of salt is low. Check the salt indicator. The cap of the salt container is loose. Your tap water is hard. Refer to "The water soft‐ ener". Use salt and set regeneration of the water softener even when multi-functional tablets are used. Refer to "The water softener".
www.electrolux.com 14. ENVIRONMENTAL CONCERNS Recycle materials with the symbol . Put the packaging in relevant containers to recycle it. Help protect the environment and human health by recycling waste of electrical and electronic appliances. Do not dispose of * appliances marked with the symbol with the household waste. Return the product to your local recycling facility or contact your municipal office.
ENGLISH 25
www.electrolux.
ENGLISH 27
117881531-A-272018 www.electrolux.