ESL7740RA EN DE Dishwasher Geschirrspüler User Manual Benutzerinformation 2 27
www.electrolux.com CONTENTS 1. SAFETY INFORMATION....................................................................................3 2. SAFETY INSTRUCTIONS..................................................................................4 3. PRODUCT DESCRIPTION................................................................................ 6 4. CONTROL PANEL............................................................................................. 7 5. PROGRAMMES.....................................
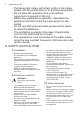
ENGLISH 1. 3 SAFETY INFORMATION Before the installation and use of the appliance, carefully read the supplied instructions. The manufacturer is not responsible for any injuries or damages that are the result of incorrect installation or usage. Always keep the instructions in a safe and accessible location for future reference. 1.
www.electrolux.com • • • • • • Put knives and cutlery with sharp points in the cutlery basket with the points down or in a horizontal position. Do not keep the appliance door open without supervision to prevent to fall on it. Before any maintenance operation, deactivate the appliance and disconnect the mains plug from the socket. Do not use high pressure water sprays and/or steam to clean the appliance. The ventilation openings in the base (if applicable) must not be obstructed by a carpet.
ENGLISH • The water inlet hose has a safety valve and a sheath with an inner mains cable. 2.5 Internal light WARNING! Risk of injury. • • • • WARNING! Dangerous voltage. If the water inlet hose is damaged, immediately close the water tap and disconnect the mains plug from the mains socket. Contact the Authorised Service Centre to replace the water inlet hose. • • • • Do not sit or stand on the open door. Dishwasher detergents are dangerous. Obey the safety instructions on the detergent packaging.
www.electrolux.com 3. PRODUCT DESCRIPTION 1 2 3 12 11 10 9 8 1 2 3 4 5 6 7 Top spray arm Upper spray arm Lower spray arm Filters Rating plate Salt container Air vent 3.1 TimeBeam The TimeBeam is a display that is shown on the floor below the appliance door. • When the programme starts, the programme duration comes on. • When the programme is completed, 0:00 and CLEAN come on. • When the delay start starts, the countdown duration and DELAY come on.
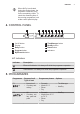
ENGLISH When AirDry is activated during the drying phase, the projection on the floor may not be completely visible. To check the remaining time of the running programme, look at the control panel display. 4. CONTROL PANEL 1 1 2 3 4 5 2 On/off button Display Delay button Program button MyFavourite button 3 4 6 7 8 9 5 6 7 8 9 TimeManager button XtraDry button Reset button Indicators 4.1 Indicators Indicator Description Rinse aid indicator. It is always off while the programme operates.
www.electrolux.
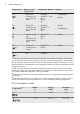
ENGLISH Programme 1) Water (l) Energy (kWh) Duration (min) P3 14 - 16 1.2 - 1.5 160 - 180 P4 12.5-14.5 1.4-1.7 170-190 P5 12 - 14 0.7 - 0.9 82-92 P6 10 0.9 30 P7 4 0.1 14 9 1) The pressure and the temperature of the water, the variations of the mains supply, the options and the quantity of dishes can change the values. 5.2 Information for test institutes For all the necessary information for test performance, send an email to: info.test@dishwasher-production.
www.electrolux.com The water softener should be adjusted according to the hardness of the water in your area. Your local water authority can advise you on the hardness of the water in your area. It is important to set the right level of the water softener to assure good washing results. Water hardness German de‐ grees (°dH) French de‐ grees (°fH) mmol/l Clarke de‐ grees Water softener level 47 - 50 84 - 90 8.4 - 9.0 58 - 63 10 43 - 46 76 - 83 7.6 - 8.3 53 - 57 9 37 - 42 65 - 75 6.
ENGLISH Factory setting: level 4. How to set the rinse aid level The appliance must be in programme selection mode. 1. To enter the user mode, press and and hold simultaneously the indicators , , , until , and start to flash and the display is blank. 2. Press • The indicators and • • . , , , go off. The indicator continues to flash. The display shows the current setting: e.g. = level 4. – The levels of rinse aid are from 0A to 6A. – Level 0 = no rinse aid is released. 3.
www.electrolux.com and start to flash and the display is blank. 2. Press • The indicators and • • , , , go off. The indicator continues to flash. The display shows the current setting: 3. Press = Acoustic signal off. to change the setting. = Acoustic signal on. 4. Press the on/off button to confirm the setting. 6.6 How to set the colour of the TimeBeam It is possible to change the colour of the TimeBeam to match the colour of the kitchen floor. There are several colours available.
ENGLISH While the drying phase operates, a device opens the appliance door. The door is then kept ajar. CAUTION! Do not try to close the appliance door within 2 minutes after automatic open. This can cause damage to the appliance. CAUTION! In case of presence of children, the AirDry system can be deactivated if you want to keep the door closed in the end of the cycle. AirDry is automatically activated with all 13 1.
www.electrolux.com How to activate XtraDry Press . The related indicator comes on. If the option is not applicable to the programme, the related indicator does not appear or it flashes quickly for a few seconds and then goes off. The display shows the updated programme duration. 7.2 TimeManager The TimeManager allows to reduce the time of the selected programme. The total programme duration decreases by approximately 50%. This option increases the pressure and the temperature of the water.
ENGLISH 15 CAUTION! Only use rinse aid specifically designed for dishwashers. 5. Turn the cap of the salt container clockwise to close the salt container. 1. Open the lid (C). 2. Fill the dispenser (B) until the rinse aid reaches the marking ''MAX''. 3. Remove the spilled rinse aid with an absorbent cloth to prevent too much foam. 4. Close the lid. Make sure that the lid locks into position. Fill the rinse aid dispenser when the indicator (A) becomes clear.
www.electrolux.com 9.1 Comfort Lift CAUTION! Do not sit on th e rack. Do not put excessive pressure on locked basket. 1 CAUTION! Do not exceed the max load capacity (18 kg). 2 CAUTION! Only use detergent specifically designed for dishwashers. To ensure symmetric unlocking on both sides, lift the trigger handle completely and the basket slightly until the basket is disengaged on both sides.
ENGLISH 3. If the programme has a prewash phase, put a small quantity of detergent on the inner part of the appliance door. 4. Close the lid. Make sure that the lid locks into position. 9.3 Setting and starting a programme The Auto Off function This function decreases energy consumption by deactivating automatically the appliance when it is not operating. The function comes into operation: • 5 minutes after the completion of the programme. • After 5 minutes if the programme has not started.
www.electrolux.com Make sure that there is detergent in the detergent dispenser before you start a new programme. End of the programme All buttons are inactive except for the on/off button. 1. Press the on/off button or wait for the Auto Off function to automatically deactivate the appliance. If you open the door before the activation of Auto Off, the appliance is automatically deactivated. 2. Close the water tap. 10. HINTS AND TIPS 10.
ENGLISH • • • • • • • • • Do not put in the appliance items made of wood, horn, aluminium, pewter and copper. Do not put in the appliance items that can absorb water (sponges, household cloths). Remove larger residues of food from the dishes into the waste bin. Make soft the remaining burned food on the items. Put hollow items (cups, glasses and pans) with the opening down. Make sure that glasses do not touch other glasses. Put cutlery and small items in the cutlery drawer.
www.electrolux.com 7. Reassemble the filters (B) and (C). 8. Put back the filter (B) in the flat filter (A). Turn it clockwise until it locks. 2. Remove the filter (C) out of filter (B). 3. Remove the flat filter (A). 4. Wash the filters. CAUTION! An incorrect position of the filters can cause bad washing results and damage to the appliance. 11.2 Cleaning the upper spray arm We recommend to clean regularly the upper spray arm to avoid soil to clog the holes. 5.
ENGLISH 21 11.3 External cleaning • • • Clean the appliance with a moist soft cloth. Only use neutral detergents. Do not use abrasive products, abrasive cleaning pads or solvents. 11.4 Internal cleaning • 3. Wash the spray arm under running water. Use a thin pointed tool, e.g. toothpick, to remove particles of soil from the holes. • • • Carefully clean the appliance, including the rubber gasket of the door, with a soft damp cloth.
www.electrolux.com WARNING! Repairs not properly done may result in serious risk to the safety of the user. Any repairs must be performed by qualified personnel. With some problems, the display shows an alarm code. The majority of problems that can occur can be solved without the need to contact an Authorised Service Centre. Problem and alarm code Possible cause and solution You cannot activate the appliance. • The program does not start. • • • • The appliance does not fill with water.
ENGLISH Problem and alarm code Possible cause and solution The remaining time in the display increases and skips nearly to the end of program time. • 23 This is not a defect. The appliance is working cor‐ rectly. The options of the program • have to be set again every time. To save your favourite configuration use option My‐ Favourite. Small leak from the appli‐ ance door. • The appliance is not levelled. Loosen or tighten the adjustable feet (if applicable).
www.electrolux.com Problem Possible cause and solution Poor drying results. • • • • • Tableware has been left for too long inside a closed appliance. There is no rinse aid or the dosage of rinse aid is not enough. Set the rinse aid dispenser to a higher level. Plastic items may need to be towel dried. For the best drying performance activate the option XtraDry and set AirDry. We recommend to always use rinse aid, even in combination with multi-tablets.
ENGLISH Problem 25 Possible cause and solution Odours inside the appliance. • Refer to "Internal cleaning". Limescale deposits on the • tableware, on the tub and on • the inside of the door. • The level of salt is low, check the refill indicator. The cap of the salt container is loose. Your tap water is hard. Refer to "The water soft‐ ener". Even using multi-functional tabs use salt and set regeneration of the water softener. Refer to "The water softener".
www.electrolux.com 14. ENVIRONMENTAL CONCERNS Recycle the materials with the symbol . Put the packaging in applicable containers to recycle it. Help protect the environment and human health and to recycle waste of electrical and electronic appliances. Do not dispose appliances marked with the symbol with the household waste. Return the product to your local recycling facility or contact your municipal office.
DEUTSCH 27 INHALTSVERZEICHNIS 1. SICHERHEITSHINWEISE................................................................................28 2. SICHERHEITSANWEISUNGEN...................................................................... 29 3. GERÄTEBESCHREIBUNG.............................................................................. 31 4. BEDIENFELD................................................................................................... 32 5. PROGRAMME.............................................
1. www.electrolux.com SICHERHEITSHINWEISE Lesen Sie vor der Montage und dem Gebrauch des Geräts zuerst die Gebrauchsanleitung. Bei Verletzungen oder Schäden infolge nicht ordnungsgemäßer Montage oder Verwendung des Geräts übernimmt der Hersteller keine Haftung. Bewahren Sie die Anleitung immer an einem sicheren und zugänglichen Ort zum späteren Nachschlagen auf. 1.
DEUTSCH • • • • • • • • • • 29 Nehmen Sie keine technischen Änderungen am Gerät vor. Der Betriebswasserdruck (Mindest- und Höchstdruck) muss zwischen 0.5 (0.05) / 8 (0.8) bar (MPa) liegen Beachten Sie, dass die Höchstzahl an Maßgedecken 13 beträgt. Wenn das Netzkabel beschädigt ist, muss es vom Hersteller, seinem autorisierten Kundenservice oder einer gleichermaßen qualifizierten Person ausgetauscht werden, um Gefahrenquellen zu vermeiden.
www.electrolux.com 2.2 Elektrischer Anschluss WARNUNG! Brand- und Stromschlaggefahr. • • • • • • • • • Das Gerät muss geerdet sein. Stellen Sie sicher, dass die elektrischen Daten auf dem Typenschild den Daten Ihrer Stromversorgung entsprechen. Wenden Sie sich anderenfalls an eine Elektrofachkraft. Schließen Sie das Gerät unbedingt an eine sachgemäß installierte Schutzkontaktsteckdose an. Verwenden Sie keine Mehrfachsteckdosen oder Verlängerungskabel.
DEUTSCH 2.5 Innenbeleuchtung • WARNUNG! Verletzungsgefahr. • • • Die Innenbeleuchtung des Geräts wird automatisch beim Öffnen der Tür eingeschaltet und beim Schließen der Tür ausgeschaltet. Die Lampe in diesem Gerät eignet sich nicht zur Raumbeleuchtung. Für den Austausch der Lampe wenden Sie sich an den Kundendienst. 2.6 Service • Wenden Sie sich zur Reparatur des Geräts an den autorisierten Kundendienst. Wir empfehlen nur Originalersatzteile zu verwenden. 2.
www.electrolux.com 3.1 TimeBeam Wird AirDry während der Trockenphase eingeschaltet, ist die Projektion auf dem Boden möglicherweise nicht vollständig sichtbar. Die verbleibende Zeit des laufenden Programms kann dann auf dem Display des Bedienfelds überprüft werden. Der TimeBeam ist ein Lichtstrahl, der unterhalb der Gerätetür auf den Boden projiziert wird. • Nach dem Start des Programms wird die Programmdauer angezeigt. • Nach Abschluss des Programms leuchten 0:00 und CLEAN.
DEUTSCH Kontrolllam‐ Beschreibung pe Kontrolllampe Salz. Sie erlischt während des Programmbetriebs. 5.
www.electrolux.com Programm Verschmut‐ zungsgrad Beladung P6 • 4) • P7 5) • Programmphasen Optionen Vor kurzem be‐ • nutztes Ge‐ schirr • Geschirr und Besteck Hauptspülgang 60 • °C Klarspülgang Alle Vorspülen • XtraDry 1) Dieses Programm gewährleistet den wirtschaftlichsten Wasser- und Energieverbrauch für normal verschmutztes Geschirr und Besteck. (Dies ist das Standardprogramm für Prüfinsti‐ tute.
DEUTSCH Programm 1) P7 Wasser (l) Energieverbrauch (kWh) Dauer (Min.) 4 0.1 14 35 1) Druck und Temperatur des Wassers, die Schwankungen in der Stromversorgung, die ausgewählten Optionen und die Geschirrmenge können die Werte verändern. 5.2 Informationen für Prüfinstitute Möchten Sie Informationen zum Leistungstest erhalten, schicken Sie eine E-Mail an: info.test@dishwasher-production.com Notieren Sie die Produktnummer (PNC), die Sie auf dem Typenschild finden. 6. EINSTELLUNGEN 6.
www.electrolux.com Wasserhärte Deutsche Wasserhärte‐ grade (°dH) Französische Wasserhärte‐ grade (°fH) mmol/l Clarke Wasserhär‐ tegrade Einstellung für den Wasseren‐ thärter 47 - 50 84 - 90 8.4 - 9.0 58 - 63 10 43 - 46 76 - 83 7.6 - 8.3 53 - 57 9 37 - 42 65 - 75 6.5 - 7.5 46 - 52 8 29 - 36 51 - 64 5.1 - 6.4 36 - 45 7 23 - 28 40 - 50 4.0 - 5.0 28 - 35 6 19 - 22 33 - 39 3.3 - 3.9 23 - 27 5 1) 15 - 18 26 - 32 2.6 - 3.2 18 - 22 4 11 - 14 19 - 25 1.9 - 2.
DEUTSCH 37 Werkseitige Einstellung: Stufe 4. Optimierung der Trocknungsleistung stets Klarspülmittel zu verwenden. Einstellen der Klarspülmittelstufe Verwenden Sie die üblichen MultiReinigungstabletten ohne Klarspülmittel, schalten Sie die Klarspülmittelnachfüllanzeige ein. Das Gerät muss sich im Programmwahlmodus befinden. 1. Halten Sie zum Aufrufen des Benutzermodus gleichzeitig und gedrückt, bis die Kontrolllampen , , , , und blinken und das Display nichts anzeigt. 2.
www.electrolux.com 1. Halten Sie zum Aufrufen des Benutzermodus gleichzeitig und gedrückt, bis die Kontrolllampen , , , , und blinken und das Display nichts anzeigt. 6.7 MyFavourite 2. Drücken Sie • Die Kontrolllampen und • • , , , erlöschen. blinkt Die Kontrolllampe weiter. Im Display wird die aktuelle zum Ändern der = Signalton ist eingeschaltet. 4. Drücken Sie die Taste Ein/Aus zur Bestätigung der Einstellung. 6.
DEUTSCH 39 AirDry wird bei automatisch bei allen Programmen eingeschaltet mit Ausnahme von Zur Verbesserung der Trocknungsleistung beachten Sie die XtraDry-Option oder schalten Sie AirDry ein. So schalten Sie AirDry aus Das Gerät muss sich im Programmwahlmodus befinden. Während der Trockenphase wird die Gerätetür durch eine Vorrichtung geöffnet. Die Tür bleibt dann einen Spaltbreit geöffnet.
www.electrolux.com 7.1 XtraDry Schalten Sie diese Option ein, wenn Sie die Trockenleistung erhöhen möchten. Diese Option kann sich auf die Dauer einiger Programme, den Wasserverbrauch und die Temperatur des letzten Spülgangs auswirken. Die Option XtraDry bleibt permanent für alle Programme außer für eingeschaltet und muss nicht mit jedem Programm erneut ausgewählt werden. eingeschaltet Jedes Mal, wenn wird, wird die Option XtraDry ausgeschaltet und muss manuell ausgewählt werden.
DEUTSCH Erzielung guter Spülergebnisse im täglichen Gebrauch benötigt. So füllen Sie den Salzbehälter Achten Sie darauf, dass der Comfort Lift leer und in angehobener Stellung ist. 1. Drehen Sie den Deckel des Salzbehälters gegen den Uhrzeigersinn und entfernen Sie ihn. 2. Füllen Sie 1 Liter Wasser in den Salzbehälter (nur beim ersten Mal). 3. Füllen Sie den Salzbehälter mit Geschirrspülsalz. 41 VORSICHT! Beim Befüllen des Salzbehälters können Wasser und Salz austreten.
www.electrolux.com Wenn Sie MultiReinigungstabletten verwenden und die Trocknungsleistung zufriedenstellend ist, kann die Klarspülernachfüllanzeige ausgeschaltet werden. Für eine bessere Trocknungsleistung empfehlen wir stets Klarspülmittel zu verwenden, auch wenn Sie MultiReinigungstabletten benutzen, die Klarspülmittel enthalten. 9. TÄGLICHER GEBRAUCH 1. Öffnen Sie den Wasserhahn. 2. Drücken Sie die Taste Ein/Aus, um das Gerät einzuschalten.
DEUTSCH 43 9.2 Verwenden des Reinigungsmittels A Der Korb wird automatisch auf der oberen Ebene verriegelt. Gehen Sie beim Be- oder Entladen des Korbs vorsichtig vor (siehe Infoblatt zum Beladen des Korbs). 2. Zum Absenken des Korbs drücken Sie die Auslöseverriegelung, um den Mechanismus zu entriegeln, und bringen Sie den Auslösegriff am Korbrahmen an (siehe Abbildung). Heben Sie den Auslösegriff und den Korb an. 1 2 B C VORSICHT! Verwenden Sie nur Reinigungsmittel für Geschirrspüler. 1.
www.electrolux.com Starten eines Programms 1. Drücken Sie die Taste Ein/Aus, um das Gerät einzuschalten. Stellen Sie sicher, dass sich das Gerät im Programmwahlmodus befindet und die Tür geschlossen ist. 2. Drücken Sie Program wiederholt, bis die Kontrolllampe des gewünschten Programms leuchtet. Im Display wird die Programmdauer angezeigt. 3. Stellen Sie die verfügbaren Optionen ein. 4. Drücken Sie Start, um das Programm zu starten. • Die Anzeige für das laufende Programm leuchtet.
DEUTSCH Funktion Auto Off automatisch ausgeschaltet wird. Wenn Sie die Tür öffnen, bevor die Funktion Auto Off eingeschaltet wird, 45 wird das Gerät automatisch ausgeschaltet. 2. Schließen Sie den Wasserhahn. 10. TIPPS UND HINWEISE 10.1 Allgemeines Die folgenden Hinweise stellen optimale Reinigungs- und Trocknungsergebnisse im täglichen Gebrauch sicher, und tragen auch zum Umweltschutz bei. • • • • • • Schütten Sie größere Lebensmittelreste auf dem Geschirr in den Abfallbehälter.
www.electrolux.com 10.4 Beladen der Körbe • • • • • • • • • • • • Spülen Sie im Gerät nur spülmaschinenfestes Geschirr. Spülen Sie im Gerät keine Geschirrteile aus Holz, Horn, Aluminium, Zinn oder Kupfer. Spülen Sie in diesem Gerät keine Gegenstände, die Wasser aufnehmen können (Schwämme, Geschirrtücher usw.). Schütten Sie größere Lebensmittelreste auf dem Geschirr in den Abfallbehälter. Weichen Sie eingebrannte Essensreste ein. Ordnen Sie hohle Gefäße (z. B.
DEUTSCH 47 C B A 1. Drehen Sie den Filter (B) nach links und nehmen Sie ihn heraus. 2. Nehmen Sie den Filter (C) aus dem Filter (B). 3. Entfernen Sie den flachen Filter (A). 4. Reinigen Sie die Filter. 5. Achten Sie darauf, dass sich keine Lebensmittelreste oder Verschmutzungen in oder um den Rand der Wanne befinden. 6. Setzen Sie den flachen Filter (A) wieder ein. Stellen Sie sicher, dass er korrekt unter den beiden Führungen eingesetzt wurde. 7. Bauen Sie die Filter (B) und (C) wieder zusammen.
www.electrolux.com VORSICHT! Eine falsche Anordnung der Filter führt zu schlechten Spülergebnissen und kann das Gerät beschädigen. 11.2 Reinigen des oberen Sprüharms Wir empfehlen den oberen Sprüharm regelmäßig zu reinigen, um zu verhindern, dass Verunreinigungen die Löcher verstopfen. Verstopfte Löcher können die Ursache für nicht zufriedenstellende Spülergebnisse sein. 1. Ziehen Sie den Oberkorb bis zum Anschlag heraus. 2.
DEUTSCH • • Wenn Sie regelmäßig Kurzprogramme verwenden, können diese zu Fett- und Kalkablagerungen im Gerät führen. Um dieses zu vermeiden, wird empfohlen, mindestens zweimal im Monat Programme mit langer Laufzeit zu verwenden. Um die Leistungsfähigkeit des Geräts zu erhalten, wird empfohlen 49 (mindestens einmal im Monat) ein spezielles Reinigungsmittel für Geschirrspüler zu verwenden. Befolgen Sie sorgfältig die Anweisungen auf der Reinigungsmittelverpackung. 12.
www.electrolux.com Störung und Alarmcode Mögliche Ursache und Abhilfe Es läuft kein Wasser in das • Gerät. Im Display erscheint . • • • • Das Gerät pumpt das Wasser nicht ab. Im Display erscheint • • . • • Das WasserauslaufSchutzsystem ist einge‐ schaltet. Stellen Sie sicher, dass der Wasserzulaufhahn geöff‐ net ist. Vergewissern Sie sich, dass der Wasserdruck der Wasserversorgung nicht zu niedrig ist. Diese Infor‐ mationen erhalten Sie von Ihrem lokalen Wasserver‐ sorger.
DEUTSCH Störung und Alarmcode 51 Mögliche Ursache und Abhilfe Die Gerätetür ist schwer zu • schließen. Das Gerät ist nicht ausgerichtet. Schrauben Sie die Schraubfüße weiter hinein oder weiter heraus (falls vorhanden). Teile des Geschirrs ragen aus den Körben heraus. • Klappernde/schlagende • Geräusche aus dem Gerä‐ teinneren. • Das Geschirr ist nicht richtig in den Körben eingeord‐ net. Siehe Broschüre zum Beladen der Körbe. Achten Sie darauf, dass sich die Sprüharme frei dre‐ hen können.
www.electrolux.com Störung Mögliche Ursache und Abhilfe Nicht zufriedenstellende Trocknungsergebnisse. • • • • • Weiße Streifen oder blau schimmernder Belag auf Gläsern und Geschirr. • Wasserflecken und andere Flecken auf Gläsern und Geschirr. • Das Geschirr ist nass. • • • • • • • Das Geschirr stand zu lange im geschlossenen Gerät. Es ist kein Klarspülmittel vorhanden oder die Klar‐ spülmittelmenge ist nicht ausreichend.
DEUTSCH Störung Mögliche Ursache und Abhilfe Rostspuren am Besteck. • • Am Ende des Programms befinden sich Reinigungs‐ mittelreste im Behälter. • • • 53 Das Spülwasser enthält zu viel Salz. Siehe „Was‐ serenthärter“. Silber- und Edelstahlbesteck wurden zusammen eingeordnet. Ordnen Sie nicht Silber- und Edel‐ stahlbesteck zusammen ein. Das Reinigungsmittel-Tab blieb im Behälter ste‐ cken und wurde daher nicht vollständig vom Was‐ ser mitgenommen.
www.electrolux.com 13. TECHNISCHE DATEN Abmessungen Breite/Höhe/Tiefe (mm) 596 / 818-898 / 550 Elektrischer Anschluss 1) Spannung (V) 200 - 240 Frequenz (Hz) 50 / 60 bar (Mindest- und Höchstwert) 0.5 - 8 MPa (Mindest- und Höchstwert) 0.05 - 0.8 Wasserversorgung Kalt- oder Warmwasser 2) max. 60 °C Fassungsvermögen Maßgedecke 13 Leistungsaufnahme Ein-Zustand (W) 5.0 Leistungsaufnahme Aus-Zustand (W) 0.10 Wasserdruck 1) Weitere Angaben finden Sie auf dem Typenschild.
DEUTSCH 55
117885250-A-432016 www.electrolux.