
Installation guide


9 ENGLISH
2. When connecting extension drain
hose, insulate the connecting part of
extension drain hose with a shield pipe,
do not let the drain hose slack.
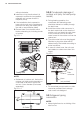
3.1.5 Fastening the Indoor Unit
1. Pass the piping through the hole in the
wall.
2. Put the upper claw at the back of the
indoor unit on the upper hook of the
wall mounting plate, move the indoor
unit from side to side to see that it is
securely hooked.
Fig.3.1.5-1
3. Piping can easily be made by lifting the
indoor unit with a cushioning material
between the indoor unit and the wall.
Fig.3.1.5-2
4. Push the lower part of the indoor unit
up on the wall, Then move the indoor
unit from side to side, up and down to
check if it is hooked securely.
3.1.6 Piping and wrapping
1. Bundle the tubing, connecting cable,
and drain hose with tape securely and
evenly as shown in the Fig.3.1.6.
2. Because the condensed water from
rear of the indoor unit is gathered in
ponding box and is piped out of room,
do not put anything else in the box.
Fig.3.1.6
NOTE:
• Connect the indoor unit rst, then the
outdoor unit.
• Be careful not to let the drain hose
slack.
• Both of the auxiliary piping should be
heat insulated.
• Be sure that the drain hose is located at
the lowest side of the bundle. Locating
at the upper side may cause drainage
overow inside the unit.
• Never intercross nor intertwist the
power wire with any other wire.
• Run the drain hose sloped downward
to drain out the condensed water
smoothly.
3.2 Outdoor unit installation
3.2.1 Securing of Outdoor Unit
1. Install the outdoor part of the unit on
a at surface to avoid excess noise
and vibration. A condenser pad is
recommended.
2. Direct the air vent toward an area
Upper Hook
Cable
Connection
Ponding
Box
Pipe
Room
Connective
Pipe
Wrapping
Belt
Drain
Hose
Lower Hook
Cushioning material