(66/ ,63 ................................................ .............................................
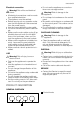
electrolux Electrolux. Thinking of you. Share more of our thinking at www.electrolux.com CONTENTS Safety information Safety instructions Product description Operating instructions Helpful hints and tips Care and cleaning 2 2 3 4 4 5 What to do if… Installation instructions Technical information Environment concerns Garantie, Garanzia, Guarantee 5 5 9 10 10 Subject to change without notice. SAFETY INFORMATION Before the installation and use of the appliance, carefully read the supplied instructions.
electrolux 3 Electrical connection Warning! Risk of fire and electrical shock. • All electrical connections must be made by a qualified electrician. • The appliance must be earthed. • Before carrying out any operation make sure that the appliance is disconnected from the power supply. • Use the correct electricity mains cable. • Do not let the electricity mains cable tangle.
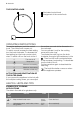
electrolux THE CONTROL KNOB 1 2 1 Illuminated control knob 2 Assignment of the control knob OPERATING INSTRUCTIONS To use the appliance, push the control knob. The control knob comes out. To switch on and increase the heat setting turn the knob clockwise. To decrease the heat setting turn the knob counter-clockwise. To switch off turn the knob to the 0.
electrolux 5 Heat setting Use to: Time Hints 1-2 Solidify: fluffy omelettes, baked eggs 10-40 min Cook with a lid on 2-3 Simmer rice and milkbased dishes, heating up ready-cooked meals 25-50 min Add at least twice as much liquid as rice, stir milk dishes part way through 3-4 Steam vegetables, fish, meat 20-45 min Add a few tablespoons of liquid 4-5 Steam potatoes 20-60 min Use max.
electrolux Warning! Risk of injury from electrical current. The combination appliance is live. q Observe electrical safety rules. q Rated voltage of the combined appliances must match. q Fit plug and socket connections together properly. q Install correctly to give anti-shock protection. q Loose and incorrect plug and socket connections can make the terminal become too hot. q A qualHjDC electrician must install the clamping connections correctly.
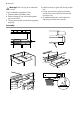
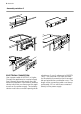
electrolux 7 Assembly variation 1 348-355 70-80 390 70 3mm Ø10 45°
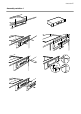
electrolux Assembly variation 2 348-355 70-80 390 70 2 3 1 ELECTRICAL CONNECTION Use a power cable of H05VV-F or higher. Connect the appliance to a socket supply line. If there is no socket supply line, the electrical installation must have an isolation device which lets you disconnect the appliance from the power supply. The isolation device must have a contact opening width of minimum 3 mm (in reference to NIN SEV 1000).
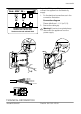
electrolux 9 Important! Only a qualified person can connect the appliance to the electricity supply. 2 L1 PE L2 N 3 1 Netz: 400V 2N ~ 1. Do the electrical connections as in the connection illustration. Phase definitions: L1, L2 (or R, S). 2. Secure the cable grip. 4 5 Connection diagram Heizkörperspannung 230V Tension des C.D.CH. 230V Tensione elementi radianti 230V Warning! If service is required always disconnect the appliance from the power supply.
electrolux Typ 57 AXC 02 AO 230 / 400 V 50 Hz Ser.Nr. .......... 7,6 kW ELECTROLUX ENVIRONMENT CONCERNS Recycle the materials with the symbol . Put the packaging in applicable containers to recycle it. Help protect the environment and human health and to recycle waste of electrical and electronic appliances. Do not dispose appliances marked with the symbol with the household waste. Return the product to your local recycling facility or contact your municipal office.
electrolux 11 de l’emploi de pièces de rechange non originales, d’erreurs de maniement ou d’installation dues à l’inobser-vation du mode d’emploi, et pour des dommages causés par des influences extérieures ou de force majeure. Garanzia Per ogni prodotto concediamo una garanzia di 2 anni a partire dalla data di consegna o dalla sua messa in funzione.
www.electrolux.