ESV09CRU-A1 ESV12CRU-A1 ESV18CRU-A1 ESV09CRT-A1 ESV12CRT-A1 ESV18CRT-A1 EN AIR CONDITIONER ESV12CRS-B1 ESV18CRS-B1 ESV24CRS-B1 ESV09CRR-B4 ESV12CRR-B4 ESV15CRR-B4 ESV18CRR-B4 USER MANUAL ESV09CRR-B5 ESV12CRR-B5 ESV18CRR-B5 ESV24CRR-B5
www.electrolux.com CONTENTS 1. SAFETY INSTRUCTIONS..................................................................................... 3 2. PRODUCT DESCRIPTION.................................................................................... 5 3. INDOOR UNIT DISPLAY....................................................................................... 6 4. REMOTE CONTROLLER...................................................................................... 6 5. REMOTE CONTROLLER DESCRIPTION........
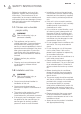
ENGLISH 1. 3 SAFETY INSTRUCTIONS Before the installation and use of the appliance, carefully read the supplied instructions. The manufacturer is not responsible if an incorrect installation and use causes injuries and damages. Always keep the instructions with the appliance for future reference. 1.1 Children and vulnerable people safety WARNING! Risk of suffocation, injury or permanent disability.
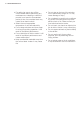
www.electrolux.com • For safety, be sure to turn off the circuit breaker before performing any maintenance or cleaning or when the product is not used for an extended period of time. Accumulated dust may cause fire or electric shock. • Select the most appropriate temperature. It can save electricity. • Do not keep windows and doors open for a long time during operation. It will result in insufficient performance. • Do not block the air inlet or outlet.
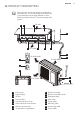
ENGLISH 2. PRODUCT DESCRIPTION All the pictures in this manual are for explanation purposes only. The actual shape of the indoor unit you purchased may be slight different on front panel and display window. The actual shape shall prevail.
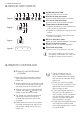
www.electrolux.com 3. INDOOR UNIT DISPLAY 1 2 3 4 5 6 7 Type A 4 3 2 5 1 Type B 4 Type C Type D 1 On/Off indication lamp Lights up when the unit is work. 2 Heat mode indication lamp Lights up when Heat mode is activated. 3 Cool mode indication lamp Lights up when Cool mode is activated. 4 Temperature indication lamp • Displays the setting or room temperature when the unit is operational. • Displays the malfunction code when fault occurs.
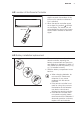
ENGLISH 4.2 Location of the Remote Controller Max. 8m • Keep the remote controller where its signal can reach the receiver of the indoor unit (a maximum distance of 8 m is allowed). • When the remote controller sends out a signal, the symbol will blink on the display. The indoor unit will acknowledge the signal with a beep sound when it receives an effective signal. 4.
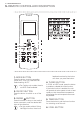
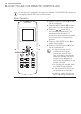
www.electrolux.com 5. REMOTE CONTROLLER DESCRIPTION 16 17 18 19 20 9 1 10 2 3 11 4 12 5 13 14 15 6 7 8 1. MODE BUTTON Press the button to set the operation mode: Auto, Cool, Dry, Heat and Fan. Default setting: AUTO. • For Cooling only models, there is no HEAT mode available. 2. ON/OFF BUTTON Press the button to switch on or off the unit. 3. SWING BUTTON Press this button to stop or start vertical louver movement or set the desired left/ right air flow direction.
ENGLISH Press the button to enable or disable the I Feel function. 7. I CLEAN BUTTON Press the button to enable or disable the I Clean function. Default setting: OFF. 8. X-FAN BUTTON Press the button to enable or disable X-Fan function. Default setting: OFF. 9. / BUTTON Press the button to increase/decrease the temperature. Temperature range: 16-32 °C (60-90 °F). In Timer function, use the button to set the timer adjustment. 10.
www.electrolux.com 6. HOW TO USE THE REMOTE CONTROLLER Ensure the unit is plugged in and power is available. The OPERATION indicator on the display panel of the indoor unit illuminates. Basic Operation C B A D 1. Press the ON/OFF button (A) to start the air conditioner. 2. Press the MODE button (B) to select Auto, Cool, Dry, Fan or Heat mode. / button (C) to 3. Press the set the desired temperature. The temperature can be set in 1ºC increments.
ENGLISH 11 Swing Operation A B Press the Swing button (A) and the Swing button (B) to adjust the desired airflow direction. 1. Left/Right direction can be adjusted with the button (A) on the remote controller. Press the button, the louver will swing left and right automatically. Press the button again to stop the louver at your desired position. 2. Up/Down direction can be adjusted with the button (B) on the remote controller. Press the button, the louver will swing up and down automatically.
www.electrolux.com • When setting the Timer on or Timer off functions, up to 10 hours, the time will increase in 30 minute increments with each press. After 10 hours and up to 24, it will increase in 1 hour increments. Examples of Timer Settings TIMER ON TIMER OFF Example: It is 8:00 AM and you want the air conditioner to start working after 6 hours. 1. When the remote controller is at off state, press the Timer button, the Timer on signal and time will show on the display. / button until “6.0h“ 2.
ENGLISH 13 Advanced Functions Operations 1. °C/°F switch function °C/°F can be switched by pressing and Mode buttons at the same time for 3 seconds. 2. Turbo function Press the Turbo button to enable or disable the turbo function. The Turbo function makes the unit work extra hard to reach your set temperature in the shortest time as soon as possible. When you need fast cool or heat, you can choose this function. 1 2 3 4 5 3.
www.electrolux.com 5. X-Fan function 7. Sleep function In power on mode, press X-Fan button, after 5 continuous rings the function will activate successfully. The indoor fan motor will keep on working for 4 minutes after the unit turned off to dry the indoor unit to prevent from bacteria and mildew growing. Continuous pressing the X-Fan button two times, the function will be canceled after 3 continuous rings. Press sleep button to enter sleep mode.
7. HOW TO USE THE INDOOR UNIT Vertical louver ENGLISH 1. Adjust the air flow direction properly otherwise it might cause discomfort or cause uneven room temperatures. 2. Adjust the horizontal louver using the remote controller. 3. Adjust the vertical louver using the remote controller. 4. Adjust the vertical louver manually (For models without 3D Swing function). To set the vertical air flow (Up Down) direction Perform this function while the unit is in operation.
www.electrolux.com 8. OPERATING TEMPERATURE Operating temperature ranges Model climate Type Ambient temperature (Cooling) Ambient temperature (Heating) T1 18°C~43°C -7°C~43°C Important! 1. Optimum performance will be achieved within these operating temperatures. If air conditioner is used outside of the above conditions, certain safety protection features might come into operation and cause the unit to function abnormally. 2.
ENGLISH 10. CLEANING AND MAINTENANCE 17 10.1 Before Maintenance Turn the system off before cleaning. To clean, wipe with a soft, dry cloth. Do not use bleach or abrasives. WARNING! Power supply must be disconnectd before cleaning the indoor unit. • A cloth dampened with cold water may be used on the indoor unit if it is very dirty. Then wipe it with a dry cloth. • Do not use a chemically treated cloth or duster to clean the unit.
www.electrolux.com 5. Install the air freshening filter back into position. 3. Install a new air freshening filter. 4. Reinstall the air filter and securely close the front panel. 10.6 Preparation for extended non-operation 6. Insert the upper portion of air filter back into the unit, taking care that the left and right edges line up correctly and place filter into position. If you plan to idle the unit for a long time, perform the following: 1. Clean the indoor unit and filters. 2.
11. OPERATION TIPS The following events may occur during normal operation. 1. Protection of the air conditioner Compressor • The compressor can’t restart for 3-4 minutes after it stops. 2. Anti-cold air (Cooling and heating models only) • The unit is designed not to blow cold air on HEAT mode, when the indoor heat exchanger is in one of the following three situations and the set temperature has not been reached. A) When heating has just started. B) Defrosting. C) Low temperature heating.
www.electrolux.com turn off the unit automatically. Dripping water may generate on the surface of the indoor unit when cooling in a high relatively humidity (relative humidity higher than 80%). Adjust the horizontal louver to the maximum air outlet position and select HIGH fan speed. Insufficient Heat (For cooling 10. and heating models only) The air conditioner draws in heat from the outdoor unit and releases it via the indoor unit during heating operation.
ENGLISH 12. TROUBLESHOOTING OPERATION (RUN) indicator or other indicators continue flashing. Trouble If one of the following code appears on the display area: E0, E1, E2...En, F0, F1, F2... Fn, P0, P1, P2...Pn, L0, L1, L2...Ln Fuse blows frequently or circuit breaker trips frequently. Other objects or water fall into the air conditioner. Terrible odors are smelled or abnormal sounds are heard.
2 www.electrolux.com สารบัญ 1. ขอแนะนำเพื1อความปลอดภัย .................................................................................................................................3 2. คำอธิบายผลิตภัณฑ .............................................................................................................................................5 3. จอแสดงผลบนตัวเครื1องภายในอาคาร ................................................................................................................6 4.
ภาษาไทย 1. 3 ขอแนะนำเพื1อความปลอดภัย โปรดอานคำแนะนำที่ ใหมาอยางละเอียดถี่ถวนกอนติดตั้ง และใชงานเครื1องปรับอากาศ ผูผลิตจะไมรับผิดชอบตอ การบาดเจ็บและความเสียหายใดๆ ที่เปนผลมาจากการติดตั้ง และการใชงานที่ ไมถูกตอง โปรดเก็บคูมือฉบับนี้ ไวกับ เครื1องทุกครั้งเพื1อการอางอิงในอนาคต 1.
4 www.electrolux.
ภาษาไทย 2.
6 www.electrolux.com 3.
ภาษาไทย 7 4.2 ตำแหนงของรีโมทควบคุม สูงสุด 8 ม. เก็บรีโมทควบคุมไวในบริเวณที่สัญญาณรีโมท ควบคุมสามารถสงถึงตัวรับสัญญาณของ เครื1องภายในอาคาร (เวนระยะหางไดสูงสุด 8 ม.) ขณะที่รีโมทควบคุมสงสัญญาณ สัญลักษณ จะกะพริบบนหนาจอ เครื1องภายในอาคารจะ ตอบรับสัญญาณดวยเสียงบี๊บเมื1อเครื1องไดรับ สัญญาณที่ ใชงานได 4.3 การใส /การเปลี่ยนแบตเตอรี ่ ถอดฝาดานหลังออกจากรีโมทควบคุม ทานจะ มองเห็นชองใสแบตเตอรี่ จากนั้นใหใสแบตเตอรี่แหง อัลคาไลนใหมจำนวน 2 กอน (ถาน AAA 1.
8 www.electrolux.com 5. คำอธิบายเกี่ยวกับรีโมทควบคุม 16 17 18 19 20 9 1 10 2 3 11 4 12 5 6 7 8 13 14 15 1. ปุม MODE 4.
ภาษาไทย 7. ปุม I CLEAN 9 14. ปุม HEALTH กดปุมนี้เพื1อเปดหรือปดฟงกชั่น I Clean คาเริ่มตน: OFF กดปุมนี้เพื1อเปดหรือปดฟงกชั่น Health คาเริ่มตน: OFF สำหรับรุนที่มีฟงกชั่นไรสาย ใหกดปุม 8. ปุม X-FAN Health ติดตอกัน 8 ครั้ง ภายใน 10 วินาที กดปุมนี้เพื1อเปดหรือปดฟงกชั่น X-FAN คาเริ่มตน: OFF เพื1อเขาสูสถานะการเชื1อมตอแบบไรสาย 9. ปุม / กดปุมนี้เพื1อเพิ่ม/ลดอุณหภูมิ ชวงอุณหภูมิ: 16-32 °C (60-90 °F) ใชปุมนี้ ในฟงกชั่น Timer เพื1อตั้งตัวจับเวลา 10.
10 www.electrolux.com 6. วิธีการใชงานรีโมทควบคุม ตรวจสอบวาเสียบปลั๊กเครื1องปรับอากาศเรียบรอยแลวและมีกระแสไฟฟา ไฟแสดงสถานะการทำงาน บนสวนแสดงผลของเครื1องภายในอาคารจะสวางขึ้น การใชงานเบื้องตน C B A D 1. กดปุมเปด/ปด (A) เพื1อเปดเครื1องปรับอากาศ 2. กดปุม MODE (B) เพื1อเลือกโหมด Auto, Cool, Dry, Fan หรือ Heat 3. กดปุม / (C) เพื1อตั้งอุณหภูมิที่ตองการ สามารถเพิ่ม/ลดอุณหภูมิไดครั้งละ 1°C กดปุม คางไว 2 วินาที เพื1อเรงการทำงาน 4. กดปุม FAN SPEED (D) เพื1อเลือกความเร็วพัดลม 5.
ภาษาไทย 11 การใชงานฟงกชั่น Swing A B กดปุม Swing (A) และปุม (B) เพื1อปรับ ทิศทางลมที่ตองการ 1. สามารถปรับทิศทางซาย/ขวาไดดวยปุม (A) บนรีโมทควบคุม เมื1อกดปุมนี้ บานเกล็ดจะเคลื1อน ไปทางซายและขวาโดยอัตโนมัติ กดปุมอีกครั้ง เพื1อหยุดบานเกล็ดในตำแหนงที่ทานตองการ 2.
12 www.electrolux.com เมื1อตั้งคาฟงกชั่น Timer on หรือ Timer off ในระยะ 10 ชั่วโมงแรก ทุกครั้งที่กดปุมเวลา จะเพิ่มขึ้นครั้งละ 30 นาที หลังจาก 10 ชั่วโมง เปนตนไปจนถึง 24 ชั่วโมง เวลาจะเพิ่มขึ้น ครั้งละ 1 ชั่วโมง ตัวอยางการตั้งคาฟงกชั่น Timer TIMER ON (ตั้งเวลาเปด) TIMER OFF (ตั้งเวลาปด) ตัวอยาง: ขณะนี้เวลา 8:00 น. และทานตองการให เครื1องปรับอากาศเริ่มทำงานหลังจาก ผานไป 6 ชั่วโมง 1. เมื1อรีโมทควบคุมมีสถานะเปน Off ใหกดปุม Timer จากนั้นสัญญาณ Timer on และเวลาจะแสดงขึ้น บนหนาจอ 2.
ภาษาไทย 13 การใชงานฟงกชั่นขั้นสูง 1. ฟงกชั่นสลับหนวย °C/°F ทานสามารถสลับหนวย °C/°F ไดโดยการกดปุม ปุม Mode พรอมกันเปนเวลา 3 วินาที และ 2. ฟงกชั่น Turbo กดปุม Turbo เพื1อเปดหรือปดฟงกชั่น Turbo ฟงกชั่น Turbo จะทำใหเครื1องปรับอากาศทำงานหนักเปนพิเศษ เพื1อใหไดอุณหภูมิที่ทานตั้งไวภายในระยะเวลาที่สั้นที่สุด เมื1อทานตองการใหทำความเย็นหรือทำความรอน อยางรวดเร็ว ทานสามารถเลือกฟงกชั่นนี้ได 1 2 3 4 5 3.
14 www.electrolux.com 5. ฟงกชั่น X-Fan 7.
ภาษาไทย 7. วิธีการใชงานตัวเครื1องภายในอาคาร 1. ปรับทิศทางลมใหเหมาะสม มิฉะนั้นอาจทำใหรูสึก ไมสบายหรือทำใหอุณหภูมิภายในหอง ไมสม่ำเสมอกัน 2. ปรับบานเกล็ดแนวนอนโดยใชรีโมทควบคุม 3. ปรับบานเกล็ดแนวตั้งโดยใชรีโมทควบคุม 4.
16 www.electrolux.com 8. อุณหภูมิการทำงาน ชวงอุณหภูมิการทำงาน ประเภทสภาพอากาศ ที่เหมาะสมกับรุน T1 อุณหภูมิโดยรอบ (ระบบทำความเย็น) 18°C~43°C สิ่งสำคัญ! 1. เครื1องปรับอากาศจะทำงานไดอยางมีประสิทธิภาพ สูงสุดเมื1อใชงานในชวงอุณหภูมิการทำงานนี้ หากใชเครื1องปรับอากาศนอกเงื1อนไขขางตน คุณสมบัติการปองกันความปลอดภัยบางอยาง อาจทำงานและสงผลใหเครื1องทำงานผิดปกติได อุณหภูมิโดยรอบ (ระบบทำความรอน) -7°C~43°C 2.
ภาษาไทย 17 10. การทำความสะอาดและการบำรุงรักษา 10.
18 www.electrolux.com 5. ติดตั้งแผนกรองปรับอากาศกลับเขาที่เดิม 3. ติดตั้งแผนกรองปรับอากาศอันใหม 4. ติดตั้งแผนกรองอากาศกลับเขาที่และปดแผง ดานหนาใหแนนหนา 10.6 การเตรียมการเมื1อจะไมมีการใชงาน เปนเวลานาน 6. ใสทอนบนของแผนกรองอากาศกลับเขาไปใน เครื1อง ระมัดระวังใหขอบซายและขอบขวาอยู ใน แนวเดียวกัน และใสแผนกรองเขาที่ 10.4 การทำความสะอาดชองลมออกและแผง 1. ใชผาที่แหงและนุมเช็ดทำความสะอาด 2.
ภาษาไทย 19 11. ขอแนะนำในการใชงาน เหตุการณตอไปนี้อาจเกิดขึ้นระหวางการใชงานตาม ปกติ 1. ระบบปองกันของคอมเพรสเซอรเครื1อง ปรับอากาศ Ç คอมเพรสเซอรจะไมสามารถเริ่มทำงานใหมได ประมาณ 3-4 นาที หลังจากหยุดทำงาน 2.
20 www.electrolux.com 10.
ภาษาไทย 21 12. การแกไขปญหา ไฟแสดงสถานะการทำงาน (ทำงาน) หรือไฟแสดงสถานะอื1นๆ ยังคงกะพริบ ปญหา ความผิดปกติ เครื1องไมทำงาน หากรหัสอยางใดอยางหนึ่งตอไปนี้ ปรากฏขึ้นในพื้นที่สวนแสดงผล: E0, E1, E2...En, F0, F1, F2...Fn, P0, P1, P2...Pn, L0, L1, L2...
www.electrolux.com/shop ศูนยบริการลูกคาอีเลคโทรลักซ ใหบริการขอมูล รับแจงซอม แนะนำวิธีการใชสินคา พรอมสรรพใหบริการ ที่ โทรศัพท: 0-2725-9000 โทรสาร: 0-2725-9299 ทุกวัน ตั้งแต เวลา 6.00 – 22.00 น. http://www.electrolux.co.