
Complete user's manual
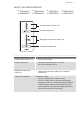
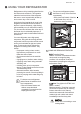


5. USING YOUR REFRIGERATOR
Refrigerators work by transferring heat from the
food inside to the outside air. This operation
makes the back and sides of the refrigerator
feel warm or even hot particularly at start-up
and on warm days – this is normal.
Avoid placing food against the air vents in the
refrigerator as it affects efficient circulation. If
the door is opened frequently, a light frosting
will occasionally occur on the freezer’s interior.
This is normal and will clear after a few days. If
the freezer door is accidentally kept open, a
heavy frost will coat the inside walls and should
be removed.
Your new refrigerator uses a high-speed
compressor, along with other energy-efficient
components, which may make unusual sounds
and be more noticeable at night and quieter
times. These sounds simply indicate your
refrigerator is working how it should. They
include:
• Compressor running noises; modern,
high-efficiency compressors run much
faster than older models.
• Air movement noise from the small fan
motor;
• A gurgling sound, similar to water boiling;
• A popping noise, heard during automatic
defrosting; and
• A clicking noise, prior to compressor
start-up. Further details can be found in the
Troubleshooting Guide.
• Automatic icemaker, while icemaker
producing ice sounds of ice cubes falling in
to ice bin pumping and/or water filling may
be heard.
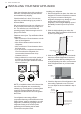
For bottom mount refrigerators
(where freezer is below the fresh
food compartment):
• Ensure all freezer drawer and
shelves are pushed back
completely to prevent them from
keeping the door open.
For top mount refrigerators (where
the freezer is on top of the fresh food
compartment).
• Don’t place food forward of the ribs
on the freezer floor, as it will
obstruct the door from closing.
5.1 USING AND REMOVING FEATURES
5.1.1
TasteSeal
Room
Use the
TasteSeal
compartment to store
meat, snack, beverage and dairy
products. You can adjust
TasteSeal
temperature by adjusting the refrigerator
temperature control.
5.1.2 Metal Tray (Option for ETB3** and
EBB3** models)
Metal tray locate in
TasteSeal
room and
can lift off from plastic body for cleaning
follow to instruction in this manual.
Avoid direct contact with food stuff that
contain high acid or alkali and clean it
immediately when found any stain.
CAUTION
Do not use in hot cooking or oven
cooking stoves.
5.1.8
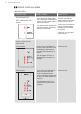
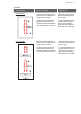
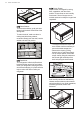
Water Tank
CAUTION
BEFORE REMOVE; to empty the
water in the tank.
To remove the water tank and
disassembly cleanable parts follow these
steps:
1. Press 2 clips on side of water tank to
unlock water tank from lugs and hold on
the tank.
2. Pull out the water tank.
3. Rotate tank cover lid up and off from the
cover.
4. Unclip the both side clips and lift off
from water tank.
5. Screw the water valve off from tank.
6. Remove nozzle rubber and o-ring from
water valve.
5.1.3 Glass Shelves
To remove the shelves, gently pull them
forward until the shelf comes clear of the
shelf guides.
To return the shelf, make sure there is
nothing behind that may obstruct
movement. Gently push the shelf, into the
cabinet and back into position.
5.1.4
Deodorizer
Your refrigerator is fitted with Deodorizer
to assist with the removal of food odours
inside your refrigerator. Keeping the food
covered and wrapping it in plastic will also
help to reduce the odours inside your
refrigerator.
5.1.5
Crisper Drawer
Crisper drawer is designed for storing
fruits, vegetables, and other fresh
produce. Crisper have an auto humidity
membrane in front of crisper cover to
maintain optimum humidity for longer fresh
vegetables.
- To empty food from the crisper. On
some models it will be necessary to
remove the bottle storage bins.
- Remove the crisper by pulling
forward, then up and forward again.
- For top mount models, remove the
crisper shelf by lifting the catches on
the left and right underside of the
shelf and pulling the shelf forward.
Auto humidity membrane automatically
releases excess moisture and maintains
optimal humidity for your fresh vegetables,
maintaining the taste, texture and
freshness.
To remove the Auto humidity membrane
part follow these step:
1.
Unclip the both side clips and,
2. Lift off from crisper drawer.
It’s not required to replace the Auto
humidity membrane unless it
becomes damaged or ruined. If the
membrane becames soiled or
dirty, it can be washed with soap
and water. Ensure membrane is
dry before putting back in crisper
drawer. Please contact our service
provider when need to replace
your AHC membrane.
5.1.6
Crisper bin
- Storing Vegetables Usethe crisper bin to
store vegetables, fruits or small items.
You can adjust the humidity inside the
bin by sliding the humidity control. Model
ETB2** and EBB2** have slide control.
5.1.7
Door storage bins
Both the refrigerator and freezer have
door storage bins.
You can adjust the refrigerator bins to
meet different storage needs. All the door
bins are completely removable for
cleaning. If you want to remove or adjust a
bin, lift and unlock from lugs to remove.
To replace, lift up and push bin down until
the support lugs lock it in place.
Rib
TasteSeal
Room
Reverse the step to assembly the water
tank and return to its place.
NOTE: Screw in the water valve to water
tank till stopper touch the rip and the water
valve nozzle must be point down as
picture.
CAUTION
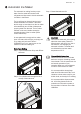
LED lighting
Your appliance is fitted with long
life LED lighting. In the unlikely
event the LED lights should fail,
then the LED lights should be
serviced by the manufacturer.
Refer to the warranty page for
contact details.
ENGLISH 25