ETK7000, ETK8000, ETK7070 ETK8080, ETK7080 Electrolux Refrigeration Trim Kit Installation Manual
electrolux.com.
CONGRATULATIONS CONTENTS Dear customer, Trim kit contents (Installation)......................................4 Congratulations and thank you for choosing our trim kit. We are sure you will find your new trim kit a pleasure to use. Before you use the trim kit we recommend that you read through the relevant sections of this manual, which provides a description of your trim kit and its functions. Trim kit contents (Single refrigerators).........................
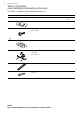
electrolux.com.au TRIM KIT CONTENTS (SINGLE & DUAL REFRIGERATOR INSTALLATION) FOR STEP 1 - INSTALLING THE LEVELLING SYSTEM (PAGE 9) Item description ANC quantity ETK7000/8000 ETK7080/7070 /8080 1 Replacement foot base with M4 threaded holes A02102702 2 2 2 Replacement hinge base LH/RH A01819908 1 1 A01819907 1 1 3 Leveller assembly 297276901 2 4 5 Space leveller 8.
TRIM KIT CONTENTS (SINGLE REFRIGERATORS) Item description ANC quantity ETK7000 ETK8000 A06147601 1 1 A06147602 1 1 Top hinge cover LH & RH A06219901 1 1 A06219801 1 1 Top trim 7000 A06127901 1 Top trim 8000 A06127902 4 Insert top trim A06147901 1 1 5 Spacer 3mm top trim bracket A06351301 2 2 Screw trilobular M5 x 10mm 811949402 4 4 Shoulder bolt M5 x 10mm (No.
electrolux.com.
TRIM KIT CONTENTS (DUAL REFRIGERATORS INSTALLATION) Item 1 2 3 4 description ANC quantity ETK7080 ETK7070 ETK8080 A06147601 1 1 1 A06147602 1 1 1 Top hinge cover LH & RH A06219901 1 1 1 A06219801 1 1 1 Top trim - 7080 A06127905 1 Top trim - 7070 A06127903 Top trim - 8080 A06127904 Screw trilobular M5 x 13mm 811949402 4 4 4 Shoulder bolt M5 x 10mm (No.
electrolux.com.au WARNING Safety: Always wear safety glasses when using power tools. Tools needed: PhillipsTM Screwdriver, Tape Measure, Socket Wrench 8mm, Flat Tip Screwdriver, Power Drill, Dia 3.2mm drill bit, Step Ladder, 4mm Allen key TRIM KIT OVERALL OUTER DIMENSIONS (ASSEMBLED) KIT NO.
CABINETRY DIMENSIONS: (INSTALLATION) Recommended minimum rear gaps for adequate ventilation: min 100 mm min 50 mm min 50 mm PROUD INSTALLATION KIT NO.
electrolux.com.au STEP 1 - INSTALLING THE LEVELLING SYSTEM FOR SINGLE AND DUAL REFRIGERATOR INSTALLATIONS Leveling system install Preparing non-door hinge side Attaching the levelling systems (2 per refrigerator) a. The leveller assembly attaches to the refrigerator with 3 spacers (1H) and 3 screws 9H and 3H (Fig 5). b. Ensuring slotted adjusting bolt is at the front, align the side of the leveller assembly to the side of the refrigerator. 2 x 9h a.
STEP 2 - JOINING THE REFRIGERATORS FOR DUAL REFRIGERATOR INSTALLATION ONLY Bottom-front bracket installation Carefully pull the refrigerators together adjacent to the final installation location, then adjust the front and rear feet to the same height. Position the bottom-front bracket • Position the bottom-front bracket between the two refrigerators. • Fasten with the two M4 screws using a Phillips head screwdriver.
electrolux.com.
STEP 3 - INSTALLING THE TRIMS AND LEVELLING FOR SINGLE & DUAL REFRIGERATOR INSTALLATIONS Trim kit installation Single unit installation – non french door models Attaching the bracket – non hinge side a. Attach the bracket to the unit using two screws. Figure 20 2X8H IMPORTANT Door alignment Figure 17 Single and dual installations Attaching the bracket – hinge side a. Remove outer screw from top hinge cover and save for later. Remove the top hinge cover and discard. (Fig. 18) a.
electrolux.com.au All models Align the front of the top trim to the front of the refrigerator and attach with screws (8H) and spacer 2H (Non French Door models only) as shown. (Fig. 22) c. Locate side trim over the top trim and attached with countersunk self tapping screws (5H) (Fig. 25). Push side trim again against refrigerator to close gap before tightening. 5H Single 2x8H 2x8H Spacer(2H) not required for french door 2x2H 2x8H Dual d.
h. Drill dia 3.2mm pilot holes on the cabinetry and secure the Top Trim to the cabinetry using two screws each on left and right ends. Figure 26 2x4H e. Adjust the front and rear levelling feet (Fig. 27) if necessary to align the edges of the trims to the front face of the cabinetry. Figure 30 i.
electrolux.com.au Uninstall Sequence 1. Uninstalling the trims a. Remove the bottom trim by pulling it towards you. b. Remove the Side trims by pulling it up and away from the refrigerator after unscrewing the top screw. c. Remove the screws attaching the top trim to timber cabinetry. d. Pull out the refrigerator from the cabinetry cavity. e. Remove the top trim. 2. Uninstall the Connection kit components a. Remove the top front bracket. b.
NOTES
electrolux.com.
Warranty FOR SALES IN AUSTRALIA AND NEW ZEALAND APPLIANCE: ELECTROLUX SPARE PARTS & ACCESSORY PRODUCTS (ii) misuse or abuse, including failure to properly maintain or service; This document sets out the terms and conditions of the product warranties for Electrolux Spare Parts and Accessory Products. It is an important document. Please keep it with your proof of purchase documents in a safe place for future reference should there be a manufacturing defect in your Product.
Electrolux Home Products Australia telephone: 1300 363 640 fax: 1800 350 067 email: customercare@electrolux.com.au web: electrolux.com.au Electrolux Home Products New Zealand telephone: 0800 234 234 fax: 0800 363 600 email: customercare@electrolux.co.nz web: electrolux.co.nz P/No.