I N F O INSTALLATION- UND GEBRAUCHSANWEISUNGEN I N S T R U C T I O N S P O U R L’ I N S T A L L A T I O N E T L ’ E M P L O I I N S T A L L A T I E- E N G E B R U I K S A A N W I J Z I N G E N INSTALLATION AND INSTRUCTION MANUAL GEFRIERSCHRANK CONGELATEUR DIEPVRIEZER FREEZER 2222 111-03 EU 1230 T EU 1230 T EU 1230 T EU 1230 T
CONTENTS Warnings . . . . . . . . . . . . . . . . . . . . . . . . . . . . . . . . .page 33 Installation . . . . . . . . . . . . . . . . . . . . . . . . . . . . . . . .page 34 Location . . . . . . . . . . . . . . . . . . . . . . . . . . . . . . . .page 34 Electrical connection . . . . . . . . . . . . . . . . . . . . . . . . . . . . .page 34 Cleaning the interior . . . . . .
WARNINGS It is most important that this instruction book should be retained with the appliance for future reference. Should the appliance be sold or transferred to another owner, or should you move house and leave the appliance, always ensure that the book is supplied with the appliance in order that the new owner can be acquainted with the functioning of the appliance and the relevant warnings. These warnings are provided in the interest of safety.
INSTALLATION If this appliance featuring magnetic door seals is to replace an older appliance having a spring lock (latch) on the door or lid, be sure to make that spring lock unusable before you discard the old appliance. This will prevent it from becoming a death-trap for a child. Location Place the appliance as far away as possible from sources of heat, e.g. radiators, heaters, direct sunlight, etc.. The best results are achieved with a room temperature ranging from +16°C to +32°C.
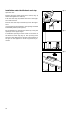
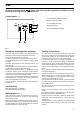
Changing the opening direction of the door Fig. 1 Unplug the freezer before performing the following operations: Remove the ventilation grid (C-Fig. 1). D E E Unscrew the bottom hinge (D-Fig. 1). Remove the door from the upper pivot (A-Fig. 2). Remove the pivot from the upper hinge (B), then mount it on the opposite side. Re-assemble the door. E C D229 Screw down the bottom hinge (D-Fig. 1) on the opposite side by using the screws previously removed. Fig. 2 Detach the plug (E-Fig.
Installation under the kitchen’s work-top Fig. 4 Open the door. Remove from the upper hinges the screws (F-Fig. 4) that fix the appliance’s work-top. F Push the work-top (G) toward the back of the appliance and remove it. G Remove the work-top’s brackets (H) from the appliance. Unscrew the feet and fit them in the openings situated immediately behind (see Figure 5). H D155 Fix the appliance to the kitchen’s work-top, using the openings on the upper hinges. Fig.
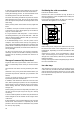
USE The freezer is marked with the symbol, which means that the compartment is suitable for freezing fresh food and for long-term storage of frozen food. Control panel (Fig. 7) A. Temperature adjustment knob B. Quick freezing switch SUPER min B max E D C C. Operating pilot lamp D. Warning lamp E. Quick freezing pilot lamp A Fig.
In this way, by avoiding contact with air, the colour flavour and nutritional value of the foods remain intact. During the freezing process, do not add further foods for freezing and do not open the freezer door. The foods for freezing should not be placed in contact with already frozen foods, but put in the top drawer. This will stop the temperature of already frozen foods from rising. Positioning the cold accumulator Pull out the bottom drawer. Remove the cold accumulator (A-Fig.
MAINTENANCE Before carrying out any maintenance operation, always disconnect the plug from the wall socket. When defrosting is completed, empty the drawer and dry the interior thoroughly. Defrosting Turn the thermostat knob (A) to the desired position or replace the plug in the socket. After letting the appliance to run for two or three hours on the quick-freeze setting, it is ready again for storing frozen food.