User Manual Freezer EUF 27391 X
electrolux 3 Welcome to the world of Electrolux You’ve chosen a first class product from Electrolux, which hopefully will provide you with lots of pleasure in the future. Electrolux ambition is to offer a wide variety of quality products that would make your life even more comfortable. You can look at some examples on the cover in this manual. But now it’s time to study this manual and start using and enjoying the benefits from your new machine. We promise that it’ll make your life a little easier.
electrolux The following symbols are used in this manual: Important information concerning your personal safety and information on how to avoid damaging the appliance. General information and tips Environmental information The symbol on the product or on its packaging indicates that this product may not be treated as household waste. Instead it shall be handed over to the applicable collection point for the recycling of electrical and electronic equipment.
electrolux 5 CONTENTS Safety Information Use Cleaning the interior Control panel Display First switch on Switching off Temperature regulation Functions Menu Ambient Temperature Function Child Lock Function Eco Mode Function Action Freeze Function Drinks Chill Function 6 9 9 9 10 10 10 11 11 11 11 12 12 13 Use of the freezer compartment Storage of frozen food Execessive temperature alarm Freezing calendar Thawing Ice-cube production Cold accumulators Health and safety guideline Maintenance Internal cleani
electrolux SAFETY INFORMATION It is most important that this instruction book should be retained with the appliance for future reference. Should the appliance be sold or transferred to another owner, or should you move house and leave the appliance, always ensure that the book is supplied with the appliance in order that the new owner can be acquainted with the functioning of the appliance and the relevant warnings.
electrolux 7 • Under no circumstances should you attempt to repair the appliance yourself. Repairs carried out by inexperienced persons may cause injury or more serious malfunctioning. Refer to your local Service Centre, and always insist on genuine spare parts. • This appliance contains hydrocarbons in its cooling unit; maintenance and recharging must therefore only be carried out by authorized technicians.
electrolux • Care must be taken to ensure that the appliance does not stand on the electrical supply cable. Important: if the supply cord is damaged, it must be replaced by a special cord or assembly availa-ble from the manufacturer or its service agent. • If the appliance is transported horizontally, it is possible that the oil contained in the compressor flows in the refrigerant circuit.
electrolux 9 USE Cleaning the interior Before using the appliance for the first time, wash the interior and all internal accessories with luke-warm water and some neutral soap so as to remove the typical smell of a brand-new product, then dry thoroughly. Do not use detergents or abrasive powders, as these will damage the finish.
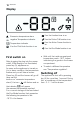
electrolux Display Excessive temperature alarm If on the function timer is on negative Temperature indicator If on the Drinks Chill function is on Temperature indicator If on the Action Freeze function is on If on the Child Lock function is on First switch on After plugging the plug into the power outlet, if the display is not illuminated, press key (A), appliance on. As soon as the appliance is turned on, it is in alarm condition, the temperature flashes and you will hear a buzzer.
electrolux 11 Temperature regulation The temperature may be regulated by pressing the key B. By pressing the key B the current temperature setting flashes on the indicator and by pressing the key B again it is possible to change it. You confirm the choice of the temperature either by pressing the key E, (you will hear the buzzer) or by waiting for some seconds (you will not hear the buzzer). Then the indicator shows again the inside compartment temperature.
electrolux In this condition the chosen temperatures are automatically set (- 18°C), in the best conditions for storing food. It is possible to de-activate the function at any time by changing the selected temperature in the compartment. 10 kg 10 kg Action Freeze Function The freezer compartment is suitable for long term storage of commercially frozen and deep-frezen food, and for freezing fresh food. The maximum quantity of foods to freeze in 24 hours is shown on the serial number plate.
electrolux 13 At the end of the selected time there are the following indications: • on the indicator flashing ; • the icon • the icon the symbol flashing ; flashing; • sounding of an acoustic alarm until key E is pressed. At this point bear in mind to remove the drinks contained in the freezer compartment. It is possible to de-activate the function at any time by pressing key D until the corresponding icon will flash and then key E.
electrolux Storage of frozen food When first starting-up or after a period out of use, before putting the products in the compartment let the appliance run at least 12 hours. To obtain the best performance from this appliance, you should: if large quantities of food are to be stored, remove all drawers and baskets from appliance and place food on cooling shelves.
electrolux 15 Ice-cube production This appliance is equipped with one or more trays for the production of icecubes. Fill these trays with water, then put them in the freezer compartment. Do not use metallic instruments to remove the trays from the freezer. Cold accumulators 2 cold accumulators are supplied in the freezer; these increase the length of time for which food will keep in the event of a power failure or breakdown.
electrolux HEALTH AND SAFETY GUIDELINES Because of consumer demand, preservatives have been removed from many pre-p prepared foods. This together with the changes in shopping habits to a once-a a-w week shop, mean that safe handling and storage of food is even more important than ever. The following tips should help you to ensure that the food in your home is in as perfect condition as possible.
electrolux 17 to food which is already frozen as this could cause the temperature of the frozen food to rise and its quality and storage life to reduce . • The symbols on the drawers show different types of frozen goods. The numbers indicate storage times in months for the appropriate types of frozen goods. Whether the upper or lower value of the indicated storage time is valid depends on the quality of the foods and pretreating before freezing. liquid added.
electrolux Defrosting The freezer compartment of this model, on the other hand, is a "no frost" type. This means that there is no buildup of frost when it is in operation, neither on the internal walls nor on the foods. The absence of frost is due to the continuous circulation of cold air inside the compartment, driven by an automatically controlled fan.
electrolux 19 SOMETHING NOT WORKING Important: If you call out an engineer to a fault listed below, or to repair a fault caused by incorrect use or installation a charge will be made, even if the appliance is under guarantee. Before contacting your local Service Force Centre, check the following points: Symptom Solution No power to the appliance Check there is power at the socket. Check there is not a power cut by checking the household lights. Check the fuse has not blown.
electrolux TECHNICAL SPECIFICATIONS DIMENSIONS Height 180 cm Width 60 cm Depth 64,5 cm POWER SUPPLY VOLTAGE AND FREQUENCY 230-240 V / 50 Hz TOTAL POWER ABSORBED 170 W AVERAGE DAILY UNITS ELECTRICITY * 0.849 kWh GROSS CAPACITY Freezer 266 l Freezer 254 l NET CAPACITY * This figure is based on standard test results in accordance with European Standard EN 153. Actual consumption will depend on how the appliance is used and where it is located.
electrolux 21 Depending upon the position which you choose for your appliance, you may wish to reverse the way in which the door opens. To do this, refer to instructions on “Door reversal directions” paragraph. Positioning This appliance should only be installed at a location where the ambient temperature corresponds to the climate classification indicated on the rating plate, which is located at the left on the inside of the appliance.
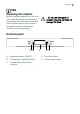
electrolux Adjust the level of the appliance by screwing out the adjustable foot, or feet, at the bottom of the cabinet using your fingers. Important It must be possible to disconnect the appliance from the mains power supply; the plug must therefore be easily accessible after installation. D200 Rear spacers In the bag with the documentation, there are two spacers which must be fitted as shown in the figure . Slacken the screws and insert the spacer under the screw head, then retighten the screws.
electrolux 23 GREEN & YELLOW Electrical connections 13 AMP Any electrical work required to install this appliance should be carried out by a qualified electrician or competent person. WARNING: THIS APPLIANCE MUST BE EARTHED. The manufacturer declines any liability should this safety measure not be observed. If the plug that is fitted to your appliance is not suitable for your socket outlet, it must be cut off and the appropriate plug fitted. Remove the fuse from the cut off plug.
electrolux This appliance complies with the E.E.C. Directive No. 87/308 of 2.6.87 relative to radio interference suppression. This appliance complies with the following E.E.C. Directives: - 73/23 EEC of 19.2.73 (Low Voltage Directive) and subsequent modifications; - 89/336 EEC of 3.5.89 (Electromagnetic Compatibility Directive) and subsequent modifications. Please ensure that when the appliance is installed it is easily accessible for the engineer in the event of a breakdown.
electrolux 25 Door reversibility Before carrying out any operations, remove the plug from the power socket. To change the opening direction of the door, proceed as follows: • To carry out the following operations, we suggest that this be made with another person that will keep a firm hold on the doors of the appliance during the operations. • Open the door with the appliance in the upright position. Unscrew the screws and remove the upper door plastic trim. b a c • Remove the door.
electrolux • Fix the screw of the new cover hinge (that can be found in the instruction for use bag). • Lift up the appliance to vertical position. • Open the door and reposition the upper door plastic trim with screws. Warning After having reversed the opening direction of the doors check that all the screws are properly tightened and that the magnetic seal adheres to the cabinet. If the ambient temperature is cold (i.e. in Winter), the gasket may not fit perfectly to the cabinet.
electrolux 27 Guarantee/Customer Service Standard guarantee conditions We, Electrolux, undertake that if within 12 months of the date of the purchase this Electrolux appliance or any part the-reof is proved to be defective by reason only of faulty workmanship or materials, we will, at our option repair or replace the same FREE OF CHARGE for labour, materials or carriage on condition that: • The appliance has been correctly installed and used only on the electricity supply stated on the rating plate.
electrolux Customer Care For general enquiries concerning your Electrolux appliance, or for further information on Electrolux products please contact our Customer Care Department by letter or telephone at the address below or visit our website at www.electrolux.co.
electrolux 29 EUROPEAN GUARANTEE This appliance is guaranteed by Electrolux in each of the countries listed at the back of this user manual, for the period specified in the appliance guarantee or otherwise by law.
electrolux www.electrolux.com Albania +35 5 4 261 450 Belgique/België/Belgien +32 2 363 04 44 Rr. Pjeter Bogdani Nr. 7 Tirane Bergensesteenweg 719, 1502 Lembeek È eská republika +420 2 61 12 61 12 Budģ jovická 3, Praha 4, 140 21 Danmark +45 70 11 74 00 Sjællandsgade 2, 7000 Fredericia Deutschland +49 180 32 26 622 Muggenhofer Str. 135, 90429 Nürnberg Eesti +37 2 66 50 030 Mustamäe tee 24, 10621 Tallinn España +34 902 11 63 88 Carretera M-300,Km.
www.electrolux.com www.electrolux.co.