EUF2949IOX ................................................ .............................................
www.electrolux.com CONTENTS 1. 2. 3. 4. 5. 6. 7. 8. 9. SAFETY INSTRUCTIONS . . . . . . . . . . . . . . . . . . . . . . . . . . . . . . . . . . . . . . . . . . . . . . . . . . 3 CONTROL PANEL . . . . . . . . . . . . . . . . . . . . . . . . . . . . . . . . . . . . . . . . . . . . . . . . . . . . . . . 5 DAILY USE . . . . . . . . . . . . . . . . . . . . . . . . . . . . . . . . . . . . . . . . . . . . . . . . . . . . . . . . . . . . . 7 HELPFUL HINTS AND TIPS . . . . . . . . . . . . . . . . . . . . . . . .
ENGLISH 1. 3 SAFETY INSTRUCTIONS In the interest of your safety and to ensure the correct use, before installing and first using the appliance, read this user manual carefully, including its hints and warnings. To avoid unnecessary mistakes and accidents, it is important to ensure that all people using the appliance are thoroughly familiar with its operation and safety features.
www.electrolux.com 1. • • • • Power cord must not be lengthened. 2. Make sure that the power plug is not squashed or damaged by the back of the appliance. A squashed or damaged power plug may overheat and cause a fire. 3. Make sure that you can come to the mains plug of the appliance. 4. Do not pull the mains cable. 5. If the power plug socket is loose, do not insert the power plug. There is a risk of electric shock or fire. 6.
ENGLISH 5 ozone layer, in either its refrigerant circuit or insulation materials. The appliance shall not be discarded together with the urban refuse and rubbish. The insulation foam contains flammable gases: the appliance shall be disposed according to the applicable regulations to obtain from your local authorities. Avoid damaging the cooling unit, especially at the rear near the heat exchanger. The materials used on this appliance marked by the symare recyclable. bol 1.
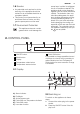
www.electrolux.com 3. The alarm buzzer could operate after few seconds. To reset the alarm refer to "High temperature alarm". 4. If DEMO appears on the display, the appliance is in demonstration mode. Refer to "What to do if..." paragraph. 5. The temperature indicators show the set default temperature. To select a different set temperature refer to "Temperature regulation". 2.3 Switching off To switch off the appliance do these steps: 1. Press the ON/OFF button for 3 seconds. 2.
ENGLISH 1. Remove any drinks contained in the freezer compartment. 2. Press the DrinkChill button to switch off the sound and terminate the function. It is possible to deactivate the function at any time during the countdown: 1. Press the DrinkChill button. 2. The DrinksChill indicator goes off. It is possible to change the time during the countdown and at the end by pressing the Temperature colder button and the Temperature warmer button. 2.
www.electrolux.com 3.3 Thawing Deep-frozen or frozen food, prior to being used, can be thawed in the refrigerator compartment or at room temperature, de- pending on the time available for this operation. Small pieces may even be cooked still frozen, directly from the freezer: in this case, cooking will take longer. 3.4 Shelf above ice maker The shelf above the ice maker cannot be removed. 3.5 Dispensing of ice The dispensing of ice start when you turn the knob counter clockwise.
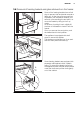
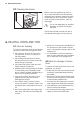
ENGLISH 9 3.6 Removal of freezing baskets and glass shelves from the freezer 2 1 Some of the freezing baskets have a limit stop to prevent their accidental removal or falling out. At the time of its removal from the freezer, pull the basket towards yourself and, upon reaching the end point, remove the basket by tilting its front upwards At the time of putting it back, slightly lift the front of the basket to insert it into the freezer.
www.electrolux.com 3.7 Cleaning the interior Before using the appliance for the first time, wash the interior and all internal accessories with lukewarm water and some neutral soap so as to remove the typical smell of a brand-new product, then dry thoroughly. Do not use detergents or abrasive powders, as these will damage the finish. Check that the drain hose at the rear of the cabinet discharges into the drip tray 4. HELPFUL HINTS AND TIPS 4.
ENGLISH 11 5. CARE AND CLEANING CAUTION! Unplug the appliance before carrying out any maintenance operation. This appliance contains hydrocarbons in its cooling unit; maintenance and recharging must therefore only be carried out by authorized technicians. 5.1 Periodic cleaning The equipment has to be cleaned regularly: • clean the inside and accessories with lukewarm water and some neutral soap. • regularly check the door seals and wipe clean to ensure they are clean and free from debris.
www.electrolux.com 5.5 Cleaning the ventilation grille The ventilation grille can be removed for washing. Make sure the door is open and then: • Loosen the lower edge of the grille by pulling outward/upward. • Pull the grille straight out to completely remove it. • Vacuum clean under the cabinet. 6. WHAT TO DO IF… During operation of the appliance some smaller but annoying trouble can often occur, which does not require calling a technician out.
ENGLISH Problem There is too much frost and ice. 13 Possible cause Solution The food temperature is too high. Let the food temperature decrease to room temperature before storage. The room temperature is too high. Decrease the room temperature. The door is not closed correctly. Refer to "Closing the door". The door gasket is deformed or dirty. Refer to "Closing the door". The temperature in the appliance is too cold. The Temperature regulator Set a warmer temperature. may be set incorrectly.
www.electrolux.com Problem Possible cause Solution Door interferes with ventilation grill. The appliance is not levelled. Refer to "Levelling". Misaligned door. The appliance is not levelled. Refer to "Levelling". DEMO appears on the Display The appliance is in demonstration mode (DEMO). Keep pressed approximately 10 sec the Mode button since a long sound of buzzer is heard and the Display shut off for a short while: appliance start works regularly.
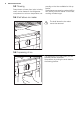
ENGLISH 15 7.2 Location To ensure best performance, if the appliance is positioned below an overhanging wall unit, the minimum distance between the top of the cabinet and the wall unit must be at least 40 mm. Ideally, however, the appliance should not be positioned below overhanging wall units. The ventilation space can be: • directly above the appliance • behind and above the top cupboard. In this case, the space behind the top cupboard must be at least 50 mm deep. 50 mm 7.
www.electrolux.com WARNING! A cut off plug inserted into a 13 amp socket is a serious safety (shock) hazard. Ensure that it is disposed of safely. 7.4 Removing the transport support Your appliance is equipped with transport support to secure the door during transportation. To remove them do these steps: • Open the door. • Remove the transport support from the door sides. Some models are fitted with a silencing pad under the cabinet. Do not remove this pad. 7.
ENGLISH there is no leakage at the connection to the water tap. Tighten the screw enough by hand. Make sure that the gasket is properly positioned in the connector. 17 We recommend that the appliance is placed on a "run-off" mat intended for refrigerators and freezers, which makes it easier to detect possible leakage. 7.7 Levelling When placing the appliance ensure that it stands level. If necessary adjust the feet using the adjustment spanner supplied. 7.8 Starting the ice maker for the first time.
www.electrolux.
ENGLISH 19 9. TECHNICAL DATA Dimension Height 1850 mm Width 595 mm Depth 623 mm Rising Time 10 h Voltage 230 V Frequency 50 Hz The technical information are situated in the rating plate on the internal left side of the appliance and in the energy label. Water pressure range The water pressure must be at least 1 bar (100kPa) Consult your installer if water pressure is less than 1 bar.
855827203-A-322013 www.electrolux.