User Manual Freezer EUG 23800
electrolux 3 Welcome to the world of Electrolux You’ve chosen a first class product from Electrolux, which hopefully will provide you with lots of pleasure in the future. Electrolux ambition is to offer a wide variety of quality products that would make your life even more comfortable. You can look at some examples on the cover in this manual. But now it’s time to study this manual and start using and enjoying the benefits from your new machine. We promise that it’ll make your life a little easier.
electrolux The following symbols are used in this manual: Important information concerning your personal safety and information on how to avoid damaging the appliance. General information and tips Environmental information The symbol on the product or on its packaging indicates that this product may not be treated as household waste. Instead it shall be handed over to the applicable collection point for the recycling of electrical and electronic equipment.
electrolux 5 CONTENTS Safety Information Use Cleaning the interior Control panel Operation Freezing fresh food Door open acoustic alarm Storage of frozen food Cold accumulators Thawing Ice cube production 6 9 9 9 11 11 11 12 12 12 12 Hints Hints for freezing Hints for storage of frozen food Maintenance Periodic cleaning Defrosting Technical information Customer service and spare parts Installation Location Electrical connection Instructions for totally built-in appliances 13 13 13 14 14 14 15 15 15 15 1
electrolux SAFETY INFORMATION It is most important that this instruction book should be retained with the appliance for future reference. Should the appliance be sold or transferred to another owner, or should you move house and leave the appliance, always ensure that the book is supplied with the appliance in order that the new owner can be acquainted with the functioning of the appliance and the relevant warnings.
electrolux 7 • This product should be serviced by an authorized Service Centre, and only genuine spare parts should be used. • Under no circumstances should you attempt to repair the appliance yourself. Repairs carried out by inexperienced persons may cause injury or more serious malfunctioning. Refer to your local Service Centre, and always insist on genuine spare parts.
electrolux Important: if the supply cord is damaged, it must be replaced by a special cord or assembly availa-ble from the manufacturer or its service agent. • If the appliance is transported horizontally, it is possible that the oil contained in the compressor flows in the refrigerant circuit. It is advisable to wait at least two hours before connecting the appliance to allow the oil to flow back in the compressor. • There are working parts in this product which heat up.
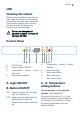
electrolux 9 USE Cleaning the interior Before using the appliance for the first time, wash the interior and all internal accessories with luke-warm water and some neutral soap so as to remove the typical smell of a brand-new product, then dry thoroughly. Do not use detergents or abrasive powders, as these will damage the finish. Control Panel ACTION FREEZE A B C A On/OFF light B Freezer button ON/OFF C Temperature (warmest) D setting D button Temperature indicator A. Light ON/OFF B.
electrolux To set a warmer temperature, press button (C). To set a colder temperature, press button (E). The indicator display the newly selected temperature for a few seconds and then shows again the inside compartment temperature. The newly selected-temperature must be reached after 24 hours. Attention! During the stability period by the first starting the temperature displayed can not correspond to the setting temperature.
electrolux 11 Operation Insert the plug in the power socket. Press the button ON/OFF (B). The freezer is switched on. The freezer is pre-set to run at -18°C. this temperature will be reached in a few hours. As soon as the appliance is switched on the temperature indicator (D) shows the current temperature inside the freezer, the alarm reset light (H) flashes and a buzzer sounds. Press the alarm reset button (I).
electrolux Storage of frozen food Cold accumulators When first starting-up or after a period out of use, before putting the products in the compartment let the appliance run at least 24 hours on the fast freeze setting. The freezer contains two cold accumulators which increas storage times in the event of a power cut or breakdown. They are located in the upper compartment.
electrolux 13 HINTS Hints for freezing To help you make the most of the freezing process, here are some important hints: • the maximum quantity of food which can be frozen in 24 hrs. is shown on the rating plate; • the freezing process takes 24 hours.
electrolux MAINTENANCE Unplug the appliance before carrying out any maintenance operation. Warning This appliance contains hydrocarbons in its cooling unit; maintenance and recharging must therefore only be carried out by authorized technicians. Periodic cleaning Many proprietary kitchen surface cleaners contain chemicals that can attack/damage the plastics used in this appliance.
electrolux 15 TECHNICAL INFORMATION The technical infomation are situated in the rating plate on the internal left side of the appliance. CUSTOMER SERVICE AND SPARE PARTS If the appliance is not functioning properly, check that: • the plug is firmly in the wall socket and the mains power switch is on; • there is an electricity supply (find out by plugging in another appliance); • the temperature is set correctly.
electrolux Electrical connection Before plugging in, ensure that the voltage and frequency shown on the serial number plate correspond to your domestic power supply. Voltage can vary by ±6% of the rated voltage. For operation with different voltages, a suitably sized auto-transformer must be used. The appliance must be earthed. The power supply cable plug is provided with a contact for this purpose.
electrolux 17 Instructions for totally built-in appliances 50 mm min. 2 200 cm Dimensions of the recess Height (1) 1780 mm Depth (2) 550 mm Width (3) 560 mm For safety reasons, minimum ventilation must be as shown in Fig. min. 200 cm2 D567 540 Attention: keep ventilation openings clear of obstruction.
www.electrolux.com www.electrolux.co.