EUX2243AOX ................................................ EN UPRIGHT FREEZER FI KAAPPIPAKASTIN IT CONGELATORE VERTICALE PT CONGELADOR VERTICAL ES CONGELADOR VERTICAL .............................................
www.electrolux.com CONTENTS 1. 2. 3. 4. 5. 6. 7. 8. 9. SAFETY INSTRUCTIONS . . . . . . . . . . . . . . . . . . . . . . . . . . . . . . . . . . . . . . . . . . . . . . . . . . 3 CONTROL PANEL . . . . . . . . . . . . . . . . . . . . . . . . . . . . . . . . . . . . . . . . . . . . . . . . . . . . . . . 5 DAILY USE . . . . . . . . . . . . . . . . . . . . . . . . . . . . . . . . . . . . . . . . . . . . . . . . . . . . . . . . . . . . . 7 HELPFUL HINTS AND TIPS . . . . . . . . . . . . . . . . . . . . . . . .
ENGLISH 1. 3 SAFETY INSTRUCTIONS In the interest of your safety and to ensure the correct use, before installing and first using the appliance, read this user manual carefully, including its hints and warnings. To avoid unnecessary mistakes and accidents, it is important to ensure that all people using the appliance are thoroughly familiar with its operation and safety features.
www.electrolux.com 1. • • • • Power cord must not be lengthened. 2. Make sure that the power plug is not squashed or damaged by the back of the appliance. A squashed or damaged power plug may overheat and cause a fire. 3. Make sure that you can come to the mains plug of the appliance. 4. Do not pull the mains cable. 5. If the power plug socket is loose, do not insert the power plug. There is a risk of electric shock or fire. 6.
ENGLISH • This product must be serviced by an authorized Service Centre, and only genuine spare parts must be used. 5 together with the urban refuse and rubbish. The insulation foam contains flammable gases: the appliance shall be disposed according to the applicable regulations to obtain from your local authorities. Avoid damaging the cooling unit, especially at the rear near the heat exchanger. The materials used on this appliance marked by the symare recyclable. bol 1.
www.electrolux.com 1. Connect the mains plug to the power socket. 2. Press the ON/OFF button if the display is off. 3. The alarm buzzer could operate after few seconds. To reset the alarm refer to "High temperature alarm". 4. If DEMO appears on the display, the appliance is in demonstration mode. Refer to "What to do if..." paragraph. 5. The temperature indicators show the set default temperature. To select a different set temperature refer to "Temperature regulation". 2.
ENGLISH ing the Temperature colder button and the Temperature warmer button. 2.8 High temperature alarm An increase in the temperature in the freezer compartment (for example due to an earlier power failure) is indicated by: • flashing the alarm and freezer temperature indicators • sounding of buzzer. To reset the alarm: 1. Press any button. 2. The buzzer switches off. 3. The freezer temperature indicator shows the highest temperature reached for a few seconds. Then show again the set temperature. 7 4.
www.electrolux.com Small pieces may even be cooked still frozen, directly from the freezer: in this case, cooking will take longer. 3.5 Ice-cube production This appliance is equipped with one or more trays for the production of icecubes. Fill these trays with water, then put them in the freezer compartment. Do not use metallic instruments to remove the trays from the freezer. 3.
ENGLISH • clean the inside and accessories with lukewarm water and some neutral soap. • regularly check the door seals and wipe clean to ensure they are clean and free from debris. • rinse and dry thoroughly. Do not pull, move or damage any pipes and/or cables inside the cabinet. Never use detergents, abrasive powders, highly perfumed cleaning products or wax polishes to clean the interior as this will damage the surface and leave a strong odour.
www.electrolux.com Problem Possible cause Solution The appliance has no Connect a different electripower. There is no voltage cal appliance to the mains in the mains socket. socket. Contact a qualified electrician. The buzzer sounds. The Alarm light flashing. The temperature in the freezer is too high. Refer to "Excessive Temperature Alarm". The door is not closed correctly. Refer to "Door open alarm". The compressor op- The temperature is not set erates continually. correctly.
ENGLISH 11 Problem Possible cause Solution DEMO appears on the Display. The appliance is in demonstration mode (DEMO). Keep pressed approximately 10sec the Mode button since a long sound of buzzer is heard and the Display shut off for a short while: appliance start works regularly. 6.1 Closing the door 1. 2. 3. Clean the door gaskets. If necessary, adjust the door. Refer to "Installation". If necessary, replace the defective door gaskets. Contact the Service Center. 7. INSTALLATION 7.
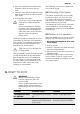
www.electrolux.com 7.3 Ventilation requirements 5 cm The airflow behind the appliance must be sufficient. min. 200 cm2 min. 200 cm2 7.4 Installing the appliance Do the following steps: CAUTION! Make sure that the mains cable can move freely. Apply the adhesive sealing strip to the appliance as shown in figure.
ENGLISH Install the appliance in the niche. Attach the appliance to the niche with 4 screws. Fix the covers on the screws. Do a final check to make sure that: • All screws are tightened.
www.electrolux.com • The sealing strip is attached tightly to the cabinet. • The door opens and closes correctly. 7.5 Assembly instructions for the compensator lower part of the door With the door open, loosen the two screws situated in the lower part without unscrewing them completely. Position the steel compensator as indicated in the figure and insert the upper part under the head of the screws. Align the compensator with the steel door panel and tighten the screws.
ENGLISH 8. NOISES There are some sounds during normal running (compressor, refrigerant circulation).
www.electrolux.com BLUBB! BLUBB! CRACK! CRACK! 9. TECHNICAL DATA Dimension of the recess Height 1780 mm Width 560 mm Depth 550 mm Rising Time 21 h Voltage 230-240 V Frequency 50 Hz The technical information are situated in the rating plate on the internal left side of the appliance and in the energy label. 10. ENVIRONMENT CONCERNS Recycle the materials with the symbol . Put the packaging in applicable and electronic appliances.
SUOMI 17 SISÄLLYS 1. 2. 3. 4. 5. 6. 7. 8. 9. TURVALLISUUSOHJEET . . . . . . . . . . . . . . . . . . . . . . . . . . . . . . . . . . . . . . . . . . . . . . . . . KÄYTTÖPANEELI . . . . . . . . . . . . . . . . . . . . . . . . . . . . . . . . . . . . . . . . . . . . . . . . . . . . . . . PÄIVITTÄINEN KÄYTTÖ . . . . . . . . . . . . . . . . . . . . . . . . . . . . . . . . . . . . . . . . . . . . . . . . . . HYÖDYLLISIÄ NEUVOJA JA VINKKEJÄ . . . . . . . . . . . . . . . . . . . . . . . . . . . . . . . . . . . .
www.electrolux.com 1. TURVALLISUUSOHJEET Lue tämä käyttöohje ja sen sisältämät neuvot sekä varoitukset huolellisesti ennen laitteen asentamista ja ensimmäistä käyttöä, jotta osaisit käyttää laitetta turvallisesti ja oikealla tavalla. Turhien virheiden ja onnettomuuksien välttämiseksi on tärkeää, että kaikki laitteen käyttäjät perehtyvät huolellisesti sen toimintaan ja turvallisuusominaisuuksiin.
SUOMI 1. 2. • • • • Virtajohtoa ei saa jatkaa. Varmista, että virtajohto ei joudu puristuksiin tai pääse vahingoittumaan laitteen takana. Litistynyt tai vahingoittunut virtajohto voi ylikuumentua ja aiheuttaa tulipalon. 3. Laitteen verkkovirtakytkennän on oltava hyvin ulottuvilla siten, että pistoke on helppo irrottaa pistorasiasta. 4. Älä vedä virtajohdosta pistoketta irrottaessasi. 5. Jos pistoke on löysästi kiinni virtajohdossa, älä kiinnitä sitä pistorasiaan.
www.electrolux.com töstäpoistossa ja hävittämisessä tulee noudattaa paikallisia jätehuoltomääräyksiä. Vältä vahingoittamasta jäähdytysyksikköä, erityisesti lämmönvaihtimen läheltä. Tässä laitteessa käytetyt, symbomerkityt materiaalit ovat lilla kierrätettäviä. 1.7 Ympäristönsuojelu Tämä laite ei sisällä otsonikerrosta tuhoavia kaasuja jäähdytyspiirissä eikä eristemateriaaleissa. Käytöstäpoistettua laitetta ei saa toimittaa tavallisen yhdyskuntajätteen keräykseen.
SUOMI 4. Jos DEMO tulee näkyviin näyttöön, laite on esitystilassa. Lue ohjeet kohdasta "Käyttöhäiriöt". 5. Lämpötilanäytöt näyttävät asetetun oletuslämpötilan. Jos haluat muuttaa lämpötila-asetusta, katso kohta "Lämpötilan säätäminen". 2.3 Laitteen kytkeminen pois toiminnasta Laite kytketään pois toiminnasta seuraavalla tavalla: 1. Paina ON/OFF-painiketta 3 sekunnin ajan. 2. Näyttö sammuu. 3. Katkaise laitteen virta irrottamalla laitteen pistoke pistorasiasta. 2.
www.electrolux.com 1. 2. 3. Paina mitä tahansa painiketta. Äänimerkki sammuu. Pakastimen lämpötilan merkkivalo näyttää korkeimman saavutetun lämpötilan muutaman sekunnin ajan. Tämän jälkeen näytössä näkyy uudelleen asetuslämpötila. 4. Hälytyksen merkkivalo palaa, kunnes normaalit olosuhteet palautuvat. Hälytyksen merkkivalo sammuu, kun hälytys on kuitattu. • vilkkuva hälytysmerkki • äänimerkki Kun olosuhteet ovat palautuneet normaaleiksi (ovi suljettu), äänimerkki sammuu.
SUOMI na: Kypsennys kestää tässä tapauksessa pitempään. 3.5 Jääkuutioiden valmistus 23 3.6 Kylmävaraajat Pakastimeen kuuluu vähintään yksi kylmävaraaja, joka pidentää kylmäsäilytysaikaa sähkökatkon tai toimintahäiriön sattuessa. Laitteen mukana toimitetaan yksi tai useampia jääkuutioastioita. Täytä jääkuutioastiat vedellä ja laita ne pakastinosastoon. Älä käytä apuna metallisia välineitä ottaessasi jääkuutioastiaa pois pakastimesta. 4. HYÖDYLLISIÄ NEUVOJA JA VINKKEJÄ 4.
www.electrolux.com • Puhdista sisäosa ja varusteet lämpimällä vedellä ja käsitiskiaineella. • Tarkista oven tiivisteet säännöllisesti ja pyyhi puhtaaksi. • Huuhtele ja kuivaa huolellisesti. Älä vedä, siirrä tai vahingoita kaapin sisällä olevia putkia ja/tai kaapeleita. Älä käytä puhdistusaineita, hankausjauhetta, voimakastuoksuisia puhdistustuotteita tai kiillotusvahaa sisätilojen puhdistamisessa, sillä tällaiset tuotteet vahingoittavat pintoja ja jättävät voimakkaan tuoksun.
SUOMI Ongelma Äänimerkki kuuluu. Hälytysmerkkivalo vilkkuu. Kompressori käy jatkuvasti. 25 Mahdollinen syy Korjaustoimenpide Laitteeseen ei tule virtaa. Pistorasiaan ei tule jännitettä. Kokeile kytkemällä pistorasiaan jokin toinen sähkölaite. Ota yhteys sähköasentajaan. Pakastimen lämpötila on liian korkea. Lue ohjeet kohdasta Korkean lämpötilan hälytys Ovi ei ole kunnolla kiinni. Lue ohjeet kohdasta "Ovihälytys". Lämpötilaa ei ole säädetty oikein. Säädä lämpötila korkeammaksi.
www.electrolux.com Ongelma Mahdollinen syy Korjaustoimenpide DEMO tulee näkyviin Laite on esitystilassa. (DEnäyttöön. MO). 6.1 Oven sulkeminen 1. 2. 3. Puhdista oven tiivisteet. Säädä ovea tarvittaessa. Lue ohjeet kohdasta "Asennus". Paina Mode-painiketta noin 10 sekunnin ajan, kunnes kuulet pitkän äänimerkin ja näyttö sammuu lyhyeksi ajaksi: laite käynnistyy ja toimii normaalisti. Vaihda tarvittaessa vaurioituneet oven tiivisteet. Ota yhteys valtuutettuun huoltoliikkeeseen. 7. ASENNUS 7.
SUOMI 27 7.3 Ilmanvaihtovaatimukset 5 cm Ilmanvaihdon on oltava riittävä laitteen takana. min. 200 cm2 min. 200 cm2 7.4 Laitteen asentaminen Suorita seuraavat toimenpiteet: HUOMIO Tarkista, että virtajohto pääsee liikkumaan vapaasti. Kiinnitä tarrakiinnitteinen tiivistelista laitteeseen kuvan mukaisesti.
www.electrolux.com Asenna laite aukkoon. Kiinnitä laite aukkoon neljällä ruuvilla. Kiinnitä ruuveihin vastaavat suojat. Tarkista lopuksi seuraavat seikat: • Kaikki ruuvit on kiristetty.
SUOMI • Tiivistelista on kiinnitetty tiukasti kaappiin. 29 • Ovi avautuu ja sulkeutuu kunnolla. 7.5 Oven alaosan listan asennusohjeet Pidä ovea auki ja löysää kahta oven alaosassa olevaa ruuvia. Älä kuitenkaan kierrä ruuveja kokonaan auki. Aseta teräksinen lista kuvan mukaisesti ja aseta sen yläosa ruuvien päiden alapuolelle. Kohdista lista teräksiseen ovipaneeliin ja kiristä ruuvit. Aseta terässuojus listan sisään kuvan osoittamalla tavalla.
www.electrolux.com 8. ÄÄNET Tietynlaiset äänet kuuluvat laitteen normaaliin toimintaan (kompressori, jäähdytysaineen kierto).
SUOMI BLUBB! BLUBB! CRACK! 31 CRACK! 9. TEKNISET TIEDOT Asennustilan mitat Korkeus 1780 mm Leveys 560 mm Syvyys 550 mm Käyttöönottoaika 21 h Jännite 230-240 V Taajuus 50 Hz Tekniset tiedot on merkitty laitteen sisälle, vasemmalle puolelle kiinnitettyyn arvokilpeen ja energiatarraan. 10. YMPÄRISTÖNSUOJELU Kierrätä materiaalit, jotka on merkitty . Kierrätä pakkaus laittamalla merkillä se asianmukaiseen kierrätysastiaan.
www.electrolux.com INDICE 1. 2. 3. 4. 5. 6. 7. 8. 9. ISTRUZIONI DI SICUREZZA . . . . . . . . . . . . . . . . . . . . . . . . . . . . . . . . . . . . . . . . . . . . . . . PANNELLO DEI COMANDI . . . . . . . . . . . . . . . . . . . . . . . . . . . . . . . . . . . . . . . . . . . . . . . . UTILIZZO QUOTIDIANO . . . . . . . . . . . . . . . . . . . . . . . . . . . . . . . . . . . . . . . . . . . . . . . . . . SUGGERIMENTI E CONSIGLI UTILI . . . . . . . . . . . . . . . . . . . . . . . . . . . . . . . . . . .
ITALIANO 1. 33 ISTRUZIONI DI SICUREZZA Per garantire un impiego corretto e sicuro dell'apparecchio, prima dell'installazione e del primo utilizzo leggere con attenzione il libretto istruzioni, inclusi i suggerimenti e le avvertenze. Per evitare errori e incidenti, è importante garantire che tutte le persone che utilizzano l'apparecchio ne conoscano il funzionamento e le caratteristiche di sicurezza.
www.electrolux.com AVVERTENZA! Tutti i componenti elettrici (cavo di alimentazione, spina, compressore) devono essere sostituiti da un tecnico certificato o da personale d'assistenza qualificato al fine di evitare di correre rischi. 1. • • • • Non collegare prolunghe al cavo di alimentazione. 2. Evitare che il lato posteriore dell'apparecchiatura possa schiacciare o danneggiare la spina, causandone il surriscaldamento con un conseguente rischio di incendio. 3.
ITALIANO una parete per evitare di toccare le parti calde o di rimanervi impigliati (compressore, condensatore), evitando così possibili scottature. • L'apparecchio non deve essere posto vicino a radiatori o piani di cottura a gas. • Installare l'apparecchio in modo che la presa rimanga accessibile. • Collegare solo a sorgenti d'acqua potabile (se è previsto un collegamento alla rete idrica). 35 1.
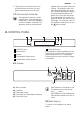
www.electrolux.com 2.1 Display A B C D E A) B) C) D) E) Spia allarme EcoMode ModalitàFastFreeze IndicatoreDrinksChill e temperatura ModalitàDrinksChil Dopo aver selezionato Mode o aver premuto il tasto della temperatura inizia l'animazione . Dopo aver selezionato la temperatura, l'animazione lampeggia per alcuni minuti. 2.2 Accensione Per accendere l'apparecchiatura procedere come segue: 1. Inserire la spina nella presa di alimentazione. 2. Premere il tasto ON/OFF se il display è spento. 3.
ITALIANO 2.6 ModalitàFastFreeze Per attivare la funzione: 1. Premere il tasto Mode finché non appare l'icona corrispondente. Questa funzione si interrompe in modo automatico dopo 52 ore. Per disattivare la funzione prima dello spegnimento automatico: 1. Premere il tasto Mode per selezionare un'altra funzione o annullare. La funzione si disattiva selezionando un'impostazione di temperatura per il congelatore diversa. 2.
www.electrolux.com 3. UTILIZZO QUOTIDIANO 3.1 Pulizia dell'interno tura per almeno 2 ore con una regolazione alta prima di introdurre gli alimenti. Prima di utilizzare l'apparecchiatura per la prima volta, lavare l'interno e gli accessori con acqua tiepida e sapone neutro per eliminare il tipico odore dei prodotti nuovi, quindi asciugare accuratamente.
ITALIANO • il processo di congelamento dura 24 ore.
www.electrolux.com Dopo la pulizia, ricollegare l'apparecchio alla rete di alimentazione. 5.2 Sbrinamento del vano congelatore Il vano congelatore in questo modello è di tipo "no frost", cioè non forma ghiaccio sulle pareti interne e sugli alimenti durante il funzionamento. L'assenza di ghiaccio è dovuta alla circolazione continua di aria fredda prodotta all'interno del vano da una ventola azionata automaticamente.
ITALIANO Problema Causa possibile 41 Soluzione Il compressore riLa temperatura non è immane sempre in fun- postata correttamente. zione. Impostare una temperatura superiore. La porta non è chiusa cor- Consultare la sezione rettamente. "Chiusura della porta". La porta viene aperta trop- Limitare il più possibile il po frequentemente. tempo di apertura della porta. La temperatura nel congelatore è troppo bassa. La temperatura degli alimenti è troppo alta.
www.electrolux.com 3. Se necessario, sostituire le guarnizioni della porta difettose. Contattare il Centro di assistenza locale. 7. INSTALLAZIONE 7.1 Luogo d'installazione AVVERTENZA! Qualora occorra ritirare dall'uso un apparecchio con serratura, si raccomanda di rendere quest'ultima inservibile per evitare che i bambini possano chiudersi all'interno. La spina dell'apparecchio deve essere accessibile dopo l'installazione.
ITALIANO 7.4 Installazione dell’apparecchiatura Seguire i seguenti passaggi: ATTENZIONE Accertarsi che il cavo di rete sia libero da ostacoli. Applicare la striscia sigillante adesiva all'apparecchiatura come mostrato in figura. Installare l'apparecchiatura nella nicchia.
www.electrolux.com Fissare l'apparecchiatura nella nicchia con 4 viti. Fissare i coprivite. Eseguire un controllo finale per accertarsi che: • Tutte le viti sono serrate. • Assicurarsi che la striscia sigillante sia fissata saldamente all'unità. • La porta si apra e si chiuda correttamente.
ITALIANO 45 7.5 Istruzioni per l'assemblaggio della parte inferiore della porta del compensatore Con la porta aperta, allentare le due viti situate nella parte inferiore senza svitarle completamente. Posizionare il compensatore in acciaio come indicato nella figura e inserire la parte superiore sotto la testa delle viti. Allineare il compensatore al pannello in acciaio della porta e serrare le viti. Inserire il carter in acciaio all'interno del compensatore come indicato nella figura. 8.
www.electrolux.
ITALIANO 47 9. DATI TECNICI Nicchia di incasso Altezza 1780 mm Larghezza 560 mm Profondità 550 mm Tempo di salita 21 h Tensione 230-240 V Frequenza 50 Hz I dati tecnici sono riportati sulla targhetta del modello, applicata sul lato sinistro in- terno dell'apparecchiatura, e sull'etichetta dei valori energetici. 10. CONSIDERAZIONI AMBIENTALI Riciclare i materiali con il simbolo . Buttare l'imballaggio negli appositi contenitori per il riciclaggio.
www.electrolux.com ÍNDICE 1. 2. 3. 4. 5. 6. 7. 8. 9. INSTRUÇÕES DE SEGURANÇA . . . . . . . . . . . . . . . . . . . . . . . . . . . . . . . . . . . . . . . . . . . . PAINEL DE CONTROLO . . . . . . . . . . . . . . . . . . . . . . . . . . . . . . . . . . . . . . . . . . . . . . . . . . UTILIZAÇÃO DIÁRIA . . . . . . . . . . . . . . . . . . . . . . . . . . . . . . . . . . . . . . . . . . . . . . . . . . . . . SUGESTÕES E DICAS ÚTEIS . . . . . . . . . . . . . . . . . . . . . . . . . . . . . . . . . . . . . .
PORTUGUÊS 1. 49 INSTRUÇÕES DE SEGURANÇA Para a sua própria segurança e para garantir uma utilização correcta, antes de instalar e usar o aparelho pela primeira vez, leia atentamente este manual do utilizador, incluindo as suas sugestões e advertências. Para evitar erros e acidentes desnecessários, é importante que todas as pessoas que utilizam o aparelho conheçam o seu funcionamento e as características de segurança.
www.electrolux.com ma. Quaisquer danos no cabo poderão provocar um curto-circuito, incêndio e/ ou choque eléctrico. ADVERTÊNCIA A substituição de qualquer componente eléctrico (cabo de alimentação, ficha, compressor) tem de ser efectuada por um agente de assistência certificado ou por pessoal técnico qualificado, para evitar perigos. 1. • • • • Não é permitido prolongar o cabo de alimentação com extensões. 2. Certifique-se de que a ficha não fica esmagada ou danificada pela parte de trás do aparelho.
PORTUGUÊS • Sempre que possível, a traseira do aparelho deve ficar virada para uma parede para evitar toques nas partes quentes (compressor, condensador) e possíveis queimaduras. • Não coloque o aparelho perto de radiadores ou fogões. • Certifique-se de que a ficha de alimentação fica acessível após a instalação do aparelho. • Ligue apenas a uma fonte de água potável (se a ligação de água estiver prevista). 51 cia autorizado, o qual deverá utilizar apenas peças sobressalentes originais. 1.
www.electrolux.com 2.1 Display A B C D E A) B) C) D) E) Indicador de alarme EcoMode Modo FastFreeze DrinksChill e indicador de temperatura Modo DrinksChil Após a selecção do botão do Mode ou da temperatura, iniciam as animações . Após a selecção da temperatura, as animações ficam intermitentes por alguns minutos. 2.2 Ligar Para ligar o aparelho, efectue os seguintes passos: 1. Ligue a ficha do aparelho à tomada. 2. Prima o botão ON/OFF se o display estiver desligado. 3.
PORTUGUÊS 1. Prima o botão Mode até aparecer o ícone correspondente. Esta função pára automaticamente após 52 horas. Para desactivar a função antes do seu fim automático: 1. Prima o botão Mode para seleccionar outra função ou nenhuma. A função é desligada se for seleccionada uma temperatura diferente para o congelador. 2.
www.electrolux.com 3. UTILIZAÇÃO DIÁRIA 3.1 Limpeza do interior Antes de utilizar o aparelho pela primeira vez, limpe o interior e todos os acessórios com água morna e detergente neutro, para remover o cheiro típico de um produto novo, e seque minuciosamente. Não utilize detergentes ou pós abrasivos, pois estes produtos danificam o acabamento. Se o visor indicar DEMO, o aparelho está em modo de demonstração: consulte o parágrafo "O QUE FAZER SE...". 3.
PORTUGUÊS 55 4. SUGESTÕES E DICAS ÚTEIS 4.1 Conselhos para a congelação Para o ajudar a tirar partido do processo de congelação, eis alguns conselhos importantes: • a quantidade máxima de alimentos que pode ser congelada em 24h. está mostrada na placa de dados; • O processo de congelamento demora 24 horas.
www.electrolux.com Não puxe, desloque nem danifique quaisquer tubos e/ou cabos dentro do armário. Nunca utilize detergentes, pós abrasivos, produtos de limpeza muito perfumados ou cera de polir para limpar o interior, pois isto irá danificar a superfície e deixar um odor forte. Limpe o condensador (grelha preta) e o compressor que está no fundo do aparelho, com uma escova. Esta operação irá melhorar o desempenho do aparelho e poupar consumo de electricidade.
PORTUGUÊS Problema Causa possível 57 Solução O aparelho não tem aliLigue um aparelho eléctrico mentação. Não existe cor- diferente à tomada. rente na tomada. Contacte um electricista qualificado. É emitido o alarme sonoro. A luz de alarme pisca. O compressor funciona continuamente. A temperatura no congelador está demasiado baixa. A temperatura no congela- Consulte "Alarme de temdor está demasiado eleva- peratura excessiva". da. A porta não está correctamente fechada.
www.electrolux.com Problema Causa possível Solução O quadrado superior Ocorreu um erro na mediou inferior é apreção da temperatura sentado no display da temperatura. DEMO aparece no display. O aparelho está no modo Mantenha o botão Mode de demonstração (DEMO). premido durante 10 segundos a partir do momento em que ouvir um sinal sonoro longo e o display se apagar por um breve momento: o aparelho começa a funcionar normalmente. 6.1 Fechar a porta 1. 2.
PORTUGUÊS 7.3 Requisitos de ventilação 5 cm A circulação de ar na parte posterior do aparelho tem de ser suficiente. min. 200 cm2 min. 200 cm2 7.4 Instalar o aparelho Execute os seguintes passos: CUIDADO Certifique-se de que o cabo de alimentação não fica preso. Aplique a tira adesiva vedante no aparelho, tal como indicado na figura.
www.electrolux.com Instale o aparelho no nicho. Fixe o aparelho no nicho com 4 parafusos. Fixe as tampas nos parafusos.
PORTUGUÊS Faça uma verificação final para garantir que: • Todos os parafusos estão apertados. 61 • A tira vedante está bem fixada no armário. • A porta abre e fecha correctamente. 7.5 Instruções de montagem do compensador na parte inferior da porta Com a porta aberta, desaperte os dois parafusos localizados na parte inferior sem os desapertar totalmente. Posicione o compensador em aço conforme indicado na figura e introduza a parte superior debaixo da cabeça dos parafusos.
www.electrolux.com 8. RUÍDOS Existem alguns ruídos durante o funcionamento normal (compressor, circulação do refrigerante).
PORTUGUÊS BLUBB! CRACK! BLUBB! 63 CRACK! 9. DADOS TÉCNICOS Dimensão do nicho de instalação Altura 1780 mm Largura 560 mm Profundidade 550 mm Tempo de reinício 21 h Tensão 230-240 V Frequência As informações técnicas encontram-se na placa de características no lado esquerdo 50 Hz interno do aparelho e na etiqueta de energia. 10. PREOCUPAÇÕES AMBIENTAIS Recicle os materiais que apresentem o .
www.electrolux.com ÍNDICE DE MATERIAS 1. 2. 3. 4. 5. 6. 7. 8. 9. INSTRUCCIONES DE SEGURIDAD . . . . . . . . . . . . . . . . . . . . . . . . . . . . . . . . . . . . . . . . . . PANEL DE MANDOS . . . . . . . . . . . . . . . . . . . . . . . . . . . . . . . . . . . . . . . . . . . . . . . . . . . . USO DIARIO . . . . . . . . . . . . . . . . . . . . . . . . . . . . . . . . . . . . . . . . . . . . . . . . . . . . . . . . . . . CONSEJOS Y SUGERENCIAS ÚTILES . . . . . . . . . . . . . . . . . . . . . . . . . .
ESPAÑOL 1. 65 INSTRUCCIONES DE SEGURIDAD Por su seguridad y para garantizar el funcionamiento correcto del aparato, antes de instalarlo y utilizarlo por primera vez lea atentamente este manual del usuario, incluidos los consejos y advertencias. Para evitar errores y accidentes, es importante que todas las personas que utilicen el aparato estén perfectamente al tanto de su funcionamiento y de las características de seguridad.
www.electrolux.com cuito, un incendio o una descarga eléctrica. ADVERTENCIA Los componentes eléctricos (cable de alimentación, enchufe, compresor) debe sustituirlos un técnico autorizado o personal de reparaciones profesional a fin de evitar riesgos. 1. • • • • El cable de alimentación no se debe prolongar. 2. Compruebe que la parte posterior del aparato no aplaste ni dañe el enchufe. Un enchufe aplastado o dañado puede recalentarse y provocar un incendio. 3.
ESPAÑOL las partes calientes (compresor, condensador) y se produzcan quemaduras. • El aparato no debe colocarse cerca de radiadores ni de hornillas de cocina. • Asegúrese de que es posible acceder al enchufe después de instalar el electrodoméstico. • Realice la conexión sólo a un suministro de agua potable (si está prevista una conexión de agua). 67 1.
www.electrolux.com A) B) C) D) E) Indicador de alarma EcoMode Modo FastFreeze DrinksChill e indicador de temperatura Modo DrinksChil Después de seleccionar la tecla de Mode o de temperatura, se ini. cian las animaciones Tras seleccionar la temperatura, la animación parpadea durante unos minutos. 2.2 Encendido Para encender el aparato siga los siguientes pasos: 1. Conecte el enchufe a la toma de corriente. 2. Pulse la tecla ON/OFF si la pantalla está apagada. 3.
ESPAÑOL Aparece el indicador DrinksChill. El temporizador muestra el valor ajustado (30 minutos). 2. Pulse la tecla de enfriamiento o calentamiento de temperatura para cambiar el valor del temporizador entre 1 y 90 minutos. 3. El Temporizador empieza a parpadear (min). Al terminar la cuenta atrás, el indicador DrinksChill parpadea y suena la alarma: 1. Saque todas las bebidas del compartimento congelador. 2. Pulse la tecla DrinkChill para apagar el sonido y desactivar la función.
www.electrolux.com El proceso de congelación dura 24 horas: durante ese periodo no deben añadirse otros alimentos para congelación. Al cabo de 24 horas, cuando haya finalizado el proceso de congelación, vuelva a ajustar la temperatura adecuada (consulte "Regulación de la temperatura"). congelar en el compartimento frigorífico o a temperatura ambiente, dependiendo del tiempo de que se disponga.
ESPAÑOL po de almacenamiento de los alimentos; • el hielo, si se consume inmediatamente después de retirarlo del compartimento congelador, puede provocar quemaduras por congelación en la piel; • es recomendable etiquetar cada paquete con la fecha de congelación para controlar el tiempo que permanecen almacenados. 4.
www.electrolux.com 5.3 Periodos sin funcionamiento Si el aparato no se utiliza durante un tiempo prolongado, tome las siguientes precauciones: • desconecte el aparato de la red eléctrica; • extraiga todos los alimentos; • descongele (si así está previsto) y limpie el aparato y todos sus accesorios. • deje la puerta(s) entreabierta para prevenir olores desagradables.
ESPAÑOL Problema La temperatura del congelador es demasiado baja. Posible causa Solución La temperatura de los alimentos es demasiado alta. Deje que la temperatura de los alimentos descienda a la temperatura ambiente antes de guardarlos. La temperatura ambiente es demasiado alta. Reduzca la temperatura ambiente. El modo FastFreeze está activado. Consulte "Modo FastFreeze ". El regulador de temperatu- Seleccione una temperatura no se ha ajustado cora más alta. rrectamente.
www.electrolux.com 7. INSTALACIÓN 7.1 Colocación ADVERTENCIA Si va a desechar un aparato antiguo que tiene una cerradura o cierre en la puerta, deberá asegurarse de su inutilización para impedir que niños pequeños queden atrapados en su interior. El enchufe del aparato debe tener fácil acceso después de la instalación.
ESPAÑOL 75 Aplique la cinta selladora adhesiva al aparato como se muestra en la figura. Instale el aparato en el hueco. Fije el aparato al hueco con cuatro tornillos.
www.electrolux.com Fije las tapas a los tornillos. Finalmente, compruebe que: • Todos los tornillos están apretados. • La cinta selladora se ha fijado con firmeza al armario. • La puerta abre y cierra correctamente. 7.5 Instrucciones de montaje de la parte inferior del compensador de la puerta Con la puerta abierta, afloje los dos tornillos situados en la parte inferior sin desatornillarlos completamente.
ESPAÑOL 77 Alinee el compensador con el panel de la puerta de acero y apriete los tornillos. Inserte el cárter de acero en el interior del compensador como se indica en la figura. 8. RUIDOS Durante el funcionamiento normal del aparato suelen producirse ciertos ruidos (compresor, circulación del refrigerante).
www.electrolux.
ESPAÑOL 79 9. DATOS TÉCNICOS Medidas de la cavidad Altura 1780 mm Anchura 560 mm Profundidad 550 mm Tiempo de estabilización 21 h Voltaje 230-240 V Frecuencia 50 Hz La información técnica se encuentra en la placa de características, situada en el la- do interior izquierdo del aparato, y en la etiqueta de consumo energético. 10. ASPECTOS MEDIOAMBIENTALES Recicle los materiales con el símbolo Coloque el material de embalaje en los contenedores adecuados para su reciclaje.
222359103-A-062013 www.electrolux.