EVY9841AA EVY9841AO ................................................ .............................................
www.electrolux.com CONTENTS 1. 2. 3. 4. 5. 6. 7. 8. 9. 10. 11. 12. 13. 14. SAFETY INFORMATION . . . . . . . . . . . . . . . . . . . . . . . . . . . . . . . . . . . . . . . . . . . . . . . . . . . 3 SAFETY INSTRUCTIONS . . . . . . . . . . . . . . . . . . . . . . . . . . . . . . . . . . . . . . . . . . . . . . . . . . 4 PRODUCT DESCRIPTION . . . . . . . . . . . . . . . . . . . . . . . . . . . . . . . . . . . . . . . . . . . . . . . . . 6 BEFORE FIRST USE . . . . . . . . . . . . . . . . . . . . . . . . .
ENGLISH 3 1. SAFETY INFORMATION Before the installation and use of the appliance, carefully read the supplied instructions. The manufacturer is not responsible if an incorrect installation and use causes injuries and damages. Always keep the instructions with the appliance for future reference. 1.1 Children and vulnerable people safety WARNING! Risk of suffocation, injury or permanent disability.
www.electrolux.com • Do not use harsh abrasive cleaners or sharp metal scrapers to clean the glass door since they can scratch the surface, which may result in shattering of the glass. • Only use the core temperature sensor recommended for this appliance. • To remove the shelf supports first pull the front of the shelf support and then the rear end away from the side walls. Install the shelf supports in the opposite sequence.
ENGLISH • Connect the mains plug to the mains socket only at the end of the installation. Make sure that there is access to the mains plug after the installation. • If the mains socket is loose, do not connect the mains plug. • Do not pull the mains cable to disconnect the appliance. Always pull the mains plug. • Use only correct isolation devices: line protecting cut-outs, fuses (screw type fuses removed from the holder), earth leakage trips and contactors.
www.electrolux.com • Clean regularly the appliance to prevent the deterioration of the surface material. • Remaining fat or food in the appliance can cause fire. • Clean the appliance with a moist soft cloth. Only use neutral detergents. Do not use abrasive products, abrasive cleaning pads, solvents or metal objects. • If you use an oven spray, obey the safety instructions on the packaging. • Do not clean the catalytic enamel (if applicable) with any kind of detergent. 2.
ENGLISH 7 Baking tray For cakes and biscuits. Grill- / Roasting pan To bake and roast or as a pan to collect fat. Core temperature sensor To measure how far the food is cooked. Steam set One unperforated and one perforated food container. The steam set drains the condensing water away from the food during steam cooking. Use it to prepare food that should not be in the water during the cooking (e.g. vegetables, pieces of fish, chicken breast).
www.electrolux.com set the language, the display contrast, the display brightness and the time of the or to set the value. day. Press Press OK to confirm. 4.1 Initial Cleaning • Remove all parts from the appliance. • Clean the appliance before first use. Refer to chapter "Care and Cleaning". 4.2 First Connection When you connect the appliance to the mains or after the power cut, you have to 5.
ENGLISH Number Sensor field Function 6 Up key 7 Down key Comment To move up in the menu. To move down in the menu. Time and additional functions 8 9 Minute Minder 10 OK 11 Display A B C E D To set different functions. When a heating function operates, touch the sensor field to set the timer, Function Lock , Favourite Programme memory, Heat + Hold , Set + Go , or to change the settings of the Core Temperature Sensor. To set the Minute Minder . To confirm the selection or setting.
www.electrolux.com 6. DAILY USE WARNING! Refer to the Safety chapters. 6.1 Navigating the menus 1. 2. Activate the appliance. Press option. or 3. Press OK to move to the submenu or accept the setting. At each point you can go back to the main menu with . to select the menu 6.2 The menus in overview Main menu Symbol Menu item Description Heating Functions Contains a list of heating functions. Assisted Cooking Contains a list of automatic cooking programmes.
ENGLISH Symbol 11 Submenu Application Buzzer Volume Adjusts the volume of press-tones and signals by degrees. Key Tones Activates and deactivates the tone of the touch fields. It is not possible to deactivate the tone of the ON / OFF touch field. Alarm/Error Tones Activates and deactivates the alarm tones. Service Shows the software version and configuration. Factory Settings Resets all settings to factory settings. 6.
www.electrolux.com Heating function Application Frozen Foods To make your convenience food like e.g. French Fries, Wedges, spring rolls crispy. Grilling To grill flat food items. To toast bread. Fast Grilling To grill flat food in large quantities. To toast bread. Turbo Grilling To roast larger meat joints or poultry with bones on one shelf position. Also to gratinate and to brown. Conventional Cooking To bake and roast on 1 shelf position.
ENGLISH 3. 4. Set a heating function. Press OK to confirm. Set the temperature. Press OK to confirm. Press to go directly to the Heating Functions menu. You can use it when the appliance is activated. 6.5 Steam cooking The water drawer cover is in the control panel. 1. 2. Press the cover to open the water drawer. Fill the water drawer with 700 ml of water. The water supply is sufficient for approximately 30 minutes. CAUTION! Do not put water directly into the steam generator! 3. 4. 5. 6.
www.electrolux.com 7. CLOCK FUNCTIONS Symbol Function Description Minute Minder To set a countdown (max. 2 h 30 min). This function has no effect on the operation of the appliance. You can also activate it when the appliance is deactivato activate the function. Press or ted. Use to set the minutes and OK to start. Duration To set how long the appliance has to be in operation (max. 23 h 59 min). End Time To set the switch-off time for a heating function (max. 23 h 59 min).
ENGLISH 3. Press to activate (or to cancel). 4. 15 Set the Extra Time period. Press OK to confirm. 8. AUTOMATIC PROGRAMMES WARNING! Refer to the Safety chapters. CT Sensor Automatic dishes Boned Poultry 8.1 Automatic programmes These 3 automatic programmes give optimum settings for each type of meat or other recipes: • Meat programmes with Weight Automatic ( Assisted Cooking menu) — This function automatically calculates the roasting time. To use it you need to input food weight.
www.electrolux.com 4. Select the Weight Automatic . Press OK to confirm. 5. Touch or to set the food weight. Press OK to confirm. The automatic programme starts. You can change the weight at any time. Press or to change the weight. When the time ends, an acoustic signal sounds. Press a sensor field to deactivate the signal. With some programmes turn over the food after 30 minutes. The display shows a reminder. 9. USING THE ACCESSORIES WARNING! Refer to the Safety chapters.
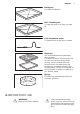
ENGLISH 17 9.2 Installing the accessories Deep Pan: Push the deep pan between the guide bars of the shelf support. Wire shelf: Put the shelf in and make sure the feet point down. Push the shelf between the guide bars of the shelf support. Wire shelf and deep pan together: Put the wire shelf on the deep pan. Push the deep pan between the guide bars of the shelf support. All accessories have a small indentation at the bottom on the right and left edge to increase the safety.
www.electrolux.com 10. ADDITIONAL FUNCTIONS 10.1 Favourite Programme menu You can save your favourite settings, like duration, temperature or heating function. They are available in the Favourite Programme menu. You can save 20 programmes. Saving a programme 1. Activate the appliance. 2. Set a heating function or an Assisted Cooking function. 3. 4. 5. Touch again and again until the display shows " SAVE ". Press OK to confirm. The display shows the first free memory position. Press OK to confirm.
ENGLISH • When the heating function operates, the function Function Lock is on. • You can activate and deactivate the SET + GO function in the Basic Settings menu. 19 • If a heating function operates. • If you do not change the oven temperature. 10.5 Automatic switch-off For safety reasons the appliance deactivates after some time: Temperature Switch-off time 30 °C - 115 °C 12.5 h 120 °C - 195 °C 8.5 h 200 °C - 230 °C 5.
www.electrolux.com 11.3 Cooking with steam Cookware for steam cooking • Use only heat and corrosion resistant cookware. Chrome steel food containers are correct too (see special accessories). Oven levels • There are the correct oven levels in the table below. Count the oven levels from the bottom to the top. General notes • When you cook longer than 30 minutes or when you cook large quantities of food, add water if it is necessary. • Put the food in the correct cooking containers on the shelves.
ENGLISH • Put the clean containers in the middle of the shelf on the 1st level. Make sure that the opening faces down at a small angle. 21 • Fill the drawer with the maximum amount of water and set a time of 40 min. Vegetables Temperature ºC Water amount in ml Time1) in min.
www.electrolux.com Temperature ºC Water amount in ml Time1) in min. Shelf position White haricot beans 96 500 25 - 35 1 Savoy cabbage 96 400 20 - 25 1 Courgette, slices 96 350 15 1 Temperature ºC Water amount in ml Time1) in min. Shelf position Yeast dumplings 96 600 30 - 40 1 Potato dumplings 96 600 35 - 45 1 Unpeeled potatoes, medium 96 750 45 - 55 1 Rice (water / rice ratio 1.
ENGLISH Food Temperature ºC Water amount in ml Time1) in min. Shelf position Salmon trout, approx. 1000 g 85 600 40 - 45 1 Mussels 96 500 20 - 30 1 Flat fish filet 80 350 15 1 Temperature ºC Water amount in ml Time1) in min.
www.electrolux.com 11.7 Half Steam + Heat Cooking Table Half Steam + Heat (water amount about 300 ml) Type of Food Temperature ºC Time in min.
ENGLISH 25 Quarter Steam + Heat (water amount about 300 ml) Type of Food Quantity Temperature ºC Time1) in min. Shelf position Misc. types of bread 0,5 - 1 kg 180 - 190 45 - 60 1 Rolls 40 - 60 g 180 - 210 30 - 40 2 Ready-to-bake rolls - 200 20 - 30 2 Ready-to-bake baguettes 40 - 50 g 200 20 - 30 2 Ready-to-bake baguettes frozen 40 - 50 g, 200 25 - 35 2 1) The times are for guidance only. 11.
www.electrolux.com Baking results Possible cause Remedy The cake is too dry. The oven temperature is too low. The next time you bake, set a higher oven temperature. The cake is too dry. The baking time is too long. The next time you bake, set a shorter baking time. The cake browns unevenly. The oven temperature is too high and the baking time is too short. Set a lower oven temperature and a longer baking time. The cake browns unevenly. The mixture is unevenly distributed.
ENGLISH Type of baking 27 Oven function Shelf position Temperature (°C) Time (min) Apple pie / Apple pie (2 tins Ø 20 cm, diagonally off set) True Fan Cooking 2 160 70 - 90 Apple pie / Apple pie (2 tins Ø 20 cm, diagonally off set) Convectional Cooking 1 180 70 - 90 Cheesecake, tray 2) Convectional Cooking 2 160 - 170 70 - 90 1) Preheat the oven. 2) Use the deep pan.
www.electrolux.com Type of baking Oven function Shelf position Temperature (°C) Time (min) Yeast cakes with delicate toppings (e.g.
ENGLISH Type of Food 29 Temperature (°C) Time (min) Shelf position Plaited bread / bread crown 170 - 190 40 - 50 1 Cake with crumble topping (dry) 160 - 170 20 - 40 2 Biscuits made with yeast dough 160 - 170 20 - 40 2 11.
www.electrolux.com Slow Cook table Food to be cooked Weight Temperature (°C) Shelf position Time (min) Roast beef 1 - 1,5 kg 150 1 120 - 150 Fillet of beef 1 - 1,5 kg 150 1 90 - 110 1 - 1,5 kg 150 1 120 - 150 200 - 300 g 120 1 20 - 40 Roast veal Steak 11.
ENGLISH • Roast lean meats in the roasting tin with the lid. This keeps the meat more succulent. • All types of meat that can be browned or have crackling can be roasted in the roasting tin without the lid. • We recommend that you cook meat and fish weighing 1 kg and above in the oven. • To prevent the meat juices or fat from burning onto the pan, put some liquid into the deep pan. 31 • If necessary, turn the roast (after 1 / 2 2 / 3 of the cooking time).
www.electrolux.com Veal Type of meat Quantity Oven function Shelf position Temperature °C Time (min) Roast veal 1 kg Turbo Grilling 1 160 - 180 150 - 120 Knuckle of veal 1.5 - 2 kg Turbo Grilling 1 160 - 180 120 - 150 Quantity Oven function Shelf position Temperature (°C) Time (min) Leg of lamb, roast lamb 1 - 1.5 kg Turbo Grilling 1 150 - 180 100 - 120 Saddle of lamb 1 - 1.
ENGLISH 33 Fish (steamed) Type of meat Whole fish Quantity Oven function Shelf position Temperature (°C) Time (min) 1 - 1.5 kg Conventional Cooking 1 210 - 220 45 - 60 • Set the shelf in the shelf level as recommended in the grilling table. • Always set the pan to collect the fat into the first shelf level. • Grill only flat pieces of meat or fish. 11.16 Grilling Always grill with the maximum temperature setting. CAUTION! Always grill with the oven door closed.
www.electrolux.com • Use the first shelf position. The one on the bottom. 11.17 Convenience food • Remove the food packaging. Put the food on a plate. • Do not cover it with a bowl or a plate. This can extend the defrost time.
ENGLISH 35 • Use the first oven shelf level. The one on the bottom. 11.18 Defrosting • Remove the food packaging. Put the food on a plate. • Do not cover it with a bowl or a plate. This can extend the defrost time. Defrosting table Food Quantity Defrosting Further time in defrosting min time in min Comment Chicken 1 kg 100 - 140 20 - 30 Put the chicken on an upturned saucer in a big plate.
www.electrolux.
ENGLISH Type of baking Oven function Shelf position Temperature °C Time in min All Grain bread Bread Baking 1 170 - 190 60 - 90 11.
www.electrolux.com Fish Food to be Cooked Food Core Temperature Salmon 65 - 70 °C Trouts 65 - 70 °C 12. CARE AND CLEANING WARNING! Refer to the Safety chapters. Notes on cleaning: • Clean the front of the appliance with a soft cloth with warm water and a cleaning agent. • To clean metal surfaces, use a usual cleaning agent. • Clean the appliance interior after each use. Then you can remove dirt more easily and it does not burn on. • Clean stubborn dirt with a special oven cleaner.
ENGLISH 39 2. Lightly move the support on the front catch inwards. 3. Pull the support out of the rear catch. Installing the shelf support 4. To install the shelf support follow the procedure in the opposite order. 5. Remove the water from the steam generator with the sponge and rub it dry. Keep the door open to let the appliance dry fully. 12.3 Steam generation system CAUTION! Dry the steam generator after each use. Remove the water with the sponge. Remove the limescale with water and vinegar.
www.electrolux.com 4. 5. Attach the metal ring to the glass cover. Install the glass cover. Replacing the lamp on the left side of the cavity: 1. Remove the left shelf support. 2. Use a Torx 20 screwdriver to remove the cover. 3. 4. 5. 6. Remove and clean the metal frame and the seal. Replace the lamp with a suitable 300 °C heat-resistant lamp. Install the metal frame and the seal. Tighten the screws. Install the left shelf support. 12.
ENGLISH 41 the above steps in the opposite sequence. Install the smaller panel first, then the larger. Installing the door and the glass panels When the cleaning is completed, install the glass panels and the oven door. Do 13. WHAT TO DO IF… WARNING! Refer to the Safety chapters. Problem Possible cause Remedy The appliance does not heat up. The appliance is deactivated. Activate the appliance. The appliance does not heat up. The clock is not set. Set the clock. The appliance does not heat up.
www.electrolux.com 15. ENVIRONMENT CONCERNS Recycle the materials with the symbol . Put the packaging in applicable and electronic appliances. Do not dispose appliances marked with the symbol containers to recycle it. Help protect the environment and human health and to recycle waste of electrical with the household waste. Return the product to your local recycling facility or contact your municipal office.
ENGLISH 43
892961251-A-212013 www.electrolux.