Electrolux Cooking Steam oven EVYP9841AX
www.electrolux.com CONTENTS 1. SAFETY INFORMATION...................................................................................... 3 2. SAFETY INSTRUCTIONS.....................................................................................4 3. PRODUCT DESCRIPTION................................................................................... 6 4. CONTROL PANEL............................................................................................... 7 5. BEFORE FIRST USE....................
ENGLISH 1. 3 SAFETY INFORMATION Before the installation and use of the appliance, carefully read the supplied instructions. The manufacturer is not responsible for any injuries or damages that are the result of incorrect installation or usage. Always keep the instructions in a safe and accessible location for future reference. 1.
www.electrolux.com • • • • • • • Before maintenance cut the power supply. Ensure that the appliance is switched off before replacing the lamp to avoid the possibility of electric shock. Do not use a steam cleaner to clean the appliance. Do not use harsh abrasive cleaners or sharp metal scrapers to clean the glass door since they can scratch the surface, which may result in shattering of the glass.
ENGLISH • Do not let mains cables touch or come near the appliance door, especially when the door is hot. • The shock protection of live and insulated parts must be fastened in such a way that it cannot be removed without tools. • Connect the mains plug to the mains socket only at the end of the installation. Make sure that there is access to the mains plug after the installation. • If the mains socket is loose, do not connect the mains plug. • Do not pull the mains cable to disconnect the appliance.
www.electrolux.com 2.4 Steam Cooking • If you use an oven spray, obey the safety instructions on the packaging. • Do not clean the catalytic enamel (if applicable) with any kind of detergent. WARNING! Risk of burns and damage to the appliance. • Released Steam can cause burns: – Do not open the appliance door during the steam cooking operation. – Open the appliance door with care after the steam cooking operation. 2.
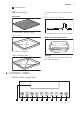
ENGLISH 10 Shelf positions 3.2 Accessories To bake and roast or as a pan to collect fat. Wire shelf Core temperature sensor For cookware, cake tins, roasts. To measure how far the food is cooked. Baking tray Glass dish with 2 grill inserts For cakes and biscuits. Grill- / Roasting pan Sponge For absorbing the remaining water from the steam generator. 4. CONTROL PANEL 4.
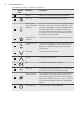
www.electrolux.com Use the sensor fields to operate the appliance. Sensor field 1 2 3 4 5 6 7 8 9 - Function Comment Display Shows the current settings of the appliance. ON / OFF To activate and deactivate the appliance. Heating Functions or Assisted Cooking Touch the sensor field once to choose a heating function or the menu: Assisted Cooking. Touch the sensor field again to switch between the menus: Heating Functions, Assisted Cooking.
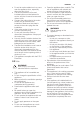
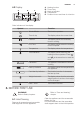
ENGLISH 4.2 Display A B C E D A. B. C. D. E. 9 Heating function Time of day Heat-up indicator Temperature Duration time or end time of a function Other indicators of the display: Symbol Function Minute Minder The function operates. Time of day The display shows the current time. Duration The display shows the necessary time for cooking. End Time The display shows when the cooking time is complete. Temperature The display shows the temperature.
www.electrolux.com 5.2 First Connection 1. Press or When you connect the appliance to the mains or after the power cut, you have to set the language, the display contrast, the display brightness and the time of the day. 2. Press to confirm. to set the value. 6. DAILY USE WARNING! Refer to Safety chapters. 3. Press to move to the submenu or accept the setting. At each point you can go back to the main menu with 6.1 Navigating the menus . 1. Activate the appliance. 2. Press option.
ENGLISH Symbol 11 Submenu Description Display Contrast Adjusts the display contrast by degrees. Display Brightness Adjusts the display brightness by degrees. Set Language Sets the language for the display. Buzzer Volume Adjusts the volume of press-tones and signals by degrees. Key Tones Activates and deactivates the tone of the touch fields. It is not possible to deactivate the tone of the ON / OFF touch field. Alarm/Error Tones Activates and deactivates the alarm tones.
www.electrolux.com Heating function Application Conventional Cooking To bake and roast food on one shelf position. Grilling To grill flat food and to toast bread. Fast Grilling To grill flat food in large quantities and to toast bread. Turbo Grilling To roast larger meat joints or poultry with bones on one shelf position. Also to make gratins and to brown. Bottom Heat To bake cakes with crispy bottom and to preserve food. Slow Cooking To prepare tender, succulent roasts.
ENGLISH Heating function Application Au Gratin For dishes such as lasagna or potato gratin. Also to gratinate and brown. Dough Proving For controlled rising of yeast dough before baking. Plate Warming To preheat plates for serving. Preserving To make vegetable preserves such as pickles. Keep Warm To keep food warm. Defrost This function can be used for defrosting frozen foods, such as vegetables and fruits. The defrosting time depends on the amount and size of the frozen food.
www.electrolux.com sounds 3 times and the bar flashes and then disappears. CAUTION! The appliance is hot. There is a risk of burns. Be careful when you empty the water tank. When the appliance cools down, soak up all remaining water from the steam generator with the sponge. If necessary, clean the steam generator with some vinegar. Let the appliance dry fully with the door open. 6.9 Fast Heat Up Indicator This function decreases the heat-up time.
ENGLISH 7.2 Setting the clock functions Before you use the functions: Duration, End Time, you must set a heating function and temperature first. The appliance deactivates automatically. You can use the functions: Duration and End Time at the same time if you want to automatically activate and deactivate the appliance on a given time later. The functions: Duration and End Time do not work when you use the core temperature sensor.
www.electrolux.com 8.2 Assisted Cooking with Weight Automatic This function automatically calculates the roasting time. To use it, it is necessary to input the food weight. 1. Activate the appliance. 2. Select the menu: Assisted Cooking. to confirm. Press 3. Select the category and dish. Press to confirm. 4. Select the function: Weight Automatic. Press 5. Touch The automatic programme starts. 6. You can change the weight at any time. Press or to change the weight. 7.
ENGLISH 8. Remove the core temperature sensor plug from the socket and remove the meat from the oven. 17 Push the deep pan between the guide bars of the shelf support. WARNING! The core temperature sensor is hot. There is a risk of burns. Be careful when you remove the tip and the plug of the core temperature sensor. 9.2 Inserting the accessories CAUTION! Do not use the baking tray or deep pan with the Full Steam function.
www.electrolux.com 9. Do step 7 again as necessary. 10. Press and hold to save. You can overwrite a memory position. When the display shows the first free memory position, touch or and press to overwrite an existing programme. You can change the name of a programme in the menu: Edit Programme Name. 1. Activate the appliance. 2. Select the menu: Favourite Programme. 6. Press to confirm. 10.2 Using the Child Lock When the Child Lock is on, the appliance cannot be activated accidentally.
ENGLISH 10.6 Brightness of the display There are two modes of display brightness: • Night brightness - when the appliance is deactivated, the brightness of the display is lower between 10 PM and 6 AM. • Day brightness: – when the appliance is activated. – if you touch a symbol during the night brightness (apart from ON / OFF), the display goes back to the day brightness mode for the next 10 seconds. 19 – if the appliance is deactivated and you set the function: Minute Minder.
www.electrolux.com • Use a recipe that is almost the same if you cannot find the settings for your recipe. • When you cook rice, use a ratio of 1.5 : 1 – 2 : 1 water to rice because rice absorbs water. 11.3 Steam water table Time (min) Water in the water drawer (ml) 15 - 20 300 30 - 40 600 50 - 60 800 11.4 Full Steam of water necessary for one of the dishes in the operation. Put the dishes into the correct cookware and then on the wire shelves.
ENGLISH Food Temperature (°C) Time (min) Shelf position Water in the water drawer (ml) Carrots 96 35 - 45 1 600 Kohlrabi, strips 96 30 - 40 1 550 Peppers, strips 96 15 - 20 1 400 Leeks, rings 96 25 - 35 1 500 Green beans 96 35 - 45 1 550 Lamb's lettuce, 96 florets 20 - 25 1 450 Brussels sprouts 96 30 - 40 1 550 Beetroot 96 70 - 90 1 800 + 400 Black salsify 96 35 - 45 1 600 Celery, cubed 96 20 - 30 1 500 Asparagus, green 96 25 - 35 1 500 Asparagus,
www.electrolux.com Food Temperature (°C) Time (min) Shelf position Water in the water drawer (ml) Rice (water / 96 rice ratio 1.5 : 1) 35 - 40 1 600 Boiled potatoes, quartered 96 35 - 40 1 600 Bread dumpling 96 35 - 45 1 600 Tagliatelle, fresh 96 20 - 25 1 450 Polenta (liquid / 96 polenta ratio 3 : 1) 40 - 45 1 750 Fish Food Temperature (°C) Time (min) Shelf position Water in the water drawer (ml) Trout, approx.
ENGLISH Food Temperature (°C) Time (min) Shelf position Water in the water drawer (ml) Kasseler (smoked loin of pork), poached 90 70 - 90 1 800 + 300 Tafelspitz (prime 96 boiled beef) 110 - 120 1 800 + 700 Chipolatas 80 15 - 20 1 400 Food Temperature (°C) Time (min) Shelf position Water in the water drawer (ml) Eggs, softboiled 96 10 - 12 1 400 Eggs, mediumboiled 96 13 - 16 1 450 Eggs, hardboiled 96 18 - 21 1 500 23 Eggs 11.
www.electrolux.com Food Temperature (°C) Time (min) Shelf position Small fish up to 350 g 90 25 - 35 1 Whole fish up to 1000 g 90 35 - 45 1 1) Continue for a further half an hour with the door closed. Reheating Food Temperature (°C) Time (min) Shelf position Dumplings 85 20 - 30 1 Pasta 85 15 - 20 1 Rice 85 15 - 20 1 One-plate dishes 85 15 - 20 1 11.7 Quarter Steam + Heat Add about 300 ml of water.
ENGLISH 25 Food Quantity Temperature (°C) Time (min) Shelf position Ready-to-bake baguettes 40 - 50 g 200 20 - 30 2 Ready-to-bake baguettes frozen 40 - 50 g 200 25 - 35 2 11.8 Baking • Your oven may bake or roast differently to the appliance you had before. Adapt your usual settings (temperature, cooking times) and shelf positions to the values in the tables. • The manufacturer recommends that you use the lower temperature the first time.
www.electrolux.com Baking results Possible cause Remedy The cake browns unevenly. The oven temperature is too Set a lower oven temperahigh and the baking time is ture and a longer baking too short. time. The cake browns unevenly. The mixture is unevenly dis- Spread the mixture evenly tributed. on the baking tray. The cake is not ready in the The oven temperature is too The next time you bake, set baking time given. low. a slightly higher oven temperature. 11.
ENGLISH Cakes / pastries / breads on baking trays Food Function Tempera- Time (min) ture (°C) Shelf position Plaited bread / bread crown Conventional Cooking 170 - 190 30 - 40 1 Christmas stollen1) Conventional Cooking 160 - 180 50 - 70 1 Bread (rye bread)1) Conventional Cooking 1 first 230 20 then 160 - 180 30 - 60 Cream puffs / eclairs1) Conventional Cooking 190 - 210 20 - 35 2 Swiss Roll1) Conventional Cooking 180 - 200 10 - 20 2 Cake with crumble top- True Fan ping (dry
www.electrolux.
ENGLISH 29 Food Function Temperature (°C) Time (min) Shelf position Fish bakes Conventional Cooking 180 - 200 30 - 60 1 Stuffed vegetables True Fan Cook- 160 - 170 ing 30 - 60 1 1) Preheat the oven. 11.
www.electrolux.com Food Temperature (°C) Time (min) Shelf position Biscuits made with sponge mixture 160 - 170 25 - 40 1/4 Pastries made with 80 - 100 egg white, meringues 130 - 170 1/4 Macaroons 100 - 120 40 - 80 1/4 Biscuits made with yeast dough 160 - 170 30 - 60 1/4 11.14 Slow Cooking Always cook without a lid when you use this function. Use this function to prepare lean, tender pieces of meat and fish.
ENGLISH Food Temperature (°C) Time (min) Shelf position Quiche Lorraine (Sa- 170 - 190 voury flan) 45 - 55 1 Swiss Flan 170 - 190 45 - 55 1 Cheesecake 140 - 160 60 - 90 1 Apple cake, covered 150 - 170 50 - 60 1 Vegetable pie 160 - 180 Unleavened bread1) 230 50 - 60 1 10 - 20 2 Puff pastry flan1) 160 - 180 45 - 55 2 Flammekuchen1) 230 12 - 20 2 15 - 25 2 Piroggen (Russian 180 - 200 version of calzone)1) 31 1) Preheat the oven. 2) Use a deep pan. 11.
www.electrolux.com Food Function Quantity Temper- Time (min) ature (°C) Shelf position Roast beef or fillet: rare1) Turbo Grilling per cm of thickness 190 - 200 5 - 6 per cm of 1 thickness Roast beef Turbo Grilling or fillet: medium per cm of thickness 180 - 190 6 - 8 per cm of 1 thickness Roast beef Turbo Grilling or fillet: well done per cm of thickness 170 - 180 8 - 10 per cm of thickness 1 1) Preheat the oven.
ENGLISH Game Food Function Quantity Tempera- Time (min) ture (°C) Shelf position Saddle of hare, leg of hare Conventional Cooking up to 1 kg 230 30 - 40 1 Saddle of venison Conventional Cooking 1.5 - 2 kg 210 - 220 35 - 40 1 Haunch of venison Conventional Cooking 1.5 - 2 kg 180 - 200 60 - 90 1 1) 1) Preheat the oven.
www.electrolux.
ENGLISH Food Temperature (°C) Time (min) Shelf position Hash Browns 210 - 230 20 - 30 2 Lasagne / Cannelloni, fresh 170 - 190 35 - 45 2 Lasagne / Cannelloni, frozen 160 - 180 40 - 60 2 Oven baked cheese 170 - 190 20 - 30 2 Chicken Wings 190 - 210 20 - 30 2 35 Frozen ready meals Food Function Temperature (°C) Time (min) Shelf position Frozen pizza Conventional Cooking as per manufacturer's instructions as per manufacturer's instructions 2 Chips1) (300 600 g) Conventional
www.electrolux.com Food Quantity Defrosting time (min) Further defrosting time (min) Comments Meat 500 g 90 - 120 20 - 30 Turn halfway through. Trout 150 g 25 - 35 10 - 15 - Strawberries 300 g 30 - 40 10 - 20 - Butter 250 g 30 - 40 10 - 15 - Cream 2 x 200 g 80 - 100 10 - 15 Whip the cream when still slightly frozen in places. Gateau 1.4 kg 60 60 - 11.21 Preserving • Use only preserve jars of the same dimensions available on the market.
ENGLISH Food Temperature (°C) Cooking time until Continue to cook simmering (min) at 100 °C (min) Mixed pickles 160 - 170 50 - 60 5 - 10 Kohlrabi / Peas / Asparagus 160 - 170 50 - 60 15 - 20 1) Leave standing in the oven after it is deactivated. 11.
www.electrolux.com 11.
ENGLISH 39 12. CARE AND CLEANING WARNING! Refer to Safety chapters. 12.1 Notes on cleaning • Clean the front of the appliance with a soft cloth with warm water and a cleaning agent. • To clean metal surfaces, use a dedicated cleaning agent. • Clean the appliance interior after each use. Fat accumulation or other food remains may result in a fire. The risk is higher for the grill pan. • Clean stubborn dirt with a special oven cleaner. • Clean all accessories after each use and let them dry.
www.electrolux.com WARNING! Be careful when you remove the door from the appliance. The door is heavy. 1. Open the door fully. 2. Fully press the clamping levers (A) on the two door hinges. A A 3. Close the door until it is at an angle of approximately 45°. When the cleaning is completed, install the door. Do the above steps in the opposite sequence. 12.6 Replacing the lamp Put a cloth on the bottom of the interior of the appliance. It prevents damage to the lamp glass cover and the cavity.
ENGLISH 41 13.1 What to do if... Problem Possible cause Remedy You cannot activate or operate the oven. The oven is not connected to an electrical supply or it is connected incorrectly. Check if the oven is correctly connected to the electrical supply (refer to the connection diagram if available). The oven does not heat up. The oven is deactivated. Activate the oven. The oven does not heat up. The clock is not set. Set the clock. The oven does not heat up. The necessary settings are not set.
www.electrolux.com We recommend that you write the data here: Model (MOD.) ......................................... Product number (PNC) ......................................... Serial number (S.N.) ......................................... 14. INSTALLATION WARNING! Refer to Safety chapters. Letter L - Live terminal Letter N - Neutral terminal - Earth terminal 14.1 Building in The built-in unit must meet the stability requirements of DIN 68930.
ENGLISH 450mm min. 20mm min. 560mm 114 mm 548mm 455mm 15mm 450mm 440mm min. 550mm 546mm 594mm 21mm 548mm min. 20mm 114 mm 450mm 15mm 450mm min. 560mm 455mm 450mm 440mm 455mm 450mm min.
www.electrolux.com 548mm 114 mm 15mm min. 20mm 450mm 455mm 450mm 440 mm 455mm 450mm 450mm 440mm 450mm min. 560mm min. 550mm 455mm 450mm 440mm 546mm 594mm 21mm 548mm min. 20mm 114 mm 450mm 15mm 590mm min. 550mm 455mm 450mm 440mm min.
ENGLISH H05VV-F H05RR-F min.
www.electrolux.com 15. ENERGY EFFICIENCY 15.1 Product Fiche and information according to EU 65-66/2014 Supplier's name Electrolux Model identification EVYP9841AX Energy Efficiency Index 105.5 Energy efficiency class A Energy consumption with a standard load, conventional mode 0.93 kWh/cycle Energy consumption with a standard load, fanforced mode 0.77 kWh/cycle Number of cavities 1 Heat source Electricity Volume 43 l Type of oven Built-In Oven Mass 39.
ENGLISH 47 16. GREAT BRITAIN & IRELAND - CUSTOMER CARE AND SERVICE GB IE Standard Guarantee Conditions and Exclusions.To see our guarantee conditions and exclusions please visit www.electrolux.co.uk or contact our Customer Care Department. Service & Spare Parts. Please contact your Authorised Service Centre on: 03445 616616 (Your call will automatically be routed to your local centre) For the address of your local centre please visit: www.electrolux.co.
User Manual: English 867335253-A-252016