WASHER-DRYER INSTRUCTION BOOKLET EW 1200 I 124 974 052 GB
Important Safety Information It is most important that this instruction book should be retained with the appliance for future reference. Should the appliance be sold or transferred to another owner, or should you move house and leave the appliance, always ensure that the book is supplied with the appliance in order that the new owner can get to know the functioning of the appliance and the relevant warnings. These warnings have been provided in the interest of safety.
Contents Wash Care Symbols Maintenance and Cleaning For the User Important Safety Information Your New Washer-Dryer Description of the Appliance 2 Descaling After each wash External cleaning Cleaning the dispenser drawer Cleaning the drawer recess Cleaning the filter The dangers of freezing 4 5 5 5 Door locked pilot light Detergent dispenser drawer The Control Panel Operating sequence 6 Washing 4.
i Your New Washer-Dryer Your new machine meets all modern requirements for effective treatment of laundry with low water, energy and detergent consumption. It is gentle with your laundry, simple to use and easy to care for. ■ ■ ■ ■ Programme and temperature setting using the programme selector. The special wool programme with its new delicate wash system treats your woollens with extreme care. Automatic cooling of the wash water to 60°C before draining, with the 95°C programme.
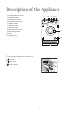
Description of the Appliance 1 Detergent dispenser drawer 2 Programme guide 3 Drying indicator light 4 Drying time selector dial 5 “Option” buttons 6 “ON/OFF” button 7 “Mains-on” light 8 Programme selector dial 9 Door opening handle 10 Filter 11 Adjustable feet 1 34 5 67 8 E W 1200 I IMPORTANT : PLEASE READ THE INSTRUCTION BOOK BEFORE USING THIS APPLIANCE 2 9 10 11 Detergent dispenser drawer Prewash Main wash Fabric softener Programme chart P0239S 5
The Control Panel E W 1200 I IMPORTANT : PLEASE READ THE INSTRUCTION BOOK BEFORE USING THIS APPLIANCE 1 2 3 4 5 6 7 8 9 1 Detergent dispenser drawer 10 If this button is not activated, the washing programmes will end with a short spin. Important! This button is not compatible with the automatic washing & drying programme. 2 Drying indicator light This light illuminates when the machine is drying.
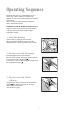
Operating Sequence Before the first wash, we recommend that you run a cotton cycle at 60°C, without any laundry in the machine, to remove any manufacturing residue from the drum and tub. Pour 1/2 a measure of detergent into the dispenser drawer and start the machine. WASHING 4.5 KG OF WHITE COTTON AT 95°C Suppose you have 4.5 kg of normally dirty laundry to wash. It is white cotton and is suitable for high temperature washing. 1. Load the laundry Open the door by pulling the catch outward.
4. Select the required option(s) Depress SPIN REDUCTION and/or ECONOMY button, if necessary and depending on the selected programme. 5. Select the required programme Turn the programme selector dial clockwise to the programme A or B. A P0429 6. Start the machine Before starting up the machine check that: ■ the appliance is plugged in ■ the water supply taps are turned on ■ the drain hose is correctly and securely positioned ■ the door and the detergent dispenser drawer are closed.
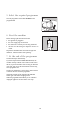
WASHING 2 KG OF MIXED FABRICS AT 50°C Suppose you have 2 kg of mixed fabrics to wash. They are rather delicate fabrics and should not be washed at a high temperature. 1. Load the laundry Open the door by pulling the catch outward. Place the laundry in the drum, one item at a time, shaking them out as much as possible. Close the door. P0004 2. Measure out the detergent Pull out the dispenser drawer until it stops. Measure out the amount of detergent required and pour it into the main wash compartment .
5. Select the required programme Turn the programme selector dial clockwise to the programme H. H P0673S 6. Start the machine Before starting up the machine check that: ■ the appliance is plugged in ■ the water supply taps are turned on ■ the drain hose is correctly and securely positioned ■ the door and the detergent dispenser drawer are closed. Depress the ON/OFF button: the mains-on light will illuminate and the machine starts operating. P0471 7.
DRYING 2.25 KG OF COTTON You have for example just machine-washed and spun at 1200 rpm 4.5 kg (10 lb) of laundry. They are cotton fabrics of medium weight which you want to iron as soon as they are dry. Switch off the machine. Then remove the laundry from the appliance and divide the items to obtain two loads of approx. 2.25 kg (5 lb) each. 1. Load the laundry Open the door by pulling the catch outward. Load the items one at a time and close the door. P0004 2.
5. At the end of the programme The machine stops automatically and the drying light goes out. The door is controlled by a safety device which releases 2 minutes after the end of the programme. Switch the machine off by depressing the ON/OFF button again, the mains-on light goes out. If the laundry is still too damp, select a further brief drying time, bearing in mind that during the last 10 minutes the appliance carries out a cooling and anticrease phase.
AUTODRYING 1 KG OF MIXED FABRICS You intend to wash and dry automatically 1 kg (2.2 lb) of mixed fabrics which have to be ironed. Proceed as follows: 1. Load the laundry Open the door by pulling the catch outward. Load the items one at a time and close the door. 2. Measure out the detergent and fabric softener Pull out the dispenser drawer until it stops. Measure out the amount of detergent required and pour it into the main wash compartment .
6. Start the machine Depress the ON/OFF button: the mains-on light comes on and the machine starts operating. P0471 7. At the end of the programme The machine stops automatically and the drying light goes out. The door is controlled by a safety device which releases 2 minutes after the end of the programme. Switch the machine off by depressing the ON/OFF button again, the mains-on light goes out.
i Washing and Drying Hints Do NOT overload the machine. Weigh the laundry the first few times you use the appliance.
Which detergent?.... And in which form? To ensure you obtain the best wash results from your appliance, it is important to use the right detergent in your everyday wash, and only detergents recommended for use in automatic machines. To maintain the appearance of your clothes and household textiles and to make them last longer you should use different types of detergent for different washes, whether for whites, colours or delicates.
Washing and Drying Programmes Programmes for cotton and linen WASHING Wash programme WHITES WITH PREWASH WHITES WITHOUT PREWASH WHITES ECONOMY QUICK WASH Degree of soil and type of laundry White cotton, for example heavy soiled work garments, sheets, household linen, underwear, towels. White cotton, for example normally soiled work garments, sheets, household linen, underwear, towels. White cotton, for example normally to lightly soiled sheets and household linen.
Washing and Drying Programmes Programmes for synthetics, mixed fabrics, delicates and wool WASHING Wash programme MIXED FABRICS WITHOUT PREWASH Degree of soil and type of laundry Synthetic or mixed fabrics, underwear, coloured garments, non-shrink shirts, blouses. Synthetic fabrics, SYNTHETICS underwear, shirts, blouses.
Wash Care Symbols Wash care labels inside garments recommend how to launder your clothes with the best results. The care labelling code is in line with care labelling used in the rest of Europe. The symbols used make it easy to select the correct programme on your washing machine. WASHING SYMBOL WASH ACTION 95 Normal (Maximum) White Cotton or Linen without Special Finishes 60 Normal (Maximum) Cotton, Linen or Viscose without Special Finishes Colourfast at 60°C.
Maintenance and Cleaning Before any maintenance or cleaning is carried out you must DISCONNECT the appliance from the electricity supply. Descaling The water we use normally contains lime. It is a good idea to periodically use a water softening powder in the machine. Do this separately from any laundry washing, and according to the softening powder manufacturer's instructions. This will help to prevent the formation of lime deposits. After each wash Leave the door open for a while.
Cleaning the filter The water drain filter A clean filter is important for the correct functioning of the machine, and should therefore be cleaned after every washing programme. Place a container under the filter to catch any spillage. If the filter is blocked and the machine is unable to drain you will need to drain the water manually from the machine at this stage. To do this, unhook the drain hose from the standpipe or sink and hold the end of the hose over a bowl on the floor.
Something Not Working Certain problems are due to lack of simple maintenance or oversights, which can be solved easily without calling out an engineer. Before contacting your local Electrolux Service Force Centre, please carry out the checks listed below. IMPORTANT: if you call out an engineer to a fault listed below, or to repair a fault caused by incorrect use or installation, a charge will be made even if the appliance is under guarantee.
Symptom Possible causes The door will not open ■ ■ ■ The programme is still running (the door locked light is on). The door lock has not yet released. There is water in tub. The machine makes an unusual noise ■ The machine is fitted with a type of motor which makes an unusual noise compared with other traditional motors. This new motor ensures a softer start and more even distribution of the laundry in the drum when spinning, as well as increased stability of the machine.
Guarantee Conditions Standard guarantee conditions Exclusions We, Electrolux, undertake that if, within 12 months of the date of the purchase, this Electrolux appliance or any part thereof is proved to be defective by reason only of faulty workmanship or materials, we will, at our option, repair or replace the same FREE OF ANY CHARGE for labour, materials or carriage on condition that: This guarantee does not cover: ■ ■ The appliance has been correctly installed and used only on the electricity supply
Installation Instructions It is dangerous to alter the specifications or attempt to modify this product in any way. Care must be taken to ensure that the appliance does not stand on the electrical supply cable. Any electrical work required to install this appliance should be carried out by a qualified electrician or competent person. Any plumbing work required to install this appliance should be carried out by a qualified plumber or competent person.
Unpacking All transit bolts and packing must be removed before using the appliance. You are advised to keep all the packaging for re-use in case the machine is to be transported again. Using a spanner unscrew and remove the rear right bolt. Lay the machine gently on its back, making sure that the hoses are not squashed. P0255 Remove the polystyrene base and take off the bottom panel by unscrewing the central screw. Carefully slide out the right polythene bag.
Positioning Install the machine on a flat hard floor. Make sure that air circulation around the machine is not impeded by carpets, rugs etc. Check that the machine does not touch the wall or other kitchen units. Never place cardboard, wood or similar materials under the machine to compensate for any unevenness in the floor. Your new washing machine has been designed to be permanently plumbed in to your home’s water supply and drainage system.
Water drainage This appliance is designed to be permanently plumbed into your home's water supply and drainage system. The appliance drain hose should hook into a standpipe, the hook in the drain hose is formed using the plastic “U-Piece” supplied. The standpipe should have an internal diameter of approximately 38mm (see diagram) thus ensuring there is an air break between the drain hose and standpipe.
Special conditions If the floor is carpeted or covered with crumbly or soft material, insert a rigid support base under the feet to prevent noise, vibration or displacement. The base should protrude a few centimetres beyond the edges of the machine. Warning The machine should NOT be placed on deep pile carpeting. Note Please ensure that when the appliance is installed it is easily accessible for the engineer in the event of a breakdown.
Electrical connection Any electrical work required to install this appliance should be carried out by a qualified electrician or competent person. WARNING: THIS APPLIANCE MUST BE EARTHED. The manufacturer declines any liability should this safety measure not be observed. Before switching on, make sure the electricity supply voltage is the same as that indicated on the appliance’s rating plate. The rating plate is located at the top of the rim of the open door.
Building-in 600 This appliance has been designed to be built into the kitchen furniture. The recess should have the dimensions shown in picture A. 600 596 min. 820 min 570 120 416 818 176,5 515 1 54 195 160 8 165 90 0 49 A P0965 Preparation and assembly of the door The machine is originally pre-arranged for the assembly of a door opening from right to left.
If the door has to be opened from left to right, invert the position of the plates (7), the magnet (4) and the plate (5) (Fig. B and E). Mount the countermagnet (6) and the hinges (1) as previously described. Important: the plastic screw (8) should never be loosened (Fig. B and E).
Fix the base firmly to the floor using four appropriate countersunk screws (see Fig. H). Hardwood strip 5 mm x 25 mm 5 X 25 X 605 490 600-605 H With the appliance installed adjust all four feet ensuring the machine is stable, and a clearance of approximately 5 mm is left between the top of the machine and the underside of the worktop. A final check for stability should be carried out with the machine on spin with a load, this will identify the need for any further fine adjustment to the feet.
Z