I N F O BEDIENUNGSANLEITUNG GEBRUIKSAANWIJZING MODE D'EMPLOI MANUAL DE INSTRUCCIONES INSTRUCTION MANUAL WASCHVOLLAUTOMAT WASAUTOMAAT LAVE - LINGE LAVADORA WASHING MACHINE EW 1230 I EW 1230 I EW 1230 I EW 1230 I EW 1230 I
CONTENTS Warnings . . . . . . . . . . . . . . . . . . . . . . . . . . Page 79 Installation . . . . . . . . . . . . . . . . . . . . . . . . . Page 80 Unpacking . . . . . . . . . . . . . . . . . . . . . . . . . . Page 80 Positioning. . . . . . . . . . . . . . . . . . . . . . . . . . Page 80 Water inlet . . . . . . . . . . . . . . . . . . . . . . . . . .
WARNINGS You must read the whole of this instruction book before you use the appliance. Follow the advice carefully. ■ Make sure that all pockets are empty. Hard, sharp objects such as coins, safety pins, nails, screws or stones can cause extensive damage. Keep the book for future reference. If you sell or give away the appliance, make sure that the book is passed to the new owner. ■ Do not machine wash fabrics which are saturated with petroleum products.
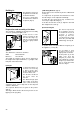
INSTALLATION Unpacking Positioning All transit bolts and packing must be removed before using the machine. You are advised to keep all packing for re-use in case you move house and the machine has to be transported again. Proceed as follows: Using a spanner remove the screw on the right at the rear of the machine. Carefully lay the machine on its back making sure that the hoses are not squashed. Place between machine and bottom one of the P0255 polystyrene angle packings.
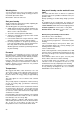
Water drainage Electrical connection The end of the drain hose can be positioned in three ways: Over the edge of a basin at a height of between 60 and 90 cm. To keep the drain hose spout bent, use the special plastic hose guide supplied with the machine. Secure it to the wall with a hook, for example, or to the tap by means of a piece of string, to prevent the drain hose P0235 moving during rinsing cycle thus causing floods.
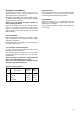
Building-in This appliance has been designed to be built into the kitchen furniture. The recess should have the dimensions shown in the picture (Fig. A). 820 600 600 A P0118 Preparation and assembly of the door c) Mounting the door (Fig. B) Fix the hinges to the machine by means of M5x8 mm screws (3). To compensate for possible uneven thickness of the door the hinges can be adjusted horizontally. To align the door perfectly it may sometimes be necessary to adjust the hinge (1).
USE Control panel 1 2 3 1 Detergent dispenser drawer and programme chart Symbols Prewash Wash Fabric softener Cl 4 5 6 7 8 9 5 Quick wash button By depressing this button on programmes «B» and «G» the washing time will be reduced by approx. 12 mins. It should be used for lightly soiled laundry, max. temp. 60°C. E P0238 There is a programme guide in Spanish on the interior part of the detergent dispenser drawer.
Washing hints You are advised not to leave your laundry too long, especially when damp. Damp laundry produces mould and unpleasant smells. Mould stains cannot be removed. Sort your laundry Study carefully the chart in this booklet explaining the symbols used on clothes labels.
Detergents and additives Good washing results also depend on the choice of detergent and use of the correct quantities to avoid waste and protect the environment. Although biodegradable, detergents contain substances which in large quantities can damage the delicate ecological balance of nature. Always use good quality detergents suitable for use in washing machines.
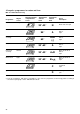
«Energetic» programmes for cotton and linen Max.
«Gentle» programmes for synthetics, mixed fabrics, delicates and wool Max.
Wash code symbols These symbols appear on fabric labels, in order to help you choose the best way to treat your laundry. Strong wash Delicate wash 95 60 40 30 Max. wash temperature 95°C Max. wash temperature 60°C Max. wash temperature 40°C Max.
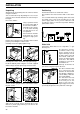
Operating sequence 5. Select the temperature 1. Place the laundry in the drum Open the loading door. Place the garments to be washed inside the drum one by one laying them as flat as possible. Close the door ensuring that the catch clicks into place. 95 Press the temperature selector dial in to pop it out and turn it to the required value. P0128 6. Select the required programme and start the machine P0004 2.
MAINTENANCE Bodywork The drain filter The outside of the machine can be cleaned with warm water and a neutral non-abrasive household detergent. Wipe with clean water and dry after cleaning. Important: do not use methylated spirit, diluents or similar products. The drain filter collects threads and small objects left in the laundry. Check regularly that the filter is clean to ensure smooth running of your machine. Place a bowl underneath and unscrew the filter by turning it to the left. Remove the filter.
SOMETHING NOT WORKING? If the machine does not start up: ■ ■ ■ ■ check that the door is firmly shut; check that the appliance is plugged in check that the mains fuse is intact; check that the programme selector dial is correctly positioned and the ON/OFF button has been depressed. If you are unable to identify or solve the problem, consult our servicing department. Before telephoning, make a note of the make, model and date of purchase of your machine: the Service Department will require this information.
124 995 773 Z