Use 8t Care B-ui[t-ln Wail Guide Ovc:n
Finding information MAKEA RECORDFORFUTUREUSE [] [] [] [] [] [] [] [] [] [] [] [] [] [] [] [] [] [] [] [] [] [] Brand Purchase Date Model Number Serial Number MODELANDSERIALNUMBERLOCATION [] [] [] [] [] [] [] Ill [] [] [] [] [] [] [] [] [] [] [] [] [] [] [] [] [] [] [] [] [] [] [] [] [] [] [] [] [] [] [] [] [] [] [] [] For toll-free telephone 1-877-4ELECTROLUX For online support support in the U.S.
TemperatureVisualDisplay............................12 OvenLight...................................................... I3 ControlLock ................................................... 13 Settingthe KitchenTimer ...............................13 Cooking Modes................................................. 14 Baking ............................................................ 14 CookTime ...................................................... 15 EndTime .....................................................
Safety (MPORTANT SAFETY(NSTRUCT(ONS [] [] [] [] [] [] [] [] [] [] [] [] [] [] [] [] [] [] [] [] [] Please read all safety instructions before using your new Electrolux wall oven. • Remove all tape and packaging wrap before using the appliance. Destroy the carton and plastic bags after unpacking the appliance. Never allow children to play with packaging material. Do not remove the wiring label and other literature attached to the back of the wall oven.
Safety To reduce the risk of tipping of the appliance. The appliance must be secured by properly installed anti tip device. To check if devices are installed properly open the oven door and verify that the anti-tip devices are engaged. See installation instructions. Do not leave children alone--Children should not be left alone or unattended in the area where an appliance is in use. They should never be allowed to sit or stand on any part of the appliance.
Safety IMPORTANT SAFETYINSTRUCTIONS Nil [] [] [] I! [] [] • Do not cover the broiler grease could ignite. [] [] [] I! [] grid or oven bottom [] [] I! [] with aluminum [] I! [] [] [] I! foil. Exposed fat and • Do not touch a hot oven light bulb with a damp cloth. Doing so could cause the bulb to break. Disconnect the appliance or shut off the power to the appliance before removing and replacing the bulb.
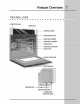
Feature Overview 7' .YO.UR.W.AL.L.OV.E........... CONVECT,ON FAN OVEN VENT CONTROL PANEL OVEN DOOR LATCH BROILINGELEMENT OVEN RACK SLIDERS OVEN RACKS OVEN RACK SUPPORT ow.L,O.
Feature Overview OVEN [] [] [] SUPPORTS & OVENVENTS [] [] [] [] [] [] [] [] [] [] [] [] [] [] [] [] [] [] [] Installing Oven Rack Supports ALWAYS INSTALL O VEN RACK SUPPORT BEFORE TURNING ON THE 0 VEN (WHEN THE OVEN IS COOL).
Feature Overview REMOVINGAND REP QNG OVEN CKS [] [] [] [] [] [] [] [] [] [] [] [] [] [] [] [] [] [] [] [] Removing Sliding Oven Racks 1. 2. 3. 4. With the rack in its closed position; grasp the rack and the sliders at once. Slightly lift the rack and sliders and pull it to clear the first bracket. Pull the rack and sliders until the second bracket stops the rack. Lift the rack and sliders and carefully remove them from the oven.
Feature Overview CONTROL PAD FUNCTIONS [] [] [] [] [] [] [] [] [] [] [] [] [] [] [] [] [] [] [] '! Light Pad- Used to turn the oven light on and off. 2 Bake Pad- Used to enter the normal baking mode temperature. 3 Broil Pad- Used to select the variable broil mode. 4 Convection Bake Pad- Used to select the convection baking mode. 5 Convection Roast Pad- Used to select the convection roasting mode. 6 Convection Broil Pad- Used to select the convection broil mode.
Feature Overview CONTROL PAD FUNCTIONS(coNT NuEm [] [] [] [] [] [] [] [] [] [] [] [] [] [] [] [] [] [] [] 18 Keep Warm Pad- Used to select the keep warm mode. 19 Slow Cook Pad- Used to select the slow cook mode. 20 Clean Pad- Used to select the self-cleaning mode. 2'! My Favorite 2 Pad- Used to save or recall the favorite 2 cooking mode. 22 My Favorite 23 Oven Pad- Used to light up the available cooking modes pads. 24 Lite Pad- Used to start a 2 hours self-clean cycle.
Getting Started SE ING CLOCKAT POWERUP [] [] [] [] [] [] [] [] [] [] [] [] [] [] [] [] [] [] [] [] [] [] When the unit is first plugged in, or when the power supply to the range has been interrupted, the timer in the display will flash with "12:00". The clock cannot be set when the oven is on. If an invalid time of day is entered, the control will triple beep to prompt you to re-enter a valid time of day. To set the clock (example for 1:30): 1. _ress,\lS_jj.\Uj pads to set the time o
Getting Started OVENLIGHT [] [] [] [] [] [] [] [] [] [] [] [] [] [] [] [] [] [] [] [] [] [] Your appliance includes "theater" style oven lighting feature that gradually lights the oven interiors to full brightness. The oven is equipped with 2 halogen lights. The oven lights will turn on automatically, when the oven door is opened. The oven light may be turned on when the door is closed by using the oven light pad located on the control panel.
Cooki [] [] [] Modes [] [] [] [] [] [] [] [] [] [] [] [] [] [] [] [] [] [] [] This mode is best used for your standard recipes. The hidden bake element is used to heat the air and maintain temperature. The temperature probe can be used in this cooking mode. The oven can be programmed to bake at any temperature from 170°F to 550°F with a default temperature of 350°F. Baking Tips: , Always preheat your oven before using the bake mode.
Cooking Modes COOKTIME [] [] [] [] [] [] [] [] [] [] [] [] [] [] [] [] [] [] [] [] [] [] Cook Time allows the oven to be set to cook for a set length of time and shut off automatically. The time remaining will always be shown in the timer section of the display. The oven will shut off and will beep when the countdown is finished. This feature can be used with Bake, Convection Bake, Convection Roast, Slow Cook, Keep Warm, Defrost, Bread Proof, Dehydrate and Perfect Turkey cooking modes.
Cooki [] [] [] [] [] [] [] [] [] [] [] [] [] [] [] [] [] [] [] [] [] [] This mode is best for meats, fish and poultry up to 1" thick. Broiling is a method of cooking tender cuts of meat by direct heat under the broil element of the oven. The high heat cooks quickly and gives a rich, brown outer appearance. The temperature probe cannot be used with this mode. The oven can be programmed to broil at any temperature from 300°F to 550°F with a default temperature of 550°F.
Cooking Modes CONVECTION BAKING [] [] [] II! [] [] [] [] [] [] [] [] [] [] [] [] [] [] [] [] [] [] This mode of cooking enables you to obtain the best culinary results when baking with multiple pans and racks. Multiple rack baking mayslightly increase cooktime forsome foods but the overall result is time saved. Most foods cooked in a standard oven will cook faster and more evenly with Convection Bake.
Cooki Modes CONVECT(ON CONVERT [] [] [] [] [] [] [] [] [] [] [] [] [] [] [] [] [] [] [] [] [] [] The Convection Convert pad is used to automatically convert a standard baking recipe for convection baking. When set properly, this feature is designed to display the actual converted (reduced) temperature in the display. Convection Convert may ONLY be used with a Convection Bake cooking mode. It can be used with the features End Time and Cook Time (see their sections for directions).
Cooking Modes CONVECT)ON ROAST(NG [] [] [] [] [] [] [] [] [] [] [] [] [] [] [] [] [] [] [] [] [] [] This mode is best for cooking tender cuts of beef, lamb, park and poultry. Use this mode when cooking speed is desired. The Convection Roasting gently browns the exterior and seals in the juices. Convection roasting uses the hidden bake element, the hidden convection element, the broil element and a fan to circulate the oven's heat evenly and continuously within the oven.
Cooki Modes CONVECT)ON BRO(L(NG [] [] [] [] [] [] [] [] [] [] [] [] [] [] [] [] [] [] [] [] [] [] Use this mode for thicker cuts of meat, fish and poultry. The Convection Broiling gently browns the exterior and seals in the juices. Convection broiling uses the broil element and a fan to circulate the oven's heat evenly and continuously within the oven. The temperature probe cannot be used in this cooking mode.
Cooking Modes KEEPWARM [] [] [] [] [] [] [] [] [] [] [] [] [] [] [] [] [] [] [] [] [] This mode is best for keeping oven baked foods warm for serving after cooking has finished. The Keep Warm feature uses the hidden bake element to maintain the temperature within the oven. The Keep Warm feature may be used with Multi-Stage (refer to its section for directions) if you wish to have the Keep Warm feature turn ON automatically when cooking has finished.
Cooki Modes SLOWCOOK m [] [] [] [] [] [] [] [] [] [] [] [] [] [] [] [] [] [] [] [] [] This mode may be used to cook foods more slowly, at lower oven temperatures and provide cooking results much the same way as a Slow Cooker or Crock-Pot. The Slow Cook feature is ideal for roasting beef, pork & poultry. Slow Cooking meats may result in the exterior of meats becoming dark but not burnt. This is normal.
Cooking Modes [] [] [] [] [] [] [] [] [] [] [] [] [] [] [] [] [] [] [] [] [] [] This mode dries foods with heat from the bake and the convection element. The heat is circulated throughout the oven by the convection fan. Dehydrating is used to dry and/or preserve foods such as fruits, meats, vegetables and herbs. This mode holds an optimum low temperature while circulating the heated airto slowly remove moisture.
Cooki Modes BREADPROOFING [] [] II! [] [] [] [] [] [] II! [] [] [] [] [] [] [] [] [] [] [] Proofing bread prepares the dough for baking by activating the yeast. This feature is ideal for proofing, or rising bread dough. The oven can be programmed for Bread Proofing at any temperature between 85°F to 100°F with a default temperature of 100°F. Bread Proofing Tips: • • • • • No need to preheat for this feature. Proof bread until dough has doubled in bulk.
Cooking Modes PERFECTTURKEY [] [] [] [] [] [] [] [] [] [] [] [] [] [] [] [] [] [] [] [] [] [] This mode uses the temperature probe to control precisely the cooking of a perfect turkey, The convection system gently browns the turkey's exterior and seals in the juices, The temperature probe is required with this cooking mode (read its section on next page for more details), The oven can be programmed for Perfect Turkey at any temperature between 170°F to 550°F with a default temperature
Cooki Modes PROBE TEMPE TURE [] [] [] [] [] [] [] [] [] [] [] [] [] [] [] [] [] [] [] [] [] [] For many foods, especially roasts and poultry, testing the internal temperature is the best method to insure properly cooked food. The Temperature Probe gets the exact temperature you desire without having to guess. This feature can be used with Bake, Convection Bake, Convection Roast and Perfect Turkey cooking modes.
. Cook=ng Modes !ii!ii i!iiil;iii_;_i_i;ii_ i!_i_ii_iii_i!i ii_i !!i!ii!iiill ii!i!ii!ii 2 This feature enables you to perform sequential cooking at the touch of a button. Its purpose is to p,ogr_ _q.eoe of.ptoth,ee oook_og _od_sw_th _od_,,_d._J oook_og tJm_ _od temper_t.,es _o ; a sequence. This feature can be used with most cooking modes; Baking, Broiling, Convection Baking, Convection Roasting, Convection Broiling, Keep Warm and Bread Proof.
Cooki Modes MULT)STAGE(coNTJNuEm [] [] [] m [] [] [] [] [] [] m [] [] [] [] [] [] [] [] [] m [] Stage 3 14. Press KEEP WARM [_. "170" will start flashing in the display prompting to enter a temperature. 15. Enter a temperature using the numeric pads _0_ to _9_. 16. Press START <_. "00:00" will start flashing in the display prompting to enter a cook time. 17. Enter a cook time using the numeric pads _/[}_'to _9_. 18. Press START 4_. The cooking sequence will begin. Canceling 19.
Electronic Control Settings USERPREFERENCES [] [] [] [] [] [] [] [] [] [] [] [] [] [] [] [] [] [] [] [] [] [] The User Preferences menu includes all user defined options. This feature enables you to control the various options of the electronic controls.
Electronic Control Settings USERPREFERENCES (CONTINUED) [] [] [] [] [] [] [] [] [] [] [] [] [] [] [] [] [] [] [] [] [] [] SE_ING CLOCKDISP_Y w ONOROFF: The oven control can be programmed to display the time of day or not. The oven has been preset at the factory to display the time of day. Changing clock display between ON and OFF: 1. Press USER PREF _ 2. Press 3. Press START <_ to accept the changes and go back to user preferences menu display.
Electronic Control Settings USERPREFERENCES (CONTINUED) [] [] [] [] [] [] [] [] [] [] [] [] [] [] [] [] [] [] [] [] [] SE_JNG TEMPE_TURE DJSP_Y w FAHRENHEITORCELSIUS: The oven control can be programmed to display temperatures in Fahrenheit or Celsius, The oven has been preset at the factory to display in Fahrenheit, To change dispJay from Fahrenheit to Celsius or Celsius to Fahrenheit: 1. Press USER PREF _ until you get to the F=C F menu page, 2.
Oven Controls MYFAVORITES m [] [] [] [] [] [] [] [] [] [] [] [] [] [] [] [] [] [] [] [] [] The Favorites settings allows you to save your most frequently used or most complex cooking sequences. This feature will save the cooking mode, the target temperature and the cooktime (if any). The oven can recall up to three cooking sequences from its internal memory, which are easily accessible from a one touch button. These functions can be used with all cooking modes and features.
Oven Controls SABBATHFEATURE (FORUSEONTHEJEWISHSABBATH& HOLDAY$) [] [] [] [] [] [] [] [] [] [] [] [] [] [] [] [] [] [] [] [] [] [] + andLO Io pads are used to set the Sabbath feature. The Sabbath feature may only The HI hi be used with the BAKE D pad.
Oven Controls SABBATHFEATURE(co.TINuED) [] [] [] [] [] [] [] [] [] [] [] [] [] [] [] [] [] [] [] [] Note: You may change the oven temperature once baking has started. Press BAKE [], [] [] the numeric key pads for the temperature you want (example for 425°F press ,_4_",_2_, s,-, _5_) and then press START <_ TWICE (for Jewish Holidays only). Remember that the oven control will no longer beep or display any further feature. changes once the oven is set for the Sabbath 8.
Care & ¢(eaning US)NGTHESELF-CLEAN FEATURE [] [] [] [] [] [] [] [] [] [] [] [] [] [] [] [] [] [] [] [] [] [] Adhere to the Following Cleaning Precautions: * Allow the oven to cool before cleaning. * Wear rubber gloves when cleaning any exterior parts of the oven manually. @ During the self-cleaning cycle, the outside of the oven can become very hot to the touch. DO NOT leave small children unattended near the appliance.
Care & Cleani STARTING SELF-CLEAN CYCLE m [] [] [] [] [] [] [] [] [] [] [] [] [] [] [] [] [] [] [] [] [] A self-cleaning oven cleans itself with high temperatures (well above cooking temperatures) which eliminate soil completely or reduce it to a fine powdered ash you can whisk away with damp cloth. If you are planning to use the oven directly after a self-clean cycle remember to allow time for the oven to cool down and the oven door to unlock. This normally takes about one hour.
Care & Cleaning GENE L [] [] [] [] CLEANING [] [] [] [] [] [] [] [] [] [] [] [] [] [] [] [] [] [] Cleaning Various Parts of Your appliance Before cleaning any part of the appliance, be sure all controls are turned OFF and the appliance is COOL. REMOVE SPILLOVERS AND HEAVY SOILING AS SOON AS POSSIBLE.
Care & Cleani CAREAND CLEANINGOFSTNNLESSSTEEL [] [] [] [] [] [] [] [] [] [] [] [] [] [] [] [] [] [] [] [] [] [] Special care and cleaning are required for maintaining the appearance of stainless parts. Please refer to the table provided at the beginning of the General Care & Cleaning section in this Use & Care Manual. TO REMOVEAND REP CE OVENDOOR [] [] 1. 2. [] [] [] [] [] [] [] [] [] [] [] [] [] [] [] [] [] [] [] [] Open the door to the fully opened position.
Care & Cleaning OVENLIGHT [] [] [] [] [] [] [] [] [] [] [] [] [] [] [] [] [] [] [] [] [] [] An interior oven light will turn on automatically when the oven door is opened, The oven light may be turned on when the door is closed by using the oven light switch located on the control panel, The lamp is covered with a glass shield, The glass shield can be remove to be cleaned manually or to change the oven light, THIS GLASS SHIELD MUST BE IN PLACE WHENEVER THE OVEN IS IN USE.
utions to Common Problems Baking Problems For best cooking results pre-heat the oven when baking cookies, breads, cakes, pies or pastries, etc. There is no need to preheat the oven for roasting meats or baking casseroles. The cooking times and temperatures needed to bake a product may vary slightly from your previous appliance. Baking Problems and Solutions Chart BakingProblems Cookies cuits and burn Causes bis- Solutions Cookies on the bottom.
utions to Common Problems OVENCONTROLBEEPSAND D_SPLAVS AN °'F" ERRORCODE [] [] • [] [] [] m [] [] [] m [] [] m [] [] [] [] [] [] m [] [] [] Electronic control has detected a fault condition. Push CANCEL pad to clear the display and stop the display from beeping. Reprogram the oven. If a fault reoccurs, record the fault number, push the CANCEL pad and contact an authorized servicer.
Solutions to Common Problems SELFoCLEAN_NG CYCLEDOESNOTWORK [] [] [] [] [] [] [] [] [] [] [] [] [] [] [] [] [] [] [] [] [] [] • Make sure the oven door is closed. • Make sure you have removed the oven racks and the oven rack supports from the oven. • Controls not set properly. Follow instructions under "Using the Self-Clean Feature".
Notes
Warranty information Your appliance or replace is covered by a one year limited any parts of this appliance warranty. that prove For one year from your original to be defective in materials date of purchase, or workmanship when Electrolux such appliance will repair is installed, used, and maintained in accordance with the provided instructions.