% Use _ Care Guide Gas Slide-_l n Range 318 203 894 (0809) Rev.
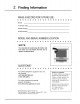
Finding Information MAKEA RECORDFORFUTUREUSE [] [] [] [] [] [] [] [] [] [] [] [] [] [] [] [] [] [] [] [] [] Brand Purchase Date Model Number Serial Number MODELANDSER(ALNUMBERLOCAT)ON [] II [] [] [] [] II [] [] [] [] [] [] [] [] [] I! [] [] [] II [] NOTE The sedaiplateis(ocateda(ongthe interior side trim of the oven and visib(ewhen the door is opened. See picture below.
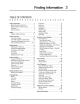
Finding Information 3 TABLEOFCONTENTS [] [] [] [] [] [] [] [] [] [] [] Finding Information ............................................ 2 Makea Recordfor Future Use.........................2 Modeland Serial NumberLocation..................2 Questions?....................................................... 2 Tableof Contents ............................................. 3 Safety ................................................................... 4 ImportantSafety Instructions....................
IMPORTANT SAFE iNSTRUCTiONS [] [] [] [] [] [] [] [] [] [] [] [] [] [] [] [] [] [] [] [] [] Please read all safety instructions before using your new Electrolux range. WARNIN@ To reduce the risk of fire, electrical shock, or injury when using your appliance,follow basic precautions includingthe following: If the information in this manual is not followed exactly, a fire or explosion may result causing property damage, personal injury or death.
Safety 5 Stepping, leaning or sitting on the door or drawer of this appliance can result in serious injuries and may also cause damage to the appliance. Do not allow children to climb or play around the appliance. The 'weight of a child on an open door may cause the appliance to tip, resulting in serious burns or other injury. An open drawer, when hot, may cause burns Do not use the oven or warmer - drawer {if equipped) for storage.
Safety iMPORTANTiNSTRUCTiONSFOR USINGYOUR COOKTOP Use proper flame size---Adjust flame size so it does not extend beyond the edge of the utensil. The use of undersized utensils will expose a portion of the burner flame to direct contact and may result in ignition of clothing. Proper relationship of utensil to flame will also improve efficiency. Do not use stove top grills on the burner grates of sealed gas burners.
Safety 7 , * . - Placement of OvenFWarmer Drawer (if equipped) Racks. Always place oven racks in desired location while oven/drawer (if equipped) is cool. Remove all utensils from the rack before removing rack. If rack must be moved while oven is hot, use extreme caution. Use potholders and grasp the rack with both hands to reposition. Do not let potholders contact the hot oven element or interior of the oven/warmer drawer (if equipped).
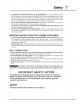
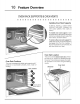
Feature Overview YOUR SUDEoJN _NGE m m m m R I m m I [] [] [] [] [] [] [] [] [] [] [] m PORCELAIN GRATES DEEPDRAWN COOKTOP TOUCHACTIVATED GLASS CONTROL LARGE CURVEDGLASSOVEN DOOR WARMER DRAWERDOOR WINDOW GLASS POWER BURNER 14 000 BTU REGULAR BURNER 9 500 BTU SIMMER BURNER 5 000 BTU DUAL FLAME BURNER '!8 000 BTU
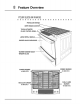
Feature Overview 9 YOURSL) -(N_NGE [] [] m [] [] B m OVEN DOOR LATCH E [] [] m [] m [] BB [] [] [] [] m [] OVEN VENT BROILING ELEfVIENT -- OVEN PACK SUPPORT SLIDEABLE OVEN PACKS -- CONVECTIONFAN OVEN LIGHT -- OVEN RACK SUPPORT BRACKETS \\ BROILERPAN BROILERPANGRiD CONVECTION ROASTINGRACK []
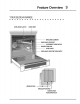
Feature Overview SUPPORTS & m [] m [] I m m m m [] B ' NTS [] [] [] m [] m Im m [] [] m Installing Oven Rack Supports ALWAYS INSTALL SUPPORT BEFORE THE OVEN (WHEN COOL). OVEN RACK TURNING ON THE OVEN tS To install oven rack support, insert the supports by pushing them downward into the two brackets on each side of the oven interior, as shown below. To remove the oven rack support for a self-clean cycle, pull upthe support to disengage them from the brackets.
Feature Overview I REMOV(NG ANDREPLAC(NG OVEN CKS [] [] [] [] [] [] [] [] !! [] [] [] [] [] [] [] [] [] [] [] [] [] Removing Sl(ding Oven Racks 1. With the rack in its closed position; grasp the rack and the sliders at once. 2. Slightly lift the rack and sliders and pull it to clear the first bracket. 3. Pull the rack and sliders until the second bracket stops the rack. 4. Lift the rack and sliders and carefully remove them from the oven.
2 Feature Overview CONTROLPADFUNCTIONS II III 1 II [] H II II [] [] In II [] II II U II II 11 II M Light Pad- Used to turn the oven light on and off. Bake Pad- Used to enter the normal baking mode temperature. Broil Pad- Used to select the variable broil mode. 5 Convection Bake Pad- Used to select the convection baking mode. Convection Roast Pad- Used to select the convection roasting mode. Keep Warm Pad- Used to select the keep warm mode.
Feature Overview 13 CONTROLPADFUNCT)ONS (CONTINUED) [] [] m II Im [] [] II II [] [] III [] I III 2! Bread Proof Pad- Used to select the bread proof mode. 22 Clean Pad- Used to select the self-cleaning II [] [] [] [] [] mode. Upper Oven Pad- Used to activate the upper oven for cooking operation. 24 Warmer Oven Pad- Used to activate the warmer oven for warming operation, 25 Lite Pad- Used to start a 2 hours self-clean cycle.
ng SEeiNG CLOCKATPOWERUP [] [] [] [] [] [] [] [] [] [] [] [] [] [] [] [] [] [] [] [] [] [] When the unit is first plugged in, or when the power supply to the range has been interrupted, the timer in the display wilt flash with "12:00". The clock cannot be set when the oven is on. If an invalid time of day is entered, the control will triple beep to prompt you to re-enter a valid time of day. To set the cJock (example for 1:30): 1. Press ._1_)/3)_.0-_pads to setthe time of dayto 1:30.
ng 5 OVEN LIGHT [] i [] m [] m [] m [] E [] i m i [] [] m R [] m [] m Your appliance includes "theater" style oven lighting feature that gradually lights both the upper and lower oven interiors to full brightness. The upper oven is equipped with 2 halogen lights and the lower oven is equipped with 1 incandescent light. The oven lights will turn on automatically when the oven door is opened.
G Surface Cooking LOCAT(ONS OFTHEBURNERS [] [] [] [] [] [] [] [] [] [] [] [] I [] [] [] [] [] [] [] [] [] The cooktop is equipped with different sized burners.
Surface Cooking 7 SURFACECOOKINGUTENSILS [] [] [] [] [] [] [] [] [] *GOOD [] [] [] [] [] [] [] [] [] [] [] [] q POOR • Curved and warped pan bottoms. • Flat bottom [] , Pan overhangs unit by more than 2.5 cm (1"). and straight sides. • Tight fitting lids. • Weight of handle does not tilt pan. Pan is well balanced. Pans should , Pan sizes match the amount of food Check for flatness by rotating a ruler across the bottom. There should be , Heavy handle tilts pan.
ng Surface Contro SETTINGSURFACECONTROLS [] II !! [] [] [] [] [] m I [] ! I Your cooktop may be equipped with any combination m [] I [] I [] [] m [] of the following burners: Simmer Burner: best used for simmering delicate sauces, etc. Standard Burner: used for most all surface cooking needs. Large Burner: best used when bringing large quantities of liquid to temperature preparing larger quantities of food.
ufface Cooking USINGTHEGRIDDLE m [] m [] [] [] [] [] [] I [] [] [] [] [] [] [] [] [] [] [] The griddle is intended for direct food cooking and can be used on both sides. Do not use pans or other cookware on the griddle. Doing so could damage the finish. With the grate in position over the burner, set the griddle on top of the grate positioning the notches in the griddle over the grate fingers (refer to figures 1 for optimal positioning).
2 Setting the Warmer Oven WAR l Ill ml [] OVENOPE T(ON [] To Operate !11 B [] the Warmer [] Ill [] [] [] [] [] Ill [] [] [] ml [] II Im Oven The purpose of the warmer oven is to keep hot cooked foods at serving temperature. Always start with hot food. It is not recommended to heat cold food in the warmer drawer. All food placed in the warmer oven should be covered with a lid or aluminum foil to maintain moisture and softness. Do not cover crisp foods.
Cooking [] [] [] i [] [] [] [] [] I [] [] I [] [] I [] 2 [] [] [] [] [] This mode is best used for your standard recipes• The hidden bake element is used to heat the air and maintain temperature. The temperature probe can be used in this cooking mode. The upper oven can be programmed to bake at any temperature from 170°F to 550°F with a default temperature of 350°F. Upper Oven Baking Tips: , Always preheat your oven before using the bake mode.
Cooking odes COOKT)ME m [] [] [] I m [] [] [] m I [] [] [] m [] m I [] [] [] [] CookTime allows the oven to be set to cookfor a set length of time and shut off automatically• The time remaining will always be shown in the timer section of the display. The oven will shut off and will beep when the countdown is finished• This feature can be used with Bake, Convection Bake, Convection Roast, SlowCook, KeepWarm, Defrost, Bread Proof, Dehydrate and Perfect Turkey cooking modes.
Cooking m m m [] [] [] m [] [] m [] [] [] [] [] [] [] [] [] m [] [] This mode is best for meats, fish and poultry up to 1" thick. Broiling is a method of cooking tender cuts of meat by direct heat under the broil element of the oven. The high heat cooks quickly and gives a rich, brown outer appearance. The temperature probe cannot be used with this mode.
Cooking odes CON CT(ON BAK)NG [] [] @ [] Convection Air F(ow [] I [] [] [] [] [] I [] [] [] B [] [] [] [] [] [] [] This mode of cooking enables you to obtain the best culinary results when baking with multiple pans and racks. Multiple rack baking may slightly increase cook time for some foods but the overall result istime saved. Most foods cooked in a standard oven will cook faster Bake and more evenly with Convection Bake.
Cooking 25 CON CT(ON CON RT [] II [] [] [] E [] II m [] [] [] II II m [] [] [] i [] II [] The Convection Convert pad is used to automatically convert a standard baking recipe for convection baking. When set properly, this feature is designed to display the actual converted (reduced) temperature in the display. Convection Convert may ONLY be used with a Convection Bake cooking mode. It can be used with the features End Time and Cook Time (see their sections for directions).
Cooking odes CON CTION ROASTING II II [] [] [] Ill [] [] [] III [] [] [] i It II [] [] [] III [] [] This mode is best for cooking tender cuts of beef, !amb, pork and poultry. Use this mode when cooking speed is desired. The Convection Roasting gently browns the exterior and seals in the juices. Convection roasting usesthe hidden bake element, the hidden convection element, the broil element and alan to circulate the oven's heat evenly and continuously within the oven.
Cooking KEEPWARM Ill I! II! !1 !11 [] II! [] !11 [] [] !11 [] [] [] Ill II! [] [] [] [] This mode is best for keeping oven hot foods warm for serving after cooking has finished. The Keep Warm feature uses the hidden bake element to maintain the temperature within the oven. The KeepWarm feature may be used with Multi-Stage (refer to its section for directions) if you wish to have the Keep Warm feature turn ON automatically when cooking has finished.
2 Cooking odes SLOWCOOK [] [] [] [] i [] [] [] [] [] [] [] [] Ill [] [] [] [] [] I [] [] This mode may be used to cook foods more slowly, at lower oven temperatures and provide cooking results much the same way as a Slow Cooker or Crock-Pot. The Slow Cook feature is ideal for roasting beefl pork & poultry. Slow Cooking meats may result in the exterior of meats becoming dark but not burnt. This is normal.
Cooking m [] [] [] [] [] [] [] [] [] [] [] [] [] This mode dries foods with heat from the convection [] [] element. [] [] [] [] [] [] The heat is circulated throughout the oven by the convection fan. Dehydrating is used to dry and/or preserve foods such as fruits, meats, vegetables and herbs. This mode holds an optimum low temperature while circulating the heated air to slowly remove moisture.
3 Cooking odes BREADPROOFING R [] m [] Ill l [] [] m [] m m m U [] [] m m [] I m Proofing bread prepares the dough for baking by activating the yeast. This feature is ideal for proofing, or rising bread dough. The oven can be programmed for Bread Proofing at any temperature between 85°F to 100°F with a default temperature of 100°F. Bread Proofing Tips: * , . , , No need to preheat for this feature. Proof bread until dough has doubled in bulk.
Cooking 3 PERFECTTURKEY This mode usesthe temperature probe to control preciselythe cooking of a perfect turkey. The convection system gently browns the turkey's exterior and seals in the juices. The temperature probe is required with this cooking mode (read its section on next page for more details). The oven can be programmed for Perfect Turkey at any temperature between 170°F to 550°F with a default temperature of 325°F. The probe default temperature for the perfect turkey feature is 180°F.
Cooking Modes PROBE TEMPE TURE ! R m ! m [] [] [] m m R [] [] [] I m m [] [] A [] li For many foods, especially roasts and poultry, testing the internal temperature is the best method to insure properly cooked food. The Temperature Probe gets the exact temperature you desire without having to guess. This feature can be used with Bake, Convection Bake, Convection Roast and Perfect Turkey cooking modes.
Cooking MULT STAGE m m m R [] [] [] [] [] [] [] [] [] [] [] [] [] [] [] [] [] [] This feature enables you to perform sequential cooking at the touch of a button. Its purpose is to program a queue of up to three cooking modes with individual cooking time and temperatures in a sequence. This feature can be used with most cooking modes; Baking, Broiling, Convection Baking, Convection Roasting, Convection Broiling, Keep Warm and Bread Proof.
Cooking odes IULTI STAGE(CONTINUED) m ml [] [] ! [] m m m [] m B m I m m m [] m m [] m Stage 3 14 Press KEEP WARM [_. "170" will start flashing in the display prompting to enter a temperature. 15. Enter a temperature using the numeric pads _ to (_.9_'/. 16. Press START€. "00:00" will start flashing in the display prompting to enter a cooktime. 17. Enter a cooktime using the numeric pads _0_) to 41). 18. Press START ¢. The cooking sequence will begin. Canceling 19.
Electronic Control Settings 35 USERPREFERENCES [] I[] [] [] [] [] [] [] [] [] [] [] [] [] [] [] [] [] [] [] [] The User Preferences menu includes all user defined options. This feature enables you to control the various options of the electronic controls.
Electronic Control Settings USERPREFERENCES (co.T .uED) [] [] [] [] E R I [] [] [] [] m [] Ill Ill m ml [] [] m [] [] SE_(NG CLOCKDJSP_Y w ONOR OFF The oven control can be programmed to display the time of day or not. The oven has been preset at the factory to display the time of day. Changing clock display between ON and OFF: 1. Press USER PREF _(_ until you get to the CLO on menu page. 2. Press hi or I to toggle between displaying or hiding the clock. 3.
Electronic Control Settings 37' USERPREFERENCES Ico.T .uEDI [] [] [] [] Im m m m B i m m i l m m [] [] i [] E SE_ING TEMPE_TURE DISPLAYm FAHRENHEITOR CELSIUS The oven control can be programmed to display temperatures oven has been preset at the factory to display in Fahrenheit. in Fahrenheit or Celsius. The To change display from Fahrenheit to Celsius or Celsius to Fahrenheit: 1. Press USER PREF _ until you get to the F-O F menu page. + 2.
3 Oven Controls FAVORFES R [] [] [] I [] [] [] [] [] [] [] [] m [] [] [] [] [] [] [] [] The Favorites settings allows you to save your most frequently used or most complex cooking sequences. This feature will save the cooking mode, the target temperature and the cooktime (if any). The oven can recall up to three cooking sequences from its internal memory, which are easily accessible from a one touch button. These functions can be used with all cooking modes and features.
Oven Controls 39 SABBATHFEATURE (FORUSEONTHEJEWISHSABBATH& HOUDAYS) [] II [] [] [] [] [] [] [] [] [] [] l! [] ll [] [] il [] [] [] [] 4- The HI hi and LO Io pads are used to set the Sabbath feature.
Oven Controls SABBATHFEATURE(CO.TINUED) [] [] [] [] [] [] [] [] [] [] [] [] [] [] [] [] [] [] [] [] []1 [] Note: You may change the oven temperature once baking has started. Press UPPER OVEN D ÷ - 4:> _PP_ BAKE the HI hi or LO Io pad to adjust the temperature and then press START TWICE (for Jewish Holidays only). Remember that the oven control will no longer beep or display any further changes once the oven is set for the Sabbath feature. OVEN _ 8.
Care & Cleaning USINGTHESELFoCL N F TURE [] [] [] [] [] [] [] [] [] [] [] [] [] [] [] [] [] [] [] [] [] [] Adhere to the Following Cleaning Precautions: , Allow the oven to cool before cleaning. , Wear rubber gloves when cleaning any exterior parts of the oven manually. @ During the self-cleaning cycle, the outside of the oven can become very" hot to the touch. DO NOT leave small children unattended near the appliance.
Care & Cleaning START(NGSELFoCL N CYCLE [] [] [] [] [] [] [] [] [] [] [] [] [] [] [] [] [] [] [] [] [] [] A self-cleaning oven cleans itself with hig htemperatures (well above cooking temperatures) which eliminate soil completely or reduce it to a fine powdered ash you can whisk away with damp cloth. If you are planning to use the oven directly after a self-clean cycle remember to allow time for the oven to cool down and the oven door to unlock. This normally takes about one hour.
Care & Cleaning GENE L CLBoNING [] [] [] [] [] [] [] [] [] [] [] [] [] [] [] [] [] [] [] [] [] Cleaning Various Parts of Your appliance Before cleaning any part of the appliance, be sure all controls are turned OFF and the appliance is COOL. REMOVE SPILLOVERS AND HEAVY SOILtNG AS SOON AS POSSIBLE.
Care Cleaning CAREANDCL_N)NG OFSTAINLESS STEEL [] [] [] [] [] [] [] [] [] [] [] [] [] [] [] [] [] [] [] [] [] [] Special care and cleaning are required for maintaining the appearance of stainless parts. Please refer to the table provided at the beginning of the General Care & Cleaning section in this Use & Care Manual. TO REMOVEAND REP_CE OVENDOOR [] [] 1. 2.
Care& Cleaning 45 OVENUGHT [] [] [] [] [] [] [] [] [] [] [] [] [] [] [] [] 1 [] [] [] [] [] An interior oven light will turn on automatically when the oven door is opened. The oven light may be turned on when the door is closed by using the oven light switch located on the control panel. The lamp is covered with a glass shield. The glass shield can be remove to be cleaned manually or to change the oven light. THIS GLASS SHIELD MUST BE IN PLACE WHENEVER THE OVEN IS IN USE.
General Care & Cleaning CLEANING THE BURNER G TE& BURNER HEADS [] [] [] [] [] [] [] Surface Burner Grate Surface Burner Cap Surface Burner Head Orifice-__ ,,, c_lectr°de _.. Figure 1 [] [] [] [] [] [] BURNER CAPS AND _il [] [] [] [] [] [] [] The Grates, Burner Caps and the Large 18k Burner Head should be routinely cleaned.
General Care & Cleaning 47' PORCE IN ENAMEL COOKTOP CLONING INSTRUC ONS [] II II II III Ill II II III [] [] Ill II Ill [] [] II II II II II [] WARNIN@ Donot usea cooktopcteaneron a hotcooktop.Thefumescan behazardoustoyourhealth,andcanchemically damagethe cookingsurface. CAUTmON Beforecleaningthe surfacecooktop,be surethe controlsare turnedto OFF and the cooktopis cod. DOriOT use commercial oven cleaners on the exterior surfacesincludingrangetopand door frame.
Solutions to Common Problems BakingProblems For best cooking results pre-heat the oven when baking cookies, breads, cakes, pies or pastries, etc. There is no need to preheat the oven for roasting meats or baking casseroles. The cooking times and temperatures needed to bake a product may vary slightly from your previous appliance. Baking Problemsand SolutionsChart BakingProblems Causes Solutions Cookies and biscuits burn on the bottom.
Solutions to Common Problems )MP@RTANT Before calling for service, review this list. it may save you both time and expense. This list includes common experiences that are not the result of defective workmanship or matedal in your cooktop. OVEN CONTROL BEEPS AND D)SP_YS AN '°F" ERROR CODE [] [] [] [] [] [] [] [] [] [] [] [] [] [] [] [] [] [] [] [] [] [] • Electronic control has detected a fault condition, Push CANCEL pad to clear the display and stop the disp(ay from beeping.
Solutions to Common Problems OVEN S[_OKES EXCESSIVELY DURING BROILING [] [] [] [] [] [] [] [] [] [] [] [] [] [] [] [] [] [] [] [] [] [] , Meat too close to the broiler element. Reposition the rack to provide more clearance between the meat and the broiler. Preheat broil element for quick searing operation. • Meat not properly prepare& Remove excess fat from meat. Cut remaining fatty edges to prevent curling, but do not cut into the lean. • Grid on broiler pan wrong side-up.
Warranty information 5 Your appliance is covered by a one year limited warranty. For one year from your original date of purchase, Electrolux will repair or replace any parts of this appliance that prove to be defective in materials or workmanship when such appliance is installed, used, and maintained in accordance with the provided instructions.