
Installation guide


INDUCTION
COOKTOP
INSTALLATION
INSTRUCTIONS
important
Notes
to
the
Installer
1.
Read
all
instructions
contained
in
these
installation
instructions
before
installing
the
cooktop.
NWEGINING)
An
extension
cord
must
not
be
used
with
this
appliance.
Such
use
may
result
in
a
fire,
electrical
shock,
or
other
personal
injury.
2.
Remove
all
packing
material
before
connecting
the
electrical
supply
to
the
cooktop.
3.
The
appliance
should
be
connected
to
the
fused
3.
Observe
all
governing
codes
and
ordinances.
disconnect
(or
circuit
breaker)
box
through
4.
Be
sure
to
leave
these
instructions
with
the
flexible
armored
or
nonmetallic
sheathed
cable.
consumer.
The
flexible
armored
cable
extending
from
this
5.
Only
certain
cooktop
models
may
be
installed
over
appliance
should
be
connected
directly
to
the
certain
built-in
electric
oven
models.
Approved
cooktops
and
built-in
ovens
are
listed
by
the
MFG
ID
number
and
product
code.
grounded
junction
box.
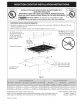
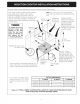
The
junction
box
should
be
located
as
shown
in
Figure
2
with
as
much
slack
as
possible
remaining
in
the
cable
between
the
box
and
the
appliance,
so
it
can
be
moved
if
servicing
is
ever
necessary.
A
suitable
strain
relief
must
be
provided
to
attach
the
flexible
armored
cable
to
the
junction
box.
important
Note
to
the
Consumer
Keep
these
instructions
with
your
Use
and
Care
Guide
4.
for
future
reference.
U
king
| i
M
PO
RTANT
SA
FETY
1
eee
ord
ciecaly
mesact
the
cooktop.
.
Be
sure
the
bottle
of
cleaner
conditioner
packed
INSTRUCTIONS
in
the
literature
bag
is
left
where
the
user
can
*
Be
sure
your
cooktop
is
installed
and
grounded
find
it
easily.
It
is
important
that
the
ceramic-glass
properly
by
a
qualified
installer
or
service
cooktop
be
pretreated
before
use.
See
Cooktop
technician.
Cleaning
and
Maintenance
section
in
the
Use
¢
This
cooktop
must
be
electrically
grounded
in
and
Care
Guide.
accordance
with
local
codes
or,
in
their
absence,
with
the
National
Electrical
Code
ANSI/NFPA
No.
70—iatest
edition
in
the
United
States.
The
electrical
power
to
the
cooktop
must
be
shut
off
while
line
connections
are
being
made.
Failure
to
do
so
could
result
in
serious
injury
or
death.
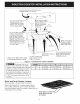
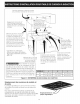
Electrical
Connection
Connect
the
flexible
armored
cable
that
extends
from
the
surface
unit
to
the
junction
box
using
a
suitable
strain
relief
at
the
point
the
armored
cable
enters
the
junction
box.
Then
make
the
electrical
connection
as
follows.
Electrical
ground
is
required
on
this
appliance.
WAIN]
This
appliance
is
equipped
with
a
copper
conductor
flexible
cable.
If
connection
is
made
to
aluminum
house
wiring,
use
only
special
connectors
which
are
approved
for
joining
copper
and
aluminum
wires
in
accordance
with
the
National
Electrical
Code
and
local
codes
and
ordinances.
Improper
connection
of
aluminum
house
wiring
to
copper
leads
can
result
in
a
short
circuit
or
fire.
Follow
the
connector
manufacturer
recommended
procedure
closely.
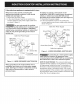
Provide
Electrical
Connection
Install
the
junction
box
under
the
cabinet and
run
120/240
or
120/208
Volt,
AC
wire
from
the
main
circuit
panel.
NOTE:
DO
NOT
connect
the
wire
to
the
circuit
panel
at
this
time.
Electrical
Requirements
Observe
all
governing codes
and
local
ordinances.
1.
A
3-wire
or
4-wire
single
phase
120/240
or
120/208
Volt,
60
Hz
AC
only
electrical
supply
is
required
on
a
separate
circuit
fused
on
both
sides
of
the
line
(time-delay
fuse
or
circuit
breaker
is
recommended).
DO
NOT
fuse
neutral.
2.
Acircuit
breaker
or
fuse
rated
at
50
Amp
is
required
for
36"
models
and
40
Amp
for
the 30"
model.
This
appliance
is
manufactured
with
a
supply
wire
and
a
frame
connected
green
or
bare
copper
grounding
wire.
DO
NOT
ground
to
a
gas
supply
pipe.
DO
NOT
connect
to
electrical
power
supply
until
appliance
is
permanently
grounded.
Connect
the
ground
wire
before
turning
on
the
power.
NOTE:
Wire
sizes
and
connections
must
conform
with
the
fuse
size
and
rating
of
the
appliance
in
accordance
with
the
National
Electrical
Code
ANSI/NFPA
No.
70—latest
edition
and
local
codes
and
ordinances.