EW6S3626BM EN Washing Machine User Manual
www.electrolux.com CONTENTS 1. SAFETY INFORMATION....................................................................................3 2. SAFETY INSTRUCTIONS..................................................................................4 3. INSTALLATION.................................................................................................. 6 4. ACCESSORIES..................................................................................................9 5. PRODUCT DESCRIPTION...............
ENGLISH 1. 3 SAFETY INFORMATION Before the installation and use of the appliance, carefully read the supplied instructions. The manufacturer is not responsible for any injuries or damage that are the result of incorrect installation or usage. Always keep the instructions in a safe and accessible location for future reference. 1.
www.electrolux.com staff kitchen areas in shops, offices and other working environments; – by clients in hotels, motels, bed & breakfast and other residential type environments; – areas for communal use in blocks of flats or in launderettes. Do not exceed the maximum load of 6 kg (refer to the "Programme chart" chapter). The operating water pressure at the water entry point from the outlet connection must be between 0.5 bar (0.05 MPa) and 8 bar (0.8 MPa).
ENGLISH • • • • • • • • • Do not install or use a damaged appliance. Do not install or use the appliance where the temperature can be less than 0°C or where it is exposed to the weather. The floor area on which the appliance is to be installed must be flat, stable, heat resistant and clean. Make sure that there is air circulation between the appliance and the floor. When the appliance is in its permanent position, check if it is levelled correctly with the aid of a spirit level.
www.electrolux.com • Make sure that all metal objects are removed from the laundry. 2.5 Service • • To repair the appliance contact the Authorised Service Centre. Use original spare parts only. Please note that self-repair or nonprofessional repair can have safety consequences and might void the guarantee. • • • • Disconnect the appliance from the mains electrical and water supplies. Cut off the mains electrical cable close to the appliance and dispose of it.
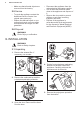
ENGLISH 7 1 2 6. Put the appliance back into an upright position. Remove the power supply cable and the drain hose from the hose holder. We recommend that you keep the packaging and the transit bolts for any transport of the appliance. 3.2 Positioning and levelling Adjust the appliance correctly to prevent vibration, noise and movement of the appliance when it operates. WARNING! It is possible to see water flowing from the drain hose. This is because the washing machine has been tested at the factory.
www.electrolux.com 3.3 The inlet hose WARNING! Make sure there is no damage to hoses and there are no leaks from the couplings. Do not use an extension hose if the inlet hose is too short. Contact the service centre for a replacement inlet hose. 1. Connect the water inlet hose to the back of the appliance. 1. Make a U shape with the drain hose and put it around the plastic hose guide. 2. On the edge of a sink - Fasten the guide to the water tap or to the wall. 45º 20º 2.
ENGLISH drain pipe. Refer to the illustration. 9 Make sure that the drain hose makes a loop to prevent particles going into the appliance from the sink. 6. Position the hose directly to a built-in drain pipe in the room wall and tighten it with a clamp. The end of the drain hose must always be ventilated , i.e. the inner diameter of the drain pipe (min. 38 mm - min. 1.5") must be larger than the external diameter of the drain hose. 5.
www.electrolux.com 5. PRODUCT DESCRIPTION 5.1 Appliance overview 1 2 8 3 9 4 5 11 12 6 10 7 1 2 3 4 5 6 7 Worktop Detergent dispenser Control panel Door handle Rating plate Drain pump filter Feet for levelling the appliance 8 9 10 11 12 Drain hose Inlet hose connection Mains cable Transit bolts Hose support 6. CONTROL PANEL 6.
ENGLISH 6.2 Control panel description 2 1 13 1 2 3 4 5 6 7 Programme dial Spin reduction options touch button Temp. touch button Display Delay Start touch button Time Manager touch button Start/Pause 3 4 12 11 8 9 10 11 12 13 touch button 6.3 Display The Temperature area: Temperature indicator Cold water indicator Child safety lock indicator.
www.electrolux.com Delay start indicator. Door locked indicator. The digital indicator can show: • Programme duration (e. g. • Delay time (e. g. • Cycle end ( • Warning code (e.g. ). ). ). ). Time Manager bars level indicator. Maximum laundry weight indicator. Add garments indicator. Lights on during the beginning of the Wash phase, while the user can still pause the appliance and add more laundry. Drum clean indicator. Night indicator. Rinse Hold indicator.
ENGLISH maximum spin speed allowed, except for programme Denim. With this option you can change the default spin speed. Touch repeatedly this button to: • Decrease the spin speed. The display shows only the spin speeds available for the set programme. • Additional spin options No Spin . Set this option to deactivate all spin phases. The appliance performs the only draining phase of the selected washing programme. Set this option for very delicate fabrics.
www.electrolux.com Set this option to optimise the fabric softener distribution and improve fabric softness. Recommended when you use fabric softener. This option increases the programme duration. The corresponding indicator above the touch button illuminates and also stays permanently on during next cycles until this option is deactivated. 7.9 Easy Iron The appliance carefully washes and spins the laundry to prevent the creases. suitable for a full load of normally soiled garments.
ENGLISH 15 8. PROGRAMMES 8.1 Programme Chart Programme Default tem‐ perature Temperature range Reference spin speed Spin speed range Maxi‐ mum load Cottons 40 °C 90 °C - Cold 1200 rpm (1200- 400) 6 kg White cotton and coloured cotton. Normal and heavy soil. Cottons Eco 1200 rpm (1200- 400) 6 kg White cotton and fast-coloured cotton. Nor‐ mal soil. The energy consumption decreases and the time of the washing programme is ex‐ tended, ensuring good washing results.
www.electrolux.com Programme Default tem‐ perature Temperature range Reference spin speed Spin speed range Baby Clothes 40 °C 40 °C - Cold 1200 rpm 1 kg (1200 - 400) Delicate cycle suitable for baby's articles. High water level and delicate movement in washing phase protects colours and fibres. Silk 30 °C 800 rpm (800 - 400) 0,5 kg Special programme for silk and mixed syn‐ thetic items.
ENGLISH Programme Default tem‐ perature Temperature range Reference spin speed Spin speed range Maxi‐ mum load Outdoor 30 °C 40 °C - Cold 1200 rpm (1200- 400) 1,5 kg3) 1 kg4) 17 Programme description (Type of load and soil level) Do not use fabric softener and make sure that there is no soften‐ er residue in the detergent dis‐ penser. Synthetic sport items. This programme is designed to gently wash modern outdoor sportswear and is also suitable for gym, cy‐ cling or jogging clothes or similar.
www.electrolux.
ENGLISH 19 9. SETTINGS 9.1 Acoustic signals If you deactivate the acoustic signals, they continue to operate when the appliance has a malfunction. This appliance has different acoustic signals, that operate when: • You activate the appliance (special short tune). • You deactivate the appliance (special short tune). • You touch the buttons (click sound). • You make an invalid selection (3 short sounds). • The programme is completed (sequence of sounds for about 2 minutes).
www.electrolux.com Always obey the instructions that you find on the packaging of the detergent products. 1 Detergent compartment for prewash phase or soak pro‐ gramme (if available). Add the detergent for prewash and soak before the start of the programme. 2 Detergent compartment for washing phase. If you use a liquid detergent, put it immedi‐ ately before you start the pro‐ gramme.
ENGLISH 21 11.5 Setting a programme 1. Turn the programme dial to select the desired washing programme. B MAX 2 1 The position B of the detergent divider is for powder detergent in the rear compartment and for liquid detergent/additive or bleach in the front compartment. 3. To use only liquid detergent: Insert the detergent divider in position C. The indicator of the Start/Pause button flashes. 2. To change the temperature and/or the spin speed, touch the related buttons. 3.
www.electrolux.com 1. Touch the Start/Pause button to pause the appliance. The related indicator flashes. 2. Touch the Delay Start button repeatedly until the display shows and the indicator goes off. button 3. Touch the Start/Pause again to start the programme immediately. Changing the delay start after the countdown has started To change the delay start: 1. Touch the Start/Pause button to pause the appliance. The related indicator flashes. 2.
ENGLISH While a programme or the delay start operates, the appliance door is locked. • The display shows the indicator • . 1. Touch the button Start/Pause The indicator . starts flashing. 2. Wait until the door lock indicator stops flashing and goes off. Open the appliance door. If necessary, add or remove the items. Close the door and touch the Start/Pause button. The programme or the delay start continues. • • The time area shows active).
www.electrolux.com If you set a programme or an option that ends with water in the drum, the Stand-by function doesn't deactivate the appliance to remind you to drain the water. 12. HINTS AND TIPS WARNING! Refer to Safety chapters. 12.1 The laundry load • • • • • • • • • • • • Divide the laundry into: white, coloured, synthetics, delicates and wool. Follow the washing instructions on the laundry care labels. Do not wash white and coloured items together.
ENGLISH • colour of clothes, size of the load, degree of soiling, wash temperature and hardness of the water used. Follow the instructions that you find on packaging of the detergents or other treatments without exceeding the indicated maximum level ( ). Do not mix different types of detergents. • Use less detergent if: – you are washing a small load, – the laundry is lightly soiled, – there is large amounts of foam during washing.
www.electrolux.com 13.2 External cleaning Clean the appliance with mild soap and warm water only. Fully dry all the surfaces. Do not use a scouring pads or any scratching material. fluff fibers that fall off the clothes to be drained out with the water. Regularly examine the seal. Coins, buttons, other small items can be recovered at the end of the cycle. CAUTION! Do not use alcohol, solvents or chemical products. CAUTION! Do not clean the metal surfaces with chlorine-based detergent. 13.
ENGLISH Occasionally, at the end of a cycle the display may show the icon : this is a recommendation to perform the “drum cleaning”. Once the drum cleaning has been performed, the icon disappears. 3. Make sure that all detergent residue is removed from the upper and lower part of the recess. Use a small brush to clean the recess. 13.
www.electrolux.com 13.8 Cleaning the drain pump Regularly check the drain pump filter and make sure that it is clean. Clean the drain pump if: • • • The appliance does not drain the water. The drum does not turn. The appliance makes an unusual noise because of the blockage of the drain pump. • The display shows the alarm code WARNING! • Disconnect the mains plug from the mains socket. • Do not remove the filter while the appliance operates.
ENGLISH 1 2 5. 6. 7. 8. 2 9. 29 1 10. WARNING! Make sure that the impeller of the pump can rotate. If it does not rotate, contact the Authorised Service Centre. Make sure also that you tighten the filter correctly to prevent leakages. When you drain the water with the emergency drain procedure, you must activate the drain system again: 1. Put 2 litres of water in the main wash compartment of the detergent dispenser. 2. Start the programme to drain the water.
www.electrolux.com 13.9 Cleaning the inlet hose and the valve filter 1 2 3 45° 20° 13.10 Emergency drain If the appliance cannot drain the water, carry out the same procedure, described in 'Cleaning the drain pump' paragraph. If necessary, clean the pump. When you drain the water with the emergency drain procedure, you must activate the drain system again: 1. Put 2 litres of water in the main wash compartment of the detergent dispenser. 2. Start the programme to drain the water. 13.
ENGLISH 31 14.1 Introduction The appliance does not start or it stops during operation. First try to find a solution to the problem (refer to the table). If the problem persists, contact the Authorised Service Centre. WARNING! Deactivate the appliance before carrying out any check. In case of major problems, the acoustic signals operate, the display shows an alarm code and the Start/Pause • • button may flash continuously: - The mains supply is unstable. Wait until the mains supply is stable.
www.electrolux.com Problem Possible solution • • • The appliance does not • fill with water properly. • • Make sure that the water tap is open. Make sure that the pressure of the water supply is not too low. For this information, contact your local water authority. Make sure that the water tap is not clogged. Make sure that the inlet hose has no kinks, damages or bends. Make sure that the connection of the water inlet hose is correct.
ENGLISH Problem Possible solution • The appliance makes an unusual noise and vibrates. The programme dura‐ tion increases or de‐ creases during pro‐ gramme execution. • • Make sure the levelling of the appliance is correct. Refer to "Installation instruction". Make sure that the packaging and/or the transit bolts are removed. Refer to "Installation instruction". Add more laundry in the drum. The load may be too small.
www.electrolux.com Programmes Load (kg) Energy con‐ sumption (kWh) Water con‐ sumption (litre) Approxi‐ Remain‐ mate pro‐ ing mois‐ gramme ture (%)1) duration (minutes) Cottons 60°C 6 1.41 73 210 53 Cottons 40°C 6 0.86 74 180 53 Synthetics 40°C 3 0.70 66 135 35 Delicates 40°C 1 0.52 42 55 35 Wool 30°C 1 0.20 39 70 30 Standard 60°C cotton 6 0.76 47 215 53 Standard 60°C cotton 3 0.54 41 185 53 Standard 40°C cotton 3 0.
ENGLISH Spin Speed Maximum spin speed 35 1200 rpm 1) Connect the water inlet hose to a water tap with a 3/4'' thread. 17. QUICK GUIDE 17.1 Daily use 1 2 3 5 4 Connect the mains plug to the mains socket. Open the water tap. Load the laundry. Pour the detergent and other treatment in the proper compartment of the detergent dispenser. 1. Push the On/Off button to switch the appliance on. 2. Turn the programme dial to set the desired programme. 3.
www.electrolux.com Clean the filter regularly and, especially, if the alarm code display. appears on the 17.3 Programmes Programmes Cottons Load Product description 6 kg White cotton and coloured cotton. 6 kg White cotton and coloured cotton. Standard programmes for the Energy Label con‐ sumption values. Synthetics 3 kg Synthetic items or mixed fabric items. Delicates 1 kg Delicate fabrics such as acrylics, viscose, polyester items. Rapid 14min 1 kg Synthetic and mixed fabric.
ENGLISH product to your local recycling facility or contact your municipal office.
155280980-A-132020 www.electrolux.