
User manual

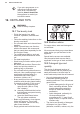

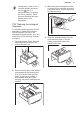
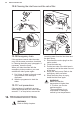
Table Of Contents
- CONTENTS
- 1. SAFETY INFORMATION
- 2. SAFETY INSTRUCTIONS
- 3. INSTALLATION
- 4. ACCESSORIES
- 5. PRODUCT DESCRIPTION
- 6. CONTROL PANEL
- 7. DIAL AND BUTTONS
- 8. PROGRAMMES
- 9. SETTINGS
- 10. BEFORE FIRST USE
- 11. DAILY USE
- 11.1 Activating the appliance
- 11.2 Loading the laundry
- 11.3 Using detergent and additives
- 11.4 Changing position of detergent divider
- 11.5 Setting a programme
- 11.6 Starting a programme
- 11.7 Starting a programme with the delay start
- 11.8 The SensiCare System load detection
- 11.9 Interrupting a programme and changing the options
- 11.10 Cancelling a running programme
- 11.11 Opening the door - Adding garments
- 11.12 End of the programme
- 11.13 Draining water out after end of cycle
- 11.14 Stand-by option
- 12. HINTS AND TIPS
- 13. CARE AND CLEANING
- 13.1 Periodic cleaning schedule
- 13.2 External cleaning
- 13.3 Descaling
- 13.4 Maintenance wash
- 13.5 Door seal with double lip trap
- 13.6 Cleaning the drum
- 13.7 Cleaning the detergent dispenser
- 13.8 Cleaning the drain pump
- 13.9 Cleaning the inlet hose and the valve filter
- 13.10 Emergency drain
- 13.11 Frost precautions
- 14. TROUBLESHOOTING
- 15. CONSUMPTION VALUES
- 16. TECHNICAL DATA
- 17. QUICK GUIDE

B
2 1
MAX
The position B of the detergent
divider is for powder detergent in the
rear compartment and for liquid
detergent/additive or bleach in the
front compartment.
3. To use only liquid detergent: Insert
the detergent divider in position C.
C
2 1
MAX
• Do not use gelatinous or thick
liquid detergents.
• Do not exceed the maximum dose
of liquid detergent.
• Do not set the prewash phase.
• Do not set the delay start function.
4. Measure out the detergent and the
fabric conditioner and carefully close
the detergent dispenser.
Make sure that the detergent divider is
inserted properly and does not cause a
blockage when you close the drawer.
11.5 Setting a programme
1. Turn the programme dial to select the
desired washing programme.
The indicator of the Start/Pause
button flashes.
2. To change the temperature and/or
the spin speed, touch the related
buttons.
3. If desired, set one or more options by
touching the related buttons. The
related indicators illuminate on the
display and the given information
changes accordingly.
If a selection is not possible
an acoustic signal sounds
and the display shows
.
11.6 Starting a programme
Touch the Start/Pause button to start
the programme.
The related indicator stops flashing and
stays on.
The programme starts, the door is
locked. The display shows the indicator
.
The drain pump can operate
shortly before the appliance
fills water.
11.7 Starting a programme with
the delay start
1. Touch the Delay Start button
repeatedly until the display shows the
desired delay time. On the display the
indicator shows .
2. Touch the Start/Pause
button. The
appliance door locks and starts the
countdown of the delay start. The display
shows the indicator .
When the countdown is completed, the
programme starts automatically.
Cancelling the delay start after
the countdown has started
To cancel the delay start:
ENGLISH 21