EW7F3946LS EN Washing Machine User Manual
www.electrolux.com CONTENTS 1. SAFETY INFORMATION....................................................................................3 2. SAFETY INSTRUCTIONS..................................................................................4 3. INSTALLATION.................................................................................................. 6 4. PRODUCT DESCRIPTION................................................................................ 9 5. CONTROL PANEL..............................
ENGLISH 1. 3 SAFETY INFORMATION Before the installation and use of the appliance, carefully read the supplied instructions. The manufacturer is not responsible for any injuries or damages that are the result of incorrect installation or usage. Always keep the instructions in a safe and accessible location for future reference. 1.
www.electrolux.com • • • • • • • • The appliance must be connected to the water mains using the new supplied hose sets, or other new hose sets supplied by the Authorised Service Centre. Old hose sets must not be reused. If the mains power supply cable is damaged, it must be replaced by the manufacturer, its Authorised Service Centre or similarly qualified persons to avoid an electrical hazard. Before any maintenance operation, deactivate the appliance and disconnect the mains plug from the socket.
ENGLISH • • Do not install the appliance where the appliance door cannot be fully opened. Do not put a closed container to collect possible water leakage under the appliance. Contact the Authorised Service Centre to ensure which accessories can be used. 2.2 Electrical connection WARNING! Risk of fire and electric shock. • • • • • • • • • The appliance must be earthed. Always use a correctly installed shockproof socket.
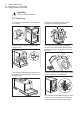
www.electrolux.com 3. INSTALLATION WARNING! Refer to Safety chapters. 3.1 Unpacking 1. Remove the external film. If necessary, use a cutter. 2. Remove the cardboard top and the polystyrene packaging materials. 3. Open the door. Remove all the items from the drum . 4. Put the front polystyrene packaging element on the floor under the appliance. Carefully put down the appliance onto its rear side. 5. Remove the polystyrene protection from the bottom. Put the appliance back into an upright position.
ENGLISH 7. Remove the three transit bolts and pull out the plastic spacers. 8. Put the plastic caps, that you find in the user manual bag, in the holes. 3.2 Information for installation 1. Connect the water inlet hose to the back of the appliance. Positioning and levelling Adjust the appliance correctly to prevent vibration, noise and movement of the appliance when it operates. 1. Install the appliance on a flat hard floor. The appliance must be levelled and stable.
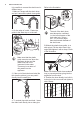
www.electrolux.com It is possible to connect the drain hose in different ways: Refer to the illustration. 1. Make a U shape with the drain hose and put it around the plastic hose guide. 2. On the edge of a sink - Fasten the guide to the water tap or to the wall. The end of the drain hose must always be ventilated , i.e. the inner diameter of the drain pipe (min. 38 mm min. 1.5") must be larger than the external diameter of the drain hose. 5.
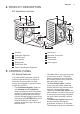
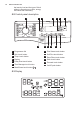
ENGLISH 9 4. PRODUCT DESCRIPTION 4.1 Appliance overview 1 2 8 3 9 10 4 5 11 12 6 7 1 2 3 4 5 6 7 Worktop Detergent dispenser Control panel Door handle Rating plate Drain pump filter Feet for levelling the appliance 8 9 10 11 12 Drain hose Inlet hose connection Mains cable Transit bolts Hose support 5. CONTROL PANEL 5.
www.electrolux.com the laundry load and the type of fabric without consuming more time, energy and water than necessary. 5.2 Control panel description 1 2 13 3 4 12 11 10 5 9 6 7 8 1 Programme dial 2 Spin touch button 8 Plus Steam touch button 3 Temp. touch button 4 Display 10 Extra Rinse touch button 5 Delay Start touch button 12 Prewash touch button 6 Time Manager touch button 7 Start/Pause touch button 5.
ENGLISH 11 The Temperature area: Temperature indicator . Cold water indicator. Child safety lock indicator. Door locked indicator. Delay start indicator. The digital indicator can show: • Programme duration (e. g. • Delay time (e. g. • Cycle end ( ). ). ). • Warning code (e.g. • Error indicator ( ). ). Time Manager indicator. Steam phase indicator. Anti-crease phase indicator. Drum clean indicator. This is a recommendation to perform the drum cleaning.
www.electrolux.com 6. DIAL AND BUTTONS 6.1 Introduction The options/functions are not available with all washing programmes. Check the compatibility between options/functions and washing programmes in the "Programme Chart". An option/function can exclude another one, in this case the appliance doesn't allow you to set incompatible options/ functions. • • . Set this option to deactivate all spin phases. The appliance performs the only draining phase of the selected washing programme.
ENGLISH The appliance empties the water out automatically after 18 hours approximately. 6.5 Prewash With this option you can add a prewash phase to a washing programme. The corresponding indicator above the touch button illuminates. • Use this option to add a pre-wash phase at 30 °C before the washing phase. This option is recommended for heavily soiled laundry, especially if containing sand, dust, mud and other solid particles. The options can increase the programme duration. 6.
www.electrolux.com 6.11 Time Manager Synthetics the Start/Pause button, the appliance begins the countdown and the door is locked. Cotton Eco indicator Cotton The display shows the indicator and the selected delay time. After touching ■ ■ ■ ■ ■ ■ ■ ■ ■ ■ ■ ■ With this option you can reduce the programme duration depending on the load size and the degree of soiling. When you set a washing programme, the display shows the default duration and dashes.
ENGLISH 15 7. PROGRAMMES 7.1 Programme Chart Programme Default tem‐ perature Temperature range Maximum spin speed Spin speed range Maxi‐ mum load Programme description (Type of load and soil level) Washing programmes Cotton 40 °C 90 °C - Cold Cotton Eco1) 40 °C 60 °C - 40 °C Synthetics 40 °C 60 °C - Cold Delicates 40 °C 40 °C - Cold 1400 rpm 9 kg (1400- 400 rpm) White cotton and coloured cotton. Normal, heavy and light soil. 1400 rpm 9 kg (1400- 400 rpm) White cotton and fast-coloured cotton.
www.electrolux.com Programme Default tem‐ perature Temperature range Maximum spin speed Spin speed range Maxi‐ mum load Programme description (Type of load and soil level) Steam programmes with FreshScent System Steam programmes can be used for reducing wrinkles and odours2) of garments that just need to be refreshed, avoiding washing. The fabric fibres are relaxed and after‐ wards ironing becomes effortless. When the programme is completed, quickly re‐ move the laundry from the drum3).
ENGLISH Programme Default tem‐ perature Temperature range Maximum spin speed Spin speed range Maxi‐ mum load 1 kg FreshScent - 17 Programme description (Type of load and soil level) Cottons, Synthetics, Delicates. Short and gentle steam programme to refresh even your very delicate garments, including very delicate garments with sequins, lace etc. When treat‐ ing smaller loads, the programme duration can be further reduced by means of the Time Manager option.
www.electrolux.com Programme Default tem‐ perature Temperature range Outdoor 30 °C 40 °C - Cold Maximum spin speed Spin speed range Maxi‐ mum load Programme description (Type of load and soil level) 1200 rpm 2.5 (1200- 400 kg4) rpm) 1 kg5) Do not use fabric softener and make sure that there is no soften‐ er residue in the detergent dis‐ penser. Synthetic sport items.
ENGLISH Programme Default tem‐ perature Temperature range Wool/Silk 40 °C 40 °C - Cold Maximum spin speed Spin speed range 1200 rpm (1200 400 rpm) Maxi‐ mum load 1.5 kg 19 Programme description (Type of load and soil level) Machine washable wool, hand washable wool and other fabrics with «hand washing» care symbol6). 1) This programme at 60 °C with a load of 9 kg is the reference programme for energy label data, in compliance with UAE. S 5010 2:2013.
Wool/Silk ■ ■ ■ Time Manager Delay Start Plus Steam Soft Plus Extra Rinse Prewash1) Spin Programme Stain 2) www.electrolux.com No Spin 20 ■ 1) Prewash and Stain cannot be selected together. 2) This option is not available with temperature lower than 40 °C. 3) If you set the No Spin option, the appliance performs draining only. 7.
ENGLISH 21 9. BEFORE FIRST USE 1. Make sure that the electrical power is available and the water tap is open. 2. Pour 2 litres of water into the detergent compartment marked by . This action activates the drain system. 3. Pour a small quantity of detergent into the compartment marked by 4. Set and start a programme for cotton at the highest temperature without any laundry in the drum. This removes all possible dirt from the drum and the tub. . 10. DAILY USE WARNING! Refer to Safety chapters. 10.
www.electrolux.com - Compartment for fabric softener and other liquid treatments(fabric condi‐ tioner, starch). - Maximum level for quantity of liquid additives. gent. - Flap for powder or liquid deter‐ Always follow the instructions that you find on the packaging of the detergent products, but we recommend that you do not exceed the maximum indicated level ( ). This quantity will however guarantee the best washing results.
ENGLISH display and the given information changes accordingly. If a selection is not possible an acoustic signal sounds and the display shows . 10.6 Starting a programme Touch the Start/Pause button to start the programme. The related indicator stops flashing and stays on. The programme starts, the door is locked. The display shows the indicator . The drain pump can operate shortly before the appliance fills water. 10.7 Starting a programme with the delay start 1.
www.electrolux.com Once removed the exceeding garments, touch the Start/Pause button to start the programme again. The SensiCare phase can be repeated up to three times (see point 1). Important! If the laundry amount will not be reduced, the washing programme starts anyway, despite the overload. In this case, it will be not possible to guarantee the best washing results.
ENGLISH 2. Press the Start/Pause button: the appliance drains the water and spins. The indicator of the Start/Pause button goes off. The option indicator Rinse Hold The door unlocks and the indicator goes off. 3. 4. 5. When you activate the appliance again, the display shows the end of the previous programme. Turn the programme dial to set a new cycle. Remove the laundry from the appliance. Make sure that the drum is empty.
www.electrolux.com • • • • • • • • • • • • Follow the washing instructions on the laundry care labels. Do not wash white and coloured items together. Some coloured items can discolour with the first wash. We recommend that you wash them separately for the first couple of times. Button up pillowcases, close zippers, hooks and poppers. Tie up belts. Empty pockets and unfold. Turn multilayered fabrics, wool and items with printed illustrations inside out. Pre-treat tough stains.
ENGLISH 27 12. CARE AND CLEANING WARNING! Refer to Safety chapters. 12.1 External cleaning Clean the appliance with mild soap and warm water only. Fully dry all the surfaces. CAUTION! Do not use alcohol, solvents or chemical products. 12.
www.electrolux.com part of the recess. Use a small brush to clean the recess. Occasionally, at the end of a cycle the display may show the icon : this is a recommendation to perform the “drum cleaning”. 12.6 Cleaning the detergent dispenser To prevent possible deposits of dried detergent or clotted fabric softener and/or formation of mould in the detergent dispenser drawer, once in a while carry out the following cleaning procedure: 4. Insert the detergent drawer into the guide rails and close it.
ENGLISH 29 WARNING! • Do not remove the filter while the appliance operates. • Do not clean the pump if the water in the appliance is hot. Wait until the water cools down Proceed as follows to clean the pump: 1. Open the pump cover. 2 1 2. Place a suitable bowl below the drain pump access to collect the water that flows out. 3. Open the chute downwards. Always keep a rag nearby to dry up any water spillages when removing the filter. 5.
www.electrolux.com 12. Close the pump cover. 2 1 11. Put the filter back into the special guides by turning it clockwise. Make sure that you tighten the filter correctly to prevent leakages. 2 When you drain the water with the emergency drain procedure, you must activate the drain system again: a. Put 2 litres of water in the main wash compartment of the detergent dispenser. b. Start the programme to drain the water. 1 12.
ENGLISH 31 45° 20° 12.9 Emergency drain If the appliance cannot drain the water, carry out the same procedure, described in 'Cleaning the drain pump' paragraph. If necessary, clean the pump. When you drain the water with the emergency drain procedure, you must activate the drain system again: 1. Put 2 litres of water in the main wash compartment of the detergent dispenser. 2. Start the programme to drain the water. 12.
www.electrolux.com • • - No communication between electronic elements of the appliance. Switch it off and switch on again. The programme was not finished properly or the appliance stopped too early. If the alarm code appears again, contact the Authorised Service Centre. - The appliance does not fill with water properly. After the proper check, start the appliance again by pressing Start/Pause button the appliance tries to resume the cycle . If the error persists the alarm code will appear again.
ENGLISH Problem Possible solution • • • The appliance does not • fill with water properly. • • Make sure that the water tap is open. Make sure that the pressure of the water supply is not too low. For this information, contact your local water authority. Make sure that the water tap is not clogged. Make sure that the inlet hose has no kinks, damages or bends. Make sure that the connection of the water inlet hose is correct.
www.electrolux.com Problem Possible solution • The appliance makes an unusual noise and vibrates. The programme dura‐ tion increases or de‐ creases during pro‐ gramme execution. • • • The SensiCare System is able to adjust the programme duration according to the type and the laundry load size. Refer to "The SensiCare System load detection" in "Dai‐ ly Use" chapter. • Increase the detergent quantity or use a different deter‐ gent.
ENGLISH 1. Press the On/Off button to switch the appliance off. 2. Disconnect the mains plug from the mains socket. 3. Open the filter flap. 4. Pull twice the emergency unlock trigger downward and open the appliance door. 35 5. Take out the laundry and then close the appliance door. 6. Close the filter flap. 14. CONSUMPTION VALUES Stated values are obtained in laboratory conditions with relevant stand‐ ards. Different causes can change the data: the quantity and type of laundry and ambient temperature.
www.electrolux.com Programmes Load (kg) Energy consump‐ tion (kWh) Water con‐ sumption (litre) Approxi‐ mate pro‐ gramme du‐ ration (mi‐ nutes) Cotton Eco 60°C1) 9 0.81 54 291 Cotton 40°C 9 1.25 80 200 Synthetics 40°C 4 0.78 55 130 Delicates 40°C 4 0.60 63 91 Wool/Silk 30°C 1.5 0.35 57 60 1) This programme at 60 °C with a load of 9 kg is the reference programme for energy label data, in compliance with UAE. S 5010 2:2013. Off Mode (W) Left On Mode (W) 0.30 0.
ENGLISH 16. ACCESSORIES 16.1 Available in www.electrolux.com/shop or from authorised dealer Only appropriate accessories approved by ELECTROLUX ensure the safety standards of the appliance. If unapproved parts are used, any claims will be invalidated. 16.2 Fixing plate kit (4055171146) Available from your authorised dealer. If you install the appliance on a plinth, secure the appliance in the fixing plates. Read carefully the instructions supplied with the accessory. 16.
www.electrolux.com 17. QUICK GUIDE 17.1 Daily use 1 2 3 5 4 Connect the mains plug to the mains socket. Open the water tap. Load the laundry. Pour the detergent and other treatment in the proper compartment of the detergent dispenser. 1. Push the On/Off button to turn the appliance on. 2. Turn the programme dial to set the desired programme. 3. Set the desired options by means of the corresponding touch buttons. 4. To start the programme, touch the Start/Pause button. 5. The appliance starts.
ENGLISH 39 17.3 Programmes Programmes Cotton Load Product description 9 kg White cotton and coloured cotton. 9 kg White cotton and coloured cotton. Standard programmes for the Energy Label con‐ sumption values. Synthetics 4 kg Synthetic items or mixed fabric items. Delicates 4 kg Delicate fabrics such as acrylics, viscose, polyester items. 1 kg Steam programme for wool and cashmere. 1 kg Steam programme for cotton, synthetic and delicate garments.
157019510-A-202018 www.electrolux.