
User manual


17
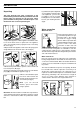
If you want to keep the alignment
of your appliance with the adja-
cent cupboards, you have the
possibility to cut the crossbar
holding the hoses located at the
back of your washing machine
(fig.6).
Water connection
Water inlet hose :
Connect the water inlet hose to
a cold water tap with a 3/4" gas
threaded orifice, after having
inserted the rugger sealing
washer with incorporated filter
(supplied with the machine) into
the hose collar. If the water
connection is made onto new
pipes or onto pipes which have
not been used for a long time, it is advisable to run off a
certain amount of water before connecting the machine.
This will avoid foreign matter blocking the filter placed at the
end of the water inlet hose.
Water outlet hose :
Place the curved end of the outled hose into a drain pipe
having a height between 70 and 100 cms from floor level or
secure it to a sink or bath tub. Make sure that the drain hose
is firmly secured so that it will not slip out or fall down from
its position.
The water should drain freely and, consequently, the drain
hose should not be choked or placed in such a way as to
obstruct the normal water flow. If an extension hose is
required, remember that it might cause a malfunction in the
drain pump, particularly if the extension has a length in
excess of 1 meter or if the diameter of the extension is
smaller than the diameter of the original drain hose.
Fig 6
INSTALLATION
Unpacking
The parts protecting the inner components of the
machine during transit are red. They must all be removed
before using your machine for the first time. These
parts and their securing means should be kept in case
the machine has to be transported again.
1. Unpack the appliance. Tilt the appliance backwards. Give
to one of the back corners a quarter turn. The appliance
comes free naturally out the polystyrene basis. Take away
this basis (fig.1).
2. Open the lid of the appliance and remove the polystyrene
wedge which blocks the drum. Close the lid (fig.2).
3. On the back part and with a spanner, remove the two red
loosened spacers (A) (fig.3).
4. The holes which are now visible must be closed with the
plugs (B) provided with the appliance (fig. 4).
5. Please ensure that these parts
have been removed from the
machine and keep them in case
of next transport (fig.5).
Nota : you can unscrew
washers, spacers and screws
using a spanner.
Be careful : when the machine is installed on carpeted floor,
ensure that the carpet do not obstruct the openings, located
at the base of the machine, which are provided for ventila-
tion.
Fig.1
Fig.2
Fig.4
B
A
Fig.3
Fig.5