Contents For the User For the Installer Safety information 3 Technical specifications 16 Disposal 4 Unpacking the machine 17 Your new washing machine 4 Description of the appliance 5-7 Installation - Machine front, Machine rear - Control panel General washing information - Damages - When lifting the machine - Transit locking devices - Levelling the machine - Water inlet - Water discharge - Electrical connection 8-9 Programme chart 10-11 Using the appliance 12-13 Gebrauchsanweisung -
Safety information Before installing and first using the washing machine, read this instruction booklet carefully, including it’s hints and warnings. To avoid unnecessary mistakes and accidents, it is important to ensure that all people using the washing machine are thoroughly familiar with it’s operation and safety features.
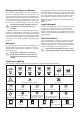
Disposal - the packing material: - energy saving tips: To save water, energy and help protect the environment, we recommend that you follow these hints: Never leave packaging material in a place where children may play with it. All materials used in packaging this machine are environmentally-friendly. The various plastics used are identified and can be recycled: ● ● PE stands for polyethylene, which is used for the bag around the machine and the bag in which these instructions were supplied.
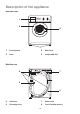
Description of the appliance Machine front 1 2 3 4 1 Control panel 3 Door latch 2 Door 4 2 adjustable feet Machine rear 7 8 6 5 5 Inlet hose 7 Power cord 6 Discharge hose 8 Transit locking devices -5-
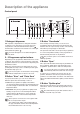
Description of the appliance Control panel 1 2 3 4 5 6 7 8 9 1 Detergent dispenser 3 Button ”Vorwäsche” With separate compartments for detergent and fabric conditioner. The detergent is poured in the larger compartment on the left marked with the symbol and the fabric conditioner in the smaller one on the right marked with the symbol . If the laundry is heavily soiled, you can choose a programme with pre-wash. Before the main wash the machine then run a pre-wash up to 30°C.
6 Button ”Start/Pause” This button has two functions: Start: Press the button in order to start the required programme. The corresponding indicator lamp is lit. The indicator lamp for ”Locked” in the programme progress display is lit and the door is locked. ”Spülstopp” (rinse hold), when selecting this position the water of the last rinse is not drained to prevent the laundry from creasing.
General washing information Sorting the laundry How much laundry per load? ● Do not allow moist laundry to lay for any longer period of time. Moist laundry becommes mouldy and begin to smell. The mould stains can not be removed. Since it’s difficult to weigh the laundry we suggest that you appriciate the weight by looking to see how full the drum is. ● It’s not recommended to mix coloured with white materials. Cotton and linen: Full drum, but not too tightly packed.
Detergent and fabric conditioner Good washing result depends on among other things of the choice of detergent and the correct dosage. Too low dosage can cause resoiling in the form of grey burls, brown discolouration from the drum and odour in the machine. Too much detergent has a negative impact on the environment. Even biodegradable detergents contains substances which can disturb the balance of the environment.
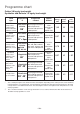
Programme chart Cotton 3.0 kg dry load weight Synthetics and Delicate 1.5 kg dry load weight Load type Temperature °C White Koch-/Bunt- Wash programme 95°C without pre-wash. wäsche heavily soiled working clothes, sheets, tablecloths, underwear, towels. White normally soiled sheets, towels, underwear. Synthetic lightly soiled underwear, anticrease shirts, blouses. Time minutes Extra Kurz Kurz Vorwäsche Spar Spülen Plus 1,43 44 ~ 126 without pre-wash. 3 rinses and spin max. 1100 rpm/min.
Wool 1.0 kg dry load weight Special programmes 3.0 kg dry load weight Load type Temperature °C Programme content Woollens Wolle Wash programme Cold, 30°C without pre-wash. 3 rinses and spin max. 900 rpm/min. garments with woolsymbol or marked with ”Machine washable”. Cold 30° Rinses/Spülen this programme can be used for rinsing hand washed garments. Drain/Pumpen emptying the last rinse water in programmes with the rinse hold option. Spin/Schleudern separate spin for hand washed items.
Using the appliance Have you removed all the transit locking devices? The very first time the machine is used, you should run a wash programme without any load, to clear any residues which may have been left by the manufacturing process. Pour approx. 100 ml of detergent straight into the drum and run a programme at 60°. When the programme is finished, the machine will be ready for use.
Interrupting a programme Press the Start/Pause button to interrupt a programme which is running. The corresponding light starts to flash. After approx. 1 minute the door can be opened. The programme continues when you press the button again. Cancelling a programme Turn the programme selector to the ”Aus” position, to cancel a pre-set programme. Now you can select a new programme. Opening the door when the programme has started Press the Start/Pause button. The door can be opened after approx.
Maintenance The cabinet Clean the outside surfaces of the appliance using a mild (non-abrasive) household cleaning product. Finish by removing remaining traces of the product with a damp cloth. 1 Do not use cleaning products which contain alcohol (spirits), thinners and similar substances. The detergent dispenser In time, residues of detergent and fabric conditioner are likely to build up inside the detergent dispenser. It should be cleaned at regular intervals by flushing it out with water.
If the machine is not working Before calling out an engineer, please check through the details below because some faults can be rectified easily without the need to call out an engineer. If an engineer is called to resolve a problem listed below or to repair a fault caused by incorrect installation or mis-use a charge will be made, even if the appliance is under guarantee. Fault Check The machine will not start.
Service Service and spare parts Servicing and possible repairs must be carried out by a service company authorised by the supplier. Use only spare parts supplied by these. Before calling service, use the trouble shooting table ”If the machine is not working” to try to attend to the fault yourself. Note that electrical faults shall always be rectified by a certified electrician. Give the appliance’s model designation, product- and serial numbers according to the data plate.
Unpacking Damages If the machine has been damaged during transport, you should immediately notify the company responsible for delivering it. Check that the machine is undamaged. If you discover any damage, faults or that anything is missing, you should notify the dealer immediately. 1 B Never leave packaging material in a place where children may play with it. When lifting the machine Be careful when lifting the machine.
Installation Levelling the machine 1 The machine must be installed on a sound and firm surface and must not be touching walls or furniture. Adjust the two front feet to level the machine. Make sure the machine is resting on all four feet (Fig. 1). Some vibration is normal and unavoidable when the machine is spinning the load, particularly if the floor is not a concrete one.
Installation Water discharge 1 The discharge hose can be placed in these three ways: Over the top edge of a washtub: Use this option only if you can be sure that the hose will not move when the machine is draining. The hose can be fixed to the wall on a hook or tied to the tap with a string (Fig. 1). Directly into a waste pipe with a trap: The discharge pipe can be connected directly into the pipe (e.g. one beneath a washtub or kitchen sink), above the water trap.