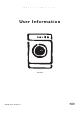
W a s h i n g M a c h i n e User Information EWF 1080 822 943 166-01 - 25.06.
Dear customer, Please read this user information carefully. In particular, pay attention to the section ”Safety” on the first pages. Keep this user information in a safe place for later reference. Pass it on to any subsequent owners of the unit. 1 Points which are necessary for your safety or which are important for the unit's functional capability are highlighted by a warning triangle and/or signal words (Warning!, Caution!, Attention!). Always remember. 1.
Contents Instructions for use . . . . . . . . . . . . . . . . . . . . . . . . . . . . . . . . . . . . . . . . . . . . . . . . . . . . . . . . . . . . . . . . 5 Safety . . . . . . . . . . . . . . . . . . . . . . . . . . . . . . . . . . . . . . . . . . . . . . . . . . . . . . . . . . . . . . . . . . . . . . . . . . . . . . 5 Disposal . . . . . . . . . . . . . . . . . . . . . . . . . . . . . . . . . . . . . . . . . . . . . . . . . . . . . . . . . . . . . . . . . . . . . . . . . . . . 6 Environment Tips .
Setting up and connection instructions . . . . . . . . . . . . . . . . . . . . . . . . . . . . . . . . . . . . . . . . . . . . 30 Technical Data /Dimensions . . . . . . . . . . . . . . . . . . . . . . . . . . . . . . . . . . . . . . . . . . . . . . . . . . . . . . . . . . . . 30 Safety Instructions for Installation . . . . . . . . . . . . . . . . . . . . . . . . . . . . . . . . . . . . . . . . . . . . . . . . . . . . . . . Setting Up the Unit . . . . . . . . . . . . . . . . . . . . . . . . . . . . . . . .
Instructions for use 1 Safety The safety of ELECTROLUX electrical appliances conforms to the recognised technical regulations and the legislation covering the safety of appliances. However, as manufacturers, we still regard it as our responsibility to inform you of the following safety information. • Refer to the ”Installation and Connection Instructions” later in this user information.
2 Disposal Dispose the packing material! Dispose of your washing machine's packaging correctly. All the packaging materials used are harmless to the environment and can be recycled. • Plastic parts are marked with standard international abbreviations: >PE< for polyethylene, e.g. sheet wrapping material >PS< for polystyrene, e.g. padding material (always CFC-free) >POM< for polyoxymethylene, e.g.
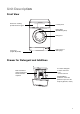
Unit Description on Front View Drawer for washing powder and care agent Control panel Rating plate (behind filling door) Filling door Screw feet (height-adjustable) Flap in front of drain pump Drawer for Detergent and Additives Main wash detergent (powder) and water softener if required Pre-wash detergent/ in-wash stain treatment or water softener Liquid additives (softeners, wash-care products to preserve the shape of garments, starch) 7
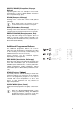
Control Panel Programme Progress Display Spin speed/RINSE HOLD button Additional Programme Buttons DOOR indicator START/PAUSE button Programme Knob The programme knob is used to set the wash cycle (for example, water level, drum movement, number of rinses, spin speed) most suitable for the type of washing, as well as the temperature of the water. OFF (Aus, Arrêt) • Switches the washing machine off - at all other positions the machine is on.
GENTLE RINSE (Feinspülen, Rinçage Délicat) Separate gentle rinse, for example to rinse handwashed items (3 rinses, liquid additive washed in from compartment æ, spin). DRAIN (Pumpen, Vidange) Draining of the water after a Rinse Hold (without spinning). 3 Rinse Hold means: the washing is left to soak in the last rinse water, it is not spun. SPIN (Schleudern, Essorage) Draining of the water after Rinse Hold and Spin, or separate Spin for hand-washed Cottons/Coloureds.
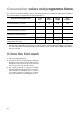
Consumption values and programme ogramme times The values for selected programmes given in the following table were established under normal conditions. They are intended as a useful guide for normal household use.
Prepare the Washing shing Cycle Sort and Prepare the Washing • Sort the washing according to care codes and type (see ”Washing Types and Care Codes”). • Empty pockets. • Remove metal parts (paper clips, safety pins etc.). • To prevent washing damage and washing snags: Close zip fasteners, button closed bed covers and pillow cases, and tie together ribbons, e.g. on aprons. • Use clothing made of double-layer fabric (sleeping bag, anorak etc.).
Washing Detergents and Care Agents Which washing detergent and care agent? 2 Use only washing detergents and care agents which are suitable for use in washing machines. Always follow the manufacturer's instructions.
Performing a Wash Cycle e Brief guide A wash cycle consists of the following steps: 1. Open the door and load the washing. 2. Close the door. 3. Add detergent/additives. 4. Set the appropriate wash programme: – Set the programme and temperature using the programme knob – Set additional programme functions as required. 5. Change the Spin Speed / press RINSE HOLD (Spülstopp, Arrêt Cuvé Pleine) as necessary. 6. Start the wash programme by pressing the START/PAUSE (Start/Pause, Marche / Pause) button.
Opening and Closing the Door To open: pull the door by the handle. To close: push the door in firmly When the appliance is switched on, the DOOR (Tür, Porte) and the START/PAUSE (Start/Pause, Marche/ Pause) light indicate whether the door can be opened DOOR (Tür, Porte) light Light START/PAUSE (Start/Pause, Marche/Pause) Can the door be opened? flashes flashes yes, after about 2 minutes lit lit no1) is off flashes yes 1) Door is locked due to high water level or high temperature.
Add detergent/additives 3 Instructions on the use of detergents and additives are contained in the section “Detergents and additives”. 1. To open the detergent/additives drawer: grasp the flap under the drawer (1) and pull the drawer out (2) till it reaches the stop. 2. Add the detergent/additives.
Setting the Wash Programme For the correct programme, temperature and additional programme functions suitable for each type of washing, see "Programme Tables". 1. Set the programme knob to the desired programme and temperature. 3 2. Select any additional programme functions: The indicator light for the selected additional programme function comes on. – To change the selection, press another button. – To de-select, press the button again.
Starting the Wash Programme mme 1. Check that the stopcock is open. 2. Starting the wash programme: Press the START/ PAUSE (Start/Pause, Marche/Pause) button. The wash programme starts. 3 If the END (Ende, Fin) light flashes 4 times and at the same time an acoustic signal sounds 4 times when the START/PAUSE (Start/Pause, Marche/Pause) button is pressed, the door is not closed properly. If this happens, push the door firmly closed and press the START/PAUSE (Start/Pause, Marche/Pause) button again.
Changing the Wash Programme Changing or cancelling the programme 1. Press the START/PAUSE (Start/Pause, Marche/ Pause) button. 2. Turn the programme knob to OFF (Aus, Arrêt). The wash programme is cancelled. 3. Set another wash programme, if required. Otherwise, turn the programme knob to DRAIN (Pumpen, Vidange) or SPIN (Schleudern, Essorage) and press the START/PAUSE (Start/Pause, Marche/Pause) button. (The water is drained or the washing is spun.
Programme Tables bles Washing The tables do not show all the possible settings but only those likely to be selected for everyday operation. Type of washing, Care symbol Cottons ç Cottons/Coloureds èç 2) Coloureds èë max.
Separate Rinsing Type of washing Cottons/Linens Max. load (dry weight) 5kg 1) Easy-cares/Delicates 2.5kg Programme knob GENTLE RINSE (Feinspülen, Rinçage Délicat) 1) Reduce spin speed. Separate Spinning Type of washing Cottons/Linens Max. load (dry weight) 5kg Easy-Cares1) 2.5kg Delicates1) 2.5kg Wool/Silk(Handwash)1) 1) Reduce spin speed.
Cleaning and Care re Control Panel Attention! For cleaning panels and control parts, do not use furniture polish or any aggressive cleaning agents. Wipe off control panels with a damp cloth. Use warm water to do this. Washing Detergent Drawer The washing detergent drawer should be cleaned from time to time. 1. Pull out the washing detergent drawer as far as it will go. 2. Remove the washing detergent drawer with a firm pull. 3. Remove the softener insert from the middle compartment. 4.
Washing Drum The washing drum is made of high-quality stainless steel. Rust deposits on the drum can occur due to foreign bodies in the washing which can cause rust. Attention! Do not clean the stainless steel drum with acidic antiliming agents, scouring agents containing chlorine or iron or steel wool. Our Customer Service Department has suitable agents available. Remove any rust deposits on the drum using a stainless steel cleaning agent.
5. Check whether the pump wheel can turn right at the back of the pump housing. (It is normal for the pump wheel to turn jerkily.) If the pump wheel cannot turn, please inform Customer Service. 6. Replace the cover. Introduce the plates on the cover into the guide slots and turn the cover in a clockwise direction until tight. 7. Seal the emergency drain hose and lay it in the holder. 8. Close the door.
What to do, if… f… Remedying faults In the case of a fault, try to remedy the fault yourself with the help of the advice given here. If you ask Customer Service to help with one of the faults listed Problem here or to remedy a control fault, a Customer Service Technician’s visit incurs costs even during the warranty period. Possible Cause Remedy The power plug is not connected. Connect the plug to a power outlet. A domestic fuse has tripped. Replace the fuse. The door is not closed properly.
Problem Possible Cause Remedy The threaded inlet hose fitting is not watertight. Screw the inlet hose in firmly. The outlet hose is not watertight. Check the outlet hose and replace it, if necessary. The drain pump cover is not closed properly. Close the cover properly. Water runs out from under the Washing has been trapped in the washing machine. door. Stop the programme and free the washing from the door. Start a new programme.
Problem Possible Cause Remedy Programme continues, when the power failure is over. Power failure during a wash programme (all lights have gone out). Detergent residues are accumulating in the detergent drawer. Possibly interruption of power by the power supplier. (Door remains locked for approx. 2 minutes for safety reasons.) The stopcock is not turned on fully. If the washing is to be removed during the power failure: Turn the programme knob to OFF (Aus, Arrêt).
Carry Out Emergency Emptying • When the washing machine no longer pumps off the washing solution, an emergency emptying operation must be carried out. • When the washing machine is in a room where there is a frost risk, an emergency emptying operation must be carried out when there is a frost risk. Also: Unscrew the intake hose from the water tap and lay it on the floor. Empty the drainage hose.
Additional rinse cycles (RINSE+) (Spülen+, Rinçage+) çage+) The washing machine is set for very economical water consumption. However, for people who suffer from allergies, it can be helpful to rinse with extra water. 3 If RINSE+ is set, two extra rinse cycles are added to the COTTONS/LINENS (Koch-/ Buntwäsche, Couleurs), EASY-CARES/ EASY IRON (Pflegeleicht/Leichtbügeln, Textiles Mélanges/Facile à Repasser) and DELICATES (Feinwäsche, Délicat) programmes.
Child Safety ty Feature When the child safety feature is used, the filling door can no longer be closed and no more washing programs can be started. Setting the Child Safety Feature: Use a coin to turn the rotary knob (on the inside of the filling door) clockwise as far as it will go. 1 Warning! The rotary knob must not be pressed in following adjustment, otherwise the child safety feature is not active. The rotary knob must project as shown in the diagram.
Setting g up and connection tion instructions Technical al Data /Dimensions ons Height adjustment Approx. +10/-5mm Filling quantity max. 5kg (program-dependent) Use Domestic Drum speed, spin see rating plate Water pressure 1-10bar (=10–100N/cm2 = 0.1–1.0MPa) Safety Instructions ructions for Installation • Do not tilt the washing machine onto its front or onto its right side (looking from the front). Electrical components could get wet! • Check the washing machine for transport damage.
Setting Up the Unit 3 Washing machines with curved panels are not suitable for substructures. Transporting the Unit • Do not place the washing machine on its front side or on its right side (looking from the front). Otherwise the electrical components can get wet. • Never transport the unit without using the transport safeguard. Do not remove the transport safeguard until you reach the installation site. Transporting the unit without the transport safeguard can result in damage to the unit.
Special key A and sealing caps B (x 2) and C (x 1) come with the appliance. 3. Remove screw D and the spring with the special key A. 4. Close the hole with the sealing cap C. Important! Press the sealing cap in firmly so that it engages in the back (protects the inside of the appliance against splashes). 3 5. 6. 7. 8. 9. Undo two screws E with special key A. Undo four screws F with special key A. Remove transit bar G. Screw in the four screws F again. Close the two big holes with sealing cap B.
Setting Up on a Concrete Pedestal When setting up the washing machine on a concrete pedestal, it is essential for safety reasons to fit stand plates in which the washing machine is then adjusted. The stand plates are available from the Customer Service Centre. Setting Up on a Vibrating floor In the case of vibrating floors, especially wooden beam floors with flexible boards, securely screw a water-resistant wooden panel at least 15mm thick onto at least 2 of the floor beams.
Electrical Connection Refer to the rating plate for details of the mains voltage, current type and the necessary fuses. The rating plate is located at the top behind the filling door.
Water Inflow A pressure hose 1.35m in length is supplied. If a longer inflow hose is required, only a VDEapproved, complete set of hoses with fitted hose screw connections offered by our Customer Service is permissible. – Sets of hoses in lengths of 2.2m, 3.5m and 5m are available for washing machines without AquaControl. – Sets of hoses in lengths of 2.0m, 2.9m and 3.9m are available for washing machines with AquaControl.
Water Drainage The drainage hose can either be connected to a siphon or hung in a wash basin or bath tub. Only original hoses may be used for extension purposes (max. 3m on the floor and then up to 80cm high). The Customer Service stocks hoses in lengths of 2.7 and 4m. Attention! It is absolutely essential to install the drainage hose free of pinches. Water Drainage into a Siphon The grommet on the end of the hose fits all commonly used siphon types.
Index A Additives . . . . . . . . . . . . . . . . . . . . . . . . . . 7, 13, 15 C Cancelling the programme . . . . . . . . . . . . . . . . . . 18 Care agent . . . . . . . . . . . . . . . . . . . . . . . . . . . . 7, 12 Changing the programme . . . . . . . . . . . . . . . . . . 18 Child safety device . . . . . . . . . . . . . . . . . . . . . . . . 24 Child safety feature . . . . . . . . . . . . . . . . . . . . . . . 29 Coloureds . . . . . . . . . . . . . . . . . . . . . . . . . . 8, 11, 19 Conditioner . . .
Service vice In the section ”What to do if ...” there is a list of some faults which you can remedy yourself. Look there first if a fault occurs. If you find no information there, please consult your Customer Service Centre. Always prepare in advance for the discussion. By doing so you will simplify the diagnosis and the decision on whether customer service is necessary. Note the PNC-number and the S-number. Both can be found on the rating plate on the inside of the door on your washing machine PNC: .......
Servicestellen Points de Service 6032 Emmen Buholzstrasse 1 1028 Préverenges Le Trési 6 9000 St.