EWF 1084 EDW ................................................ .............................................
www.electrolux.com CONTENTS 1. 2. 3. 4. 5. 6. 7. 8. 9. 10. 11. 12. 13. SAFETY INFORMATION . . . . . . . . . . . . . . . . . . . . . . . . . . . . . . . . . . . . . . . . . . . . . . . . . . . 3 SAFETY INSTRUCTIONS . . . . . . . . . . . . . . . . . . . . . . . . . . . . . . . . . . . . . . . . . . . . . . . . . . 4 PRODUCT DESCRIPTION . . . . . . . . . . . . . . . . . . . . . . . . . . . . . . . . . . . . . . . . . . . . . . . . . 6 CONTROL PANEL . . . . . . . . . . . . . . . . . . . . . . . . . . . . .
ENGLISH 3 1. SAFETY INFORMATION Before the installation and use of the appliance, carefully read the supplied instructions. The manufacturer is not responsible if an incorrect installation and use causes injuries and damages. Always keep the instructions with the appliance for future reference. 1.1 Children and vulnerable people safety WARNING! Risk of suffocation, injury or permanent disability.
www.electrolux.com • If the supply cord is damaged, it must be replaced by the manufacturer, its service agent or similarly qualified persons in order to avoid a hazard. • The operating water pressure (minimum and maximum) must be between 0,5 bar (0,05 MPa) and 8 bar (0,8 MPa) • The ventilation openings in the base (if applicable) must not be obstructed by a carpet. • The appliance is to be connected to the water mains using the new supplied hose-sets. Old hose sets must not be reused. 2.
ENGLISH Water connection • Make sure not to cause damage to the water hoses. • The appliance is to be connected to the water mains using the new supplied hose-sets. Old hose sets must not be reused. • Before you connect the appliance to new pipes or pipes not used for a long time, let the water flow until it is clean. • The first time you use the appliance, make sure that there is no leakage. 2.2 Use WARNING! Risk of injury, electrical shock, fire, burns or damage to the appliance.
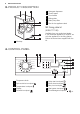
www.electrolux.com 3. PRODUCT DESCRIPTION 1 2 2 Detergent dispenser 3 3 Control panel 4 Door handle 5 Rating plate 6 Drain pump filter 4 7 Feet for the appliance level 5 3.1 Fixing plate kit (4055171146) Available from your authorized dealer. If you install the appliance on a plinth, secure the appliance in the fixing plates. Follow the instructions supplied with the kit. 6 7 1 Worktop 4.
ENGLISH 4.1 Display A B C B) C) D) E A) The time area: D E) 7 – Programme time. – The alarm codes. Refer to the chapter “Troubleshooting” for their description. – The level of the Time Manager . The Delay Start indicator. The Child Lock indicator. The Door Lock indicator: – It is on, you cannot open the door. – It is off, you can open the door. – It flashes, you cannot open the door. Wait for some minutes until the indicator is off. Washing phase indicators. 5.
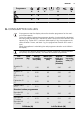
www.electrolux.com Programme Temperature range Type of load and soil Maximum load, Maximum spin To spin the laundry. All fabrics. 8 kg, 1000 rpm Spin Jeans 60 °C – Cold Items in denim and jersey. Also for items in dark colours. 8 kg, 1000 rpm Curtains 40 °C - Cold Special programme for curtains. The prewash phase activates automatically.2) 2 kg, 800 rpm Synthetic and delicate items. Light soil or items or items to refresh. 3 kg, 800 rpm Sports 30 °C Synthetic and mixed fabric items.
ENGLISH 9 Programme ■ ■ ■ ■ ■ ■ ■ ■ ■ ■ ■ 6. CONSUMPTION VALUES At programme start the display shows the duration programme for the maximum load capacity. During the washing phase the programme duration is automatically calculated and can greatly be reduced if the laundry load is lower than the maximum load capacity (e.g. Cotton 60°C, maximum load capacity 8 kg, the programme duration exceeds 2 hours; real load 1 kg, the programme duration don’t reach 1 hour).
www.electrolux.com Programmes Load (Kg) Energy consumption (kWh) 0.48 Water consumption (litre) Approximate programme duration (minutes) Remaining moisture (%)1) 0.48 The information given in the chart above are in compliance with the EU Commission regulation 1015/2010 implementing directive 2009/125/EC. 1) At the end of spin phase. 7. OPTIONS 7.1 Temperature 7.3 Prewash Set this option to change the default temperature. Indicator = cold water. The display shows the set temperature.
ENGLISH The Time Manager is available only with the programmes in the table. indicator Time Manager compatibility 1) You can activate this option: , the options and • After you press the programme knob are locked. • Before you press : the appliance cannot start. 7.9 Permanent extra rinse ■ ■ ■ ■ 2) 11 ■ ■ ■ ■ ■ ■ ■ ■ ■ ■ ■ ■ ■ ■ With this option you can permanently have an extra rinse when you set a new programme.
www.electrolux.com 9. DAILY USE 9.1 Loading the laundry 1. 2. 3. Open the appliance door. Put the laundry in the drum, one item at a time. Shake the items before you put them in the appliance. Make sure not to put too much laundry in the drum. Close the door. CAUTION! Make sure that no laundry stays between the seal and the door. There is a risk of water leakage or damage to the laundry. 9.2 Using detergent and additives • Measure out the detergent and the fabric conditioner.
ENGLISH 13 Liquid or powder detergent 1. 2. A 1 2 3. 4. B • Position A for powder detergent (factory setting). • Position B for liquid detergent. When you use the liquid detergent: – Do not use gelatinous or thick liquid detergents. – Do not put more liquid then the maximum level. – Do not set the prewash phase. – Do not set the delay start. 9.3 Setting a programme 1. 2. Turn the programme knob and set the programme: – The indicator flashes.
www.electrolux.com After approximately 15 minutes from the start of the programme: • The appliance adjusts automatically the programme duration agree with the laundry load. • The display shows the new value. 9.5 Starting a programme with delay start • Press again and again until the display shows the delay you want to set. The related indicator comes on the display. : • Press – The appliance starts the countdown. – When the countdown is completed, the programme starts automatically.
ENGLISH – You must drain the water to open the door. To drain the water: 1. If necessary, decrease the spin speed. if you set , the appliance only drains. 2. Press . The appliance drains the water and spins. 3. When the programme is completed and the door lock indicator goes off, you can open the door. 4. Turn the programme knob to deactivate the appliance. to 15 9.
www.electrolux.com • If your appliance has not the detergent dispenser with the flap device, add the liquid detergents with a dosing ball. 10.4 Ecological hints • Set a programme without the prewash phase to wash laundry with normal soil. • Always start a washing programme with the maximum load of laundry. • If necessary, use a stain remover when you set a programme with a low temperature. • To use the correct quantity of the detergent, check the water hardness of your domestic system 10.
ENGLISH 11.5 Cleaning the detergent dispenser 1. 2. 1 2 3. 4. 11.6 Cleaning the drain filter WARNING! Do not clean the drain filter if the water in the appliance is hot. 1. 2.
www.electrolux.com 3. 4. 2 1 5. 6. 1 7. 2 8. 1 2 9.
ENGLISH 19 11.7 Cleaning the inlet hose and the valve filter 1. 2. 1 2 3 3. 4. 20° 11.8 Emergency drain 1. Because of a malfunction, the appliance cannot drain the water. If this occurs, do steps (1) through (9) of 'Cleaning the drain filter'. If necessary, clean the pump. When you drain the water with the emergency drain procedure, you must activate again the drain system: 1. Put 2 litres of water in the main wash compartment of the detergent dispenser. 2. Start the programme to drain the water.
www.electrolux.com 12. TROUBLESHOOTING The start of the appliance does not occur or it stops during operation. First try to find a solution to the problem (refer to the table). If not, contact the service centre. • - The appliance door is open or not closed correctly. Please check the door! • - The mains supply is unstable. Wait until the mains supply is stable. With some problems, the acoustic signals operate and the display shows an alarm code: • - The appliance does not fill with water.
ENGLISH Problem 21 Possible solution Set the drain programme if you set an option which ends with water in the tub. The spin phase does not operate or the washing cycle lasts longer than usually. Set the spin programme. Make sure that the drain filter is not clogged. Clean the filter, if necessary. Refer to 'Care and cleaning'. Adjust manually the items in the tub and start the spin phase again. This problem may be caused by balance problems. There is water on the floor.
www.electrolux.com 13.
ENGLISH 23
132916460-A-062013 www.electrolux.