Steam System EWF 127570W ................................................ .............................................
electrolux Electrolux. Thinking of you. Share more of our thinking at www.electrolux.
electrolux 3 • Do not change the specification of this appliance. • Obey the maximum load volume of 7 kg (refer to the “Programme chart” chapter). • If the supply cord is damaged, it must be replaced by the manufacturer, its service agent or similarly qualified persons in order to avoid a hazard. • The operating water pressure (minimum and maximum) must be between 0,5 bar (0,05 MPa) and 8 bar (0,8 MPa) • The ventilation openings in the base (if applicable) must not be obstructed by a carpet.
electrolux • The appliance is to be connected to the water mains using the new supplied hose-sets. Old hose sets must not be reused. • Before you connect the appliance to new pipes or pipes not used for a long time, let the water flow until it is clean. • The first time you use the appliance, make sure that there is no leakage. USE Warning! Risk of injury, electrical shock, fire, burns or damage to the appliance. tact the Service to ensure which accessories can be used.
electrolux 5 1 Detergent dispenser drawer 2 Control panel 3 Door opening handle 4 Rating Plate 5 Drain pump 6 Adjustable feet DETERGENT DISPENSER DRAWER Compartment for detergent used for prewash and soak phase or for stain remover used during the stain action phase (if available). The prewash and soak detergent is added at the beginning of the wash programme. The stain remover is added during the stain action phase. Compartment for powder or liquid detergent used for main wash.
electrolux SPECIAL ACCESSORIES FOR INSTALLATION RUBBER FEET KIT (4055126249) Available from your authorized dealer. The rubber feet are particularly recommended on floating, slippery and wooden floors. Mount the rubber feet to prevent vibration, noises and displacement of the appliance during operation. Read carefully the instructions supplied with the kit. FIXING PLATE KIT (4055171146) Available from your authorized dealer.
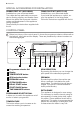
electrolux 7 DELAY START The programme can be delayed from 30 min - 60 min - 90 min, 2 hours and then by 1 hour up to a maximum of 20 hours by means of this button. TIME MANAGER These buttons allows you to modify the programme duration automatically proposed by the appliance. START PAUSE This button allows you to start or to interrupt the selected programme. DISPLAY 2.12 2.1 2.2 2.3 2.4 2.5 2.11 2.10 2.6 2.7 2.8 2.9 The display shows the following information: 2.1: Temperature value 2.
electrolux 2.8: Door locked icon : after you have pressed button 8 and the machine has started, this icon is lighted on and only the phase running icon stays on. When the programme has ) are displayed and this icon disappears. finished, three flashing zeros ( 2.9: • Duration of the set programme: after selecting a programme, the duration is dis). The duration is calculated automatiplayed in hours and minutes (for example cally on the basis of the maximum load for each type of fabric.
electrolux 9 = Freshen-up Options buttons and lights = Temperature = Spin = Prewash = Extra Rinse = Delay Start = Start / Pause = Child safety lock +/- = Time Manager buttons FIRST USE • Ensure that the electrical and water connections comply with the installation instructions. • Remove the polystyrene block and any material from the drum. • Before the first wash, run a cotton cycle at the highest temperature without any laundry in the machine, to remove any manufacturing residue from the drum and tub.
electrolux Measure out the detergent and the fabric softener Pull out the dispenser drawer until it stops. Measure out the amount of detergent required, pour it into the main wash compartor in the appropriate compartment ment if the selected programme/option it requires (see more details in «Detergent dispenser drawer»). If required, pour fabric softener into the compartment marked (the amount used must not exceed the «MAX» mark in the drawer). Close the drawer gently.
electrolux 11 flashes for 3 times and the Err message appears on the display for a few seconds. For the compatibility among the washing programmes and the options see chapter «Washing Programmes». SELECT THE DELAY START BY PRESSING BUTTON 7 Before you start the programme, if you wish to delay the start, press the button 7 repeatedly, to select the desired delay. The corresponding icon 2.6 will appear on the display in the upper part of the display.
electrolux ton 8 (if you wish to change the Time Manager option, you must cancel the running programme and make your selection again). Changing a running programme is possible only by resetting it. Turn the programme seand then to the new prolector dial to gramme position. Start the new programme by pressing the button 8 again. The washing water in the tub will be not emptied out. attention to the water level and temperature!).
electrolux 13 Button up pillowcases, close zip fasteners, hooks and poppers. Tie any belts or long tapes. Remove persistent stains before washing. Rub particularly soiled areas with a special detergent or detergent paste. Treat curtains with special care. Remove hooks or tie them up in a bag or net. REMOVING STAINS Stubborn stains may not be removed by just water and detergent. It is therefore advisable to treat them prior to washing. Blood: treat fresh stains with cold water.
electrolux ness of the water in your area can be obtained from the relevant water supply company, or from your local authority. If the water hardness degree is medium or high we suggest you to add a water softener following always the manufacturer’s instructions. When the degree of hardness is soft, readjust the quantity of the detergent. WASHING PROGRAMMES STEAM FUNCTION Steam can reduce creases and odours depending of the type of textile. Maximum amount of laundry : 1 kg of dried laundry.
electrolux 15 Programme - Maximum and Minimum Temperature - Cycle Description - Maximum Spin Speed Maximum Fabrics Load - Type of Laundry Rinse Rinse - Long spin Spin at the maximum speed Max. load 7 kg With this programme it is possible to rinse and spin cotton garments which have been washed by hand. To intensify the rinsing action, select the option EXTRA RINSE. The appliance will add some additional rinses. Options SPIN REDUCTION NIGHT CYCLE RINSE HOLD NO SPIN EXTRA RINSE Drain Draining of water Max.
electrolux Programme - Maximum and Minimum Temperature - Cycle Description - Maximum Spin Speed Maximum Fabrics Load - Type of Laundry Easy Iron 60° - Cold Main wash - Rinses Maximum spin speed at 900 rpm Max. load 1 kg Selecting this programme the laundry is gently washed and spun to avoid any creasing. In this way ironing is easier. Furthermore the machine will perform additional rinses.
electrolux 17 Programmes Load (kg) Energy consumption (kWh) Water consumption (litre) Approximate programme duration (minutes) Remaining moisture (%)1) Cottons 60 °C 7 1.40 62 150 53 Cottons 40 °C 7 0.90 62 140 53 Synthetics 40 °C 3.5 0.48 44 80 35 Delicates 40 °C 3.5 0.55 58 65 35 2 0.25 52 60 30 Wool/Hand wash 30 °C Standard cotton programmes Standard 60 °C cotton 7 1.20 49 176 53 Standard 60 °C cotton 3.5 0.85 39 144 53 Standard 40 °C cotton 3.5 0.
electrolux CLEANING THE DISPENSER DRAWER The detergent dispenser drawer should be cleaned regularly. The washing powder and additive dispenser drawer should be cleaned regularly. Remove the drawer by pressing the catch downwards and by pulling it out. 1 2 Important! Do not clean the drum with acidic descaling agents, scouring agents containing chlorine or iron or steel wool. 1. Remove any rust deposits on the drum with a cleaning agent for stainless steel. 2.
electrolux 19 1. Open the pump door. 2. Put a container below the recess of the drain pump to collect the water that flows out. 3. Press the two levers and pull forward the drainage duct to let the water flow out. 4. When the container is full of water, put the drainage duct back again and empty the container. Do steps 3 and 4 again and again until no more water flows out from the drain pump. 7. Remove fluff and objects from the pump. 8. Make sure that the impeller of the pump can turn.
electrolux refitting the pump cover, ensure it is securely re-tightened so as to stop leaks and young children being able to remove it. CLEANING THE WATER INLET FILTERS If you notice that the machine is taking longer to fill, check that the filter in the water inlet hose is not blocked. 1. Turn off the water tap. 2. Unscrew the water inlet hose. 3. Clean the filter in the hose using a hard bristle brush. 4. Screw the hose back onto the tap. 5. Unscrew the hose from the machine.
electrolux 21 WHAT TO DO IF… Certain problems are due to lack of simple maintenance or oversights, which can be solved easily without calling out an engineer. Before contacting your local Service Centre, please carry out the checks listed below.
electrolux Problem Possible cause/Solution There is water on the floor: Too much detergent or unsuitable detergent (creates too much foam) has been used. • Reduce the detergent quantity or use another one. Check whether there are any leaks from one of the inlet hose fittings. It is not always easy to see this as the water runs down the hose; check to see if it is damp. • Check the water inlet hose connection. The drain or inlet hose is damaged. • Replace it with a new one.
electrolux 23 Problem Possible cause/Solution After a steam programme, garments are not sufficiently smooth: A wrong STEAM programme has been selected (e.g. Synthetic instead of Cotton). • Note the composition of the fabric. Excessive laundry load. • Reduce the laundry load. If you are unable to identify or solve the problem, contact our service centre. Before telephoning, make a note of the model, serial number and purchase date of your machine: the Service Centre will require this information. Mod. .
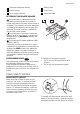
electrolux 2. Remove the power supply cable and the draining hose from the hose holders on the rear of the appliance. 6. Fill the smaller upper hole and the two large ones with the corresponding plastic plug caps supplied in the bag containing the instruction booklet. 3. Unscrew the three bolts. 2 1 4. Slide out the relevant plastic spacers. POSITIONING Install the machine on a flat hard floor. Make sure that air circulation around the machine is not impeded by carpets, rugs etc.
electrolux 25 the hose from your previous machine to connect to the water supply. This appliance must be connected to a cold water supply. 1. Connect the hose with the angled connection to the machine. 2. Do not place the inlet hose downwards. Angle the hose to the left or right depending on the position of your water tap. the tap, you will have to purchase a new, longer hose specially designed for this type of use. WATER DRAINAGE The end of the drain hose can be positioned in three ways.
electrolux ELECTRICAL CONNECTION Information on the electrical connection is given on the rating plate on the inner edge of the appliance door. Check that your domestic electrical installation can take the maximum load required, also taking into account any other appliances in use. Connect the machine to an earthed socket. injury through failure to comply with the above safety precaution. The power supply cable must be easily accessible after installing the machine.
electrolux 27
www.electrolux.