WASHING MACHINE I N S T RU C T I O N B O O K L ET EWF 1470 132 977 020
Contents Warnings Operating sequence 3 15-17 Washing programmes 18 International wash code symbols 19 Disposal 4 Tips for environmental protection 4 Technical specifications 4 After each wash 20 Maintenance wash 20 Installation 5 Door seal 20 Unpacking 5 Cabinet 20 Positioning 5 Detergent dispenser drawer 20 Water inlet 5 Drain filter 21 Water drainage 6 Electrical connection 6 Your new washing machine 7 Detergent dispenser drawer 7 Use Maintenance Control panel C
Dear customer, Please read these operating instructions carefully and pay particular attention to the safety notes indicated below. We recommend that you keep this instruction manual for future reference and pass it on to any future owners. Warnings The following warnings are provided in the interests of overall safety. You must read them carefully before installing or using the appliance. • Place small items such as socks, belts, etc.
• Make sure that children or pets do not climb into the drum. To avoid this the machine incorporates a special feature. To activate this device, rotate the button (without pressing it) inside the door clockwise until the groove is horizontal. If necessary use a coin. Disposal Packaging materials The materials marked with the symbol recyclable. are >PE<=polyethylene >PS<=polystyrene >PP<=polypropylene This means that they can be recycled by disposing of them properly in appropriate collection containers.
Installation 5. Set the machine upright and remove the remaining rear screw. Slide out the relevant pin. Unpacking 6. Plug all the holes with the plugs which you will find in the envelope containing the instruction manual. All transit bolts and packing must be removed before using the appliance. You are advised to keep all transit devices so that they can be refitted if the machine ever has to be transported again. 1. Using a spanner, unscrew and remove the two rear bottom screws.
The drain hose must not be kinked. Run it along the floor; only the part near the drainage point must be raised. The inlet hose must not be lengthened. If it is too short and you do not wish to move the tap, you will have to purchase a new, longer hose specially designed for this type of use. Water drainage The end of the drain hose can be positioned in four ways: Hooked over the edge of a sink using the plastic hose guide supplied with the machine.
Your new washing machine This new washing machine, which is fitted with the Jet System, patented Electrolux, meets all modern needs for effective treatment of laundry with low water, energy and detergent consumption. • The possibility of selecting the temperature and all the options offered by this washing machine gives you truly “customised” washing.
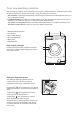
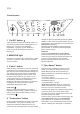
Use Control panel EWF 1470 Delay Cottons Synthetics Delicates Wool Hand wash On/Off Fabric 1 2 3 Anti+Bac 60°C 40°C 30°C Cold Temperature 4 Prewash 1400 1200 700 500 Night Cycle Soak Extra Rinse Time Save Eco Start/Pause Options Spin Speed 5 Skip/ Reset 6 Prewash Wash Rinses Spin Drain 7 8 9 10 11 12 will light up.
• Extra Rinse: can be used with all programmes except the Wool and Hand wash programme. The machine will add 2 rinses to the cotton programmes and 1 rinse to the synthetic and delicate programmes. This option is recommended for people who are allergic to detergents and in areas where the water is very soft. To complete the cycle, press Skip Reset button once,so as to cause all the lights to go off, the display will show three flashing dashes.
• The washing machine has stopped with water in tub, at the end of a programme with Night Cycle option: this is indicated by a blinking zero. • The washing machine has completed the programme: this is indicated by a blinking zero. The zero will reappear when you switch the washing machine on, unless the previous programme has been erased by means of the Skip Reset button.
To select rinses & spin, the programme must be paused (Start/Pause button depressed), now press the Skip button once, the wash LED goes out. 10 “Skip Reset” button This button performs two functions: - Clears the memory - Selects special programmes Prewash At the end of every programme the Reset button must be pressed once or repeatedly to clear the programme memory. This will be confirmed by three dashes, flashing in the display.
11 “Delay” button 12 Programme phase indicator lights This button makes it possible to delay the starting of the programme selected from 30 min - 60 min - 90 min, 2 hours and then by 1 hour up to a maximum of 23 hours.The delay you have selected is shown on the display for about 3 seconds; afterwards, the duration of the programme reappears. When you select a programme, the lights relevant to the phases that form the programme will light up.
Maximum loads Washing hints Recommended loads are indicated in the programme charts. Sorting the laundry General rules: Follow the wash code symbols on each garment label and the manufacturer’s washing instructions. Sort the laundry as follows: whites, coloureds, synthetics, delicates, woollens. Cotton, linen: drum full but not too tightly packed; Synthetics: drum no more than half full; Delicate fabrics and woollens: drum no more than one third full.
Rust: oxalic acid dissolved in hot water or a rust removing product used cold. Be careful with rust stains which are not recent since the cellulose structure will already have been damaged and the fabric tends to hole. If a dosage ball/device is supplied with your concentrate detergent, measure the detergent into the device/ball which should then be placed on top of the laundry and at the back of the machine drum.
Operating sequence Before the first wash we recommend that you run a cotton cycle at 90°C (Anti+Bac), with the machine empty, in order to remove any manufacturing residue from the drum and tub. Pour half a measure of detergent into the main wash compartment and start up the machine. 4. Switch the machine on To switch the machine on, press the On/Off button : the mains-on light comes on. The display will show three blinking dashes or a blinking zero. 1. Place the laundry in the drum On/Off Open the door.
6. Select the temperature 9. Select the Delay Press the Temperature button if you wish to select a temperature value different from the one proposed by the washing machine. The relevant light will light up. Before you start the programme, if you wish the starting to be delayed, press the Delay button repeatedly, or keep it pressed, to select the desired delay. The selected delay time value (up to 23 hours) will appear on the display for 3 seconds, then the duration of the programme will appear again.
11. How to change an option or a programme during its cycle Pay attention to the level and temperature of the water in the washing machine! When you close the door and press the On/Off button again, the washing machine will resume the programme from the point of where it had been interrupted. Before you make any change, you must PAUSE the machine by pressing the Start/Pause button. It is possible to change the temperature or any option before the programme carries it out.
Washing Programmes Type of laundry and degree of soil COTTONS Whites and fast coloureds Programme/ temperature Cottons Anti+Bac 90°C - 60°C Description Wash at 90°-60° 3 rinses Long spin Possible options SPIN SPEED NIGHT CYCLE PREWASH SOAK EXTRA RINSE TIME SAVE ECO Dispenserwashing agents * SPIN SPEED COTTONS Coloureds Wash at 60° - 40°- NIGHT CYCLE 30°C or cold PREWASH 3 rinses SOAK Long spin EXTRA RINSE Cottons 60°C - 40°C 30°C - Cold * TIME SAVE ECO** SYNTHETICS/MIXED FABRICS Whites and c
International wash code symbols These symbols appear on fabric labels, in order to help you choose the best way to treat your laundry. Energetic wash 95 60 40 30 Max. wash temperature 95°C Max. wash temperature 60°C Max. wash temperature 40°C Max.
Maintenance Detergent dispenser drawer Before any maintenance or cleaning is carried out you must DISCONNECT the appliance from the electricity supply. After a while, detergents and fabric softeners leave deposits in the drawer. Inspect the drawer regularly. To remove the drawer from the machine, press the button in the rear left-hand corner. After each wash Leave the door open for a while. This helps to prevent mould and stagnant smells forming inside the appliance.
Drain filter Water inlet filter The drain filter collects threads and small objects inadvertently left in the laundry. Check regularly that the filter is clean. If you notice that the machine is taking longer to fill, check that the filter in the water inlet hose is not blocked. Open the filter door by pulling it towards the right. Turn off the water tap. Place a container under the filter to catch any spillage. Unscrew the hose from the tap.
The dangers of freezing If the machine is exposed to temperatures below 0°C, certain precautions should be taken. • Turn off the water tap. • Unscrew the inlet hose. • Place the end of the inlet hose and that of the emergency emptying hose in a bowl placed on the floor and let the water drain out. • Screw the water inlet hose back on and put the emergency emptying hose back in its place after having screwed the cap on again.
Trouble-Shooting Guide Certain problems are due to lack of simple maintenance or oversights, which can be solved easily without calling out a service technician. Before contacting your local Service Centre, please carry out the checks listed below. During machine’s operation it is possible that one of the following alarm codes will appear on the display, then a warning signal will be heard.
Problem Possible cause • The door will not open: • The programme is still running, the drum is turning. • The door lock has not yet released. (door locked light on). • The water level is above the bottom edge of the door. • The machine is heating the water. • Spinning starts late or the laundry is not spun enough: • The electronic unbalance detection device has cut in because the laundry is not evenly distributed in the drum. The laundry is redistributed by reverse rotation of the drum.
ELECTROLUX APPLIANCE WARRANTY – NEW ZEALAND This appliance is warranted by Electrolux Home Products (NZ) Ltd (“the Company”) from the date of purchase. The following terms and conditions apply: 1 2 3 4 5 6 7 8 9 10 11 12 13 14 The Company or its Authorised Service Centre will pay the cost of repairing or replacing all parts of the appliance which the Company or its Authorised Service Centre find defective for a period of 24 months following the date of purchase (the “Warranty Period”).
ELECTROLUX WARRANTY AUSTRALIA Nothing in this warranty, limits any rights you may have under the Trade Practices Act or any other Commonwealth or State legislation. Such rights cannot be changed by the conditions in this warranty. Subject to the conditions below, this appliance is warranted by Electrolux Home Products Pty. Ltd. A.B.N. 51 004 762 341, (the “Company”), to be free from defects in materials and workmanship for a period of 24 months following the date of purchase (the “Warranty Period”).
The Electrolux Group. The world’s No. 1 Choice. The Electrolux Group is the world's largest producer of powered appliances for kitchen, cleaning and outdoor use. More than 55 million Electrolux Group products (such as refrigerators, cookers, washing machines, vacuum cleaners, chain saws and lawn mowers) are sold each year to a value of approx. USD 14 billion in more than 150 countries around the world.