EWF80743 EWF85743 EWF10843 EWF12843 ................................................... ....................................................................
www.electrolux.com CONTENTS 1 2 3 4 5 6 7 8 9 10 11 12 SAFETY INFORMATION .................................................................................... 3 PRODUCT DESCRIPTION ................................................................................. 6 CONTROL PANEL ............................................................................................ 7 BEFORE FIRST USE ....................................................................................... 12 DAILY USE ...............
ENGLISH 1. 3 SAFETY INFORMATION CONDITIONS OF USE This appliance is intended to be used in household and similar applications such as: Farm houses By clients in serviced apartments, holiday apartments and residential type environments. In the interest of your safety and to ensure the correct use, before installing and first using the appliance, read this user manual carefully, including its hints and warnings.
www.electrolux.com This appliance is not intended for use by persons (including children) with reduced physical, sensory or mental capabilities, or lack of experience and knowledge, unless they have been given supervision or instruction concerning use of the appliance by a person responsible for their safety. Do not use your washing machine to wash articles with whalebones, material without hems or torn material. Always unplug the appliance and turn off the water supply after use, clean and maintenance.
ENGLISH 5 1.3 USE This appliance is designed for domestic use. It must not be used for purposes other than those for which it was designed. Only wash fabrics which are designed to be machine washed. Follow the instructions on each garment label. Do not overload the appliance. See the relevant section in the user manual. Before washing, ensure that all pockets are empty and buttons and zips are fastened.
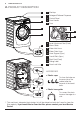
www.electrolux.com 2. PRODUCT DESCRIPTION 1 2 3 1 Worktop 2 Detergent/Softener Dispenser 3 Control Panel 4 Door Handle 5 Door 4 13 5 14 6 6 Level Adjustment Feet (Front) 7 Mains Cable 8 Water Inlet Hose 9 Water Drain Hose 10 Hose Support (2pcs) 11 Transit Bolts (3pcs) 12 Back Feet (Fixed) 13 Rating Label 7 14 Drum Leaf Lifter ACCESSORIES 9 11 8 10 12 Plastic caps To close the holes on the rear side of the cabinet after the removal of the transit bolts.
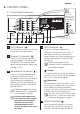
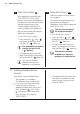
ENGLISH 7 3. CONTROL PANEL 3.1 Control Panel Description NOTE: For model EWF80743, this option replaced by “Easy Iron” program. * Picture of control panel model: EWF12843 1 1 2 3 On/Off Button ( 9 4 10 5 7 ) 4 On/Off button is used to turn on and turn off your washing machine. 2 Program Touchpads ( ) Press this touchpad to select the washing program. The relevant light will light up.
www.electrolux.com Different options can be combined which is dependent on the program selected. Quick With this option you can decrease the program duration. Use this option for items with light soil or items to refresh. This option will reduce the working time and the number of rinses. If you need to add more rinse phases, press “ ” + “ ” at the same time to add “Rinse Plus” option.
ENGLISH 6 Delay End Touchpad ( ) Before you start the program, this option makes it possible to define the end of the washing program from minimum 3 hours to maximum 20 hours. 7 Start/Pause Touchpad ( ) To start the selected program, press the “Start/Pause ( )”. To interrupt a program which is running, press the “Start/Pause ( )” to pause the machine, the Start/Pause pilot light flashes. NOTE: If program duration is longer than 3 hours minimum Delay End option starts from 4 hours.
www.electrolux.com 9 Child Lock Option ( ) 10 Your appliance is provided with CHILD SAFETY LOCK which permits you to leave the appliance unsupervised with the door closed without having to worry that children might be injured by or cause damage to the appliance. Set this option after pressing the Start/Pause touchpad. ) Select this option to add 2 rinses to a program. This option is recommended for people who are allergic to detergents, and in areas where the water is very soft.
ENGLISH 11 3.3 Programs + Options Cottons; Cold ( ) to 90 °C White and coloured cotton with heavy level of soil. EWF10843, EWF12843: 8 kg EWF85743: 7.5 kg EWF80743: 7 kg Mixed; Cold ( ) to 60 °C Synthetic or mixed EWF10843, EWF12843: fabric items with 4 kg normal level of soil. EWF80743, EWF85743: 3.5 kg Quick 20; 30 °C Synthetic and mixed fabric items. 1.5 kg Light soil and items to freshen EWF80743, up.
www.electrolux.com Baby Wear; Cold ( ) to 40 °C Energy Saving; 40 °C and 60 °C 2) Baby cotton clothes and delicate knitting items with normal soil; EWF10843, EWF12843: White and colourfast, cotton with normal soil. Set this program to have a good washing results and decrease the energy consumption. The time of the washing program is extended; EWF10843, EWF12843: EWF12843: EWF85743: EWF10843: EWF80743: EWF80743, EWF85743: 4 kg EWF80743, EWF85743: 3.5 kg 8 kg 7.
ENGLISH 13 5. DAILY USE Connect the mains plug to the mains socket. Turn the water tap on. 5.1 Four Steps Start Up Guide Step 1 - Loading The Laundry 1. IMPORTANT! Make sure that no metal objects are left in the laundry (e.g. hair clips, safety pins, pins). Make sure that you wash lint collectors separately from lint producers. Check and remove objects (if there are any) that could be trapped in the fold. 3. Place the laundry in the drum, one item at a time, shaking them out as much as possible.
www.electrolux.com Step 2 - Using Detergent And Additives 1. Detergent Dispenser Drawer Position up: for powder detergent (factory setting). When you use the liquid detergent: The detergent dispenser is divided into two compartments. - Compartment “DETERGENT” This compartment is used for detergent on all programs. - Compartment “SOFTENER” This compartment is used for fabric conditioner and starching agent. Powder or liquid detergent ( - Do not use gelatinous or thick liquid detergents.
ENGLISH - If required, pour fabric softener into the compartment marked (the amount used must not exceed the “MAX” mark in the drawer). 15 If you use thick softeners it is recommended to dilute with water. After washing cycle finish, residues of detergent, softener and water may remain in the dispenser. It is recommended to clean the dispenser regularly to remove any residue. - Close the drawer gently. Step 3 - Setting A Program For Washing 1. 2.
www.electrolux.com Step 4 - Starting a program To start a program, press the Start/Pause ( ) touchpad, the corresponding pilot light will stop flashing and a default program duration will be displayed on the screen. NOTE After starting the washing program the dot ( ) on the display starts to flash. The appliance will automatically adjust the selected program duration according to the type and size of the load (approximately 15 minutes).
ENGLISH When the program is completed and the door lock indicator “ ” goes off, you can open the door. 5.6 When The Washing Program Is Completed, But There Is Water In The Drum (Option “Rinse Hold ” is used) The drum turns regularly to prevent the creases in the laundry. The indicator “Start/Pause” flashes to remind you to drain the water. The door lock indicator “ ” is on. The door stays locked. You must drain the water to open the door. To drain the water: 1. Press the “Start/Pause ” touchpad.
www.electrolux.com 5.8 AUTO Stand-By Option The AUTO Stand-by option automatically deactivates the appliance to decrease the energy consumption when: After 5 minutes from the end of the washing program. Press the “On/Off” button to activate the appliance again. You do not press any touchpads for 5 minutes before you press “Start/Pause”. Press the “On/Off” button to activate the appliance again. 6. WASHING HINTS 6.
ENGLISH 6.4 Maximum Loads Recommended loads are indicated in the program charts. General rules: Cotton, linen: drum full but not too tightly packed; Synthetics, Delicate: drum no more than half full; woollens: drum no more than one third full. Washing a maximum load makes the most efficient use of water and energy. For heavily soiled laundry, reduce the load size. 6.5 Removing Stains Stubborn stains may not be removed by just water and detergent.
www.electrolux.com The choice of detergent will depend on the type of fabric (delicates, woollens, cottons, etc.), the colour, washing temperature and degree of soiling. Only low suds Front load washer detergents should be used in this appliance: powder detergents for all types of fabric, powder detergents for delicate fabrics (60 °C max) and woollens, liquid detergents, preferably for low temperature wash program (60 °C max) for all types of fabric, or special for woollens only. 6.
ENGLISH 7. INTERNATIONAL WASH CODE SYMBOLS These symbols appear on fabric labels, in order to help you choose the best way to treat your laundry. Energetic wash Max. wash Max. wash temperature temperature 95 °C 60 °C Max. wash temperature 40 °C Max. wash temperature 30 °C DO NOT wash at all Hand wash Delicate wash Bleaching Bleach in cold water Ironing Hot iron max. 200 °C Dry cleaning Dry cleaning in all solvents DO NOT bleach Warm iron max. 150 °C Lukewarm iron max.
www.electrolux.com 8. CARE AND CLEANING WARNING! You must DISCONNECT the appliance from the electricity supply, before you can carry out any cleaning or maintenance work. 8.1 External Cleaning Clean the appliance only with soap and warm water. Fully dry all the surfaces. CAUTION! Do not use alcohol, solvents or chemical products. 8.2 Descaling The water we use normally contains lime. It is a good idea to periodically use a water softening powder in the machine.
ENGLISH 23 8.6 Cleaning The Drawer Bottom After washing cycle finish, residues of softener and water may remain in the softener dispenser. It is recommended to clean the bottom of softener dispenser regularly to remove any residue. To clean the bottom of softener dispenser: 1. After pulling out the drawer from its recess, turn the bottom side up. 4. Close the softener bottom cover. 8.7 Cleaning The Drawer Recess 2. Push the catch and pull up the softener bottom cover.
www.electrolux.com To clean the water inlet filters: 1. Close the water tap. 2. Remove the water inlet hose from the water tap. 8.9 The Dangers Of Freezing If the machine is exposed to temperatures below 0°C, certain precautions should be taken. 3. Clean the filter in the inlet hose with a stiff brush. Do this procedure also when you want to do the emergency drain. Disconnect the mains plug from the mains socket. 4. Remove the inlet hose behind the appliance. 5.
ENGLISH 25 9. TROUBLESHOOTING Certain problems are due to lack of simple maintenance or oversights, which can be solved easily without calling out an engineer. Before contacting your local Service Centre, please carry out the checks listed below. During machine operation it is possible that the red Start/Pause pilot light flashes to indicate that the machine is not working. Once the problem has been eliminated, press the Start/Pause touchpad to restart the program.
www.electrolux.com Malfunction There is water on the floor: Unsatisfactory washing results: The door will not open: The machine vibrates or is noisy: Cycle time longer than displayed: Possible cause Solution Too much detergent or unsuitable detergent (creates too much foam) has been used. Reduce the detergent quantity or use another one. Check whether there are any leaks from one of the inlet hose fittings.
ENGLISH Malfunction Possible cause The electronic unbalance detection device has cut in because the laundry is not evenly distributed in the drum. Spinning starts late or the machine does not spin: The machine makes an unusual noise: No water is visible in the drum: 27 Solution Pause the machine and redistribute laundry manually. The laundry is redistributed by reverse rotation of the drum. This may happen several times before the unbalance disappears and normal spinning can resume.
www.electrolux.com 10. TECHNICAL DATA Dimensions (H x W x D) 85 x 60 x 56.8 cm 220-240 V / 50 Hz (For PHILIPPINES: 220 V / 60 Hz) Power supply (Voltage / Frequency) 2000 W (For PHILIPPINES: 1700 W) Total power absorbed Minimum fuse protection 10 A Water supply pressure (Maximum / Minimum) Program: Maximum dry clothes capacity Spin speed (Maximum / Minimum) Cottons Mixed Quick 20 Bedding Delicates Wool/Handwash Baby Wear Energy Saving 0.8 MPa / 0.
ENGLISH 29 2. Open top flaps and remove internal foam inserts as shown on picture. 4. Open the door. Remove all the items from the drum. 3. Remove the carton box and plastic bag which cover the machineas as indicated on picture. 5. Put one of the polystyrene packaging elements on the floor behind the appliance. Carefully put down the appliance with the rear side on it. Make sure not to damage the hoses. 6. Remove the polystyrene base.
www.electrolux.com 7. Pull up the appliance in vertical position. 8. Remove the power supply cable and the drain and inlet hoses from the hose holders (A) on the rear of the appliance. 11. Put the plastic caps in the holes. You can find these caps in the user manual bag. 1 2 A 9. 3 Remove the three bolts. 10. Pull out the plastic spacers. 11.2 Positioning IMPORTANT It is important that your washing machine stands firm and level on the floor to ensure correct operation.
ENGLISH 31 Never place cardboard, wood or similar materials under the machine to compensate for any unevenness in the floor. If you do not have a spirit level, as a guide use the edge of a door frame, cupboard or bench to check that the washing machine is level. Loosen or tighten the feet to adjust the level. A correct adjustment of the appliance level prevents the vibration, noise and the movement of the appliance when in operation. Install the machine on a flat hard floor.
www.electrolux.com The inlet hose must not be lengthened. If it is too short and you do not wish to move the tap, you will have to purchase a new, longer hose specially designed for this type of use. 11.4 Water Drainage The end of the drain hose can be positioned in three ways: Hooked over the edge of a sink using the plastic hose guide supplied with the machine.
ENGLISH When the appliance is installed the power supply cable must be easily accessible. 33 If this appliance is supplied from a cord extension set or electrical portable outlet device, the cord extension set or electrical portable device must be positioned so that it is not subject to splashing or ingress of moisture. 12. ENVIRONMENT CONCERNS 12.1 Packaging Materials The materials marked with the symbol are recyclable.
www.electrolux.com KANDUNGAN 1 2 3 4 5 6 7 8 9 10 11 12 MAKLUMAT KESELAMATAN ....................................................................... 35 HURAIAN PRODUK ..................................................................................... 38 PANEL KAWALAN ....................................................................................... 39 SEBELUM PENGGUNAAN YANG PERTAMA .............................................. 44 PENGGUNAAN HARIAN .............................................
MELAYU 1. 35 MAKLUMAT KESELAMATAN SYARAT-SYARAT PENGGUNAAN Perkakas ini dimaksudkan untuk digunakan dalam rumah tangga dan aplikasi yang serupa seperti: Rumah ladang Oleh klien di apartmen, pangsapuri percutian dan persekitaran penginapan. Demi kepentingan kesela,atan anda dan untuk memastikan penggunaan yang betul, sebelum memasang dan perkara pertama untuk menggunakan mesin ini, baca panduan pengguna ini dengan berhati-hati, termasuklah petua dan amaran.
www.electrolux.com Hanya gunakan kuantiti pelembut pakaian dan detergen yang disarankan. Kerosakan kepada fabrik atau peralatan boleh berlaku jika anda terlebih muatkan. Rujuk cadangan kuantiti daripada pengilang.
MELAYU 37 1.3 PENGGUNAAN Perkakas ini direka bentuk untuk kegunaan rumah. Jangan gunakannya untuk tujuan selain daripada yang dimaksudkan. Basuh fabrik yang ditujukan untuk dibasuh dengan mesin sahaja. Arahan di label pakaian hendaklah dipatuhi. Jangan memuatkan perkakas secara berlebihan. Lihat bahagian yang relevan dalam manual pengguna ini. Sebelum membasuh, pastikan semua poket dikosongkan dan butang serta zip diketatkan.
www.electrolux.com 2. HURAIAN PRODUK 1 2 3 1 Meja kerja 2 Tempat Letak Detergen/ Pelembut Fabrik 3 Panel Kawalan 4 Pemegang Pintu 5 Pintu 4 13 5 14 6 6 Pelaras Kaki (Hadapan) 7 Kabel Wayar Utama 8 Hos Saliran Air Masuk 9 Saliran Air keluar 10 Pemegang Hos (2pcs) 11 Bolt Pangangkutan (3pcs) 12 Kaki Belakang (Tetap) 7 13 Plat Label 14 Pengangkat Bentuk Dedaun AKSESORI 9 11 8 10 12 Penutup plastik Untuk menutup lubang pada bahagian sisi kabinet selepas pembuangan bolt pengangkutan.
MELAYU 39 3. PANEL KAWALAN 3.1 Panel Kawalan Penerangan NOTA: Untuk model EWF80743, pilihan ini digantikan dengan program “Easy Iron” (Mudah Seterika). * Picture kawalan panel model: EWF12843 1 1 2 3 Butang On/Off ( 9 4 10 5 ) Suis On/Off (Hidup/Mati) digunakan untuk menghidupkan dan mematikan mesin basuh anda. 2 Pad Sentuh Program ( ) Tekan touchpad ini untuk memilih program basuh. Penunjuk program yang berkaitan akan menyala.
www.electrolux.com 5 Pad Sentuh Pilihan ( ) Tekan touchpad pilihan, jika ingin pakaian dicuci dengan fungsi khas. Lampu yang berkenaan akan menyala. Fungsi berlainan boleh digabungkan yang bergantung pada program yang dipilih. Quick (Cepat) Dengan opsyen ini anda boleh mengurangkan tempoh program. Gunakan opsyen ini bagi item dengan sedikit kotoran atau item untuk disegarkan semula. Opsyen ini akan mengurangkan masa berfungsi dan bilangan bilasan.
MELAYU Drain & Spin (Salir & Putaran) Gunakan pilihan ini untuk pakaian sangat basah untuk membuang air dan putaran. Sekiranya anda mengubah atau membatalkan opsyen Tunda Akhir selepas memulakan program, ikuti langkahlangkah di bawah: Jika anda juga menetapkan “No Spin” ( ) pilihan, perkakas hanya bilas.
www.electrolux.com Kod Penggera Peggunaan pilihan ini disyorkan untuk orang yang alah kepada bahan sisa cucian dan di kawasan yang airnya amat lembut. Fungsi ini tetap didayakan walaupun selepas perkakas dimatikan. Jika berlaku masalah pengendalian, beberapa kod penggera boleh dipaparkan, contohnya “ ” (lihat “PENYELESAIAN MASALAH”).
MELAYU 43 3.3 Program + Pilihan Opsyen Cottons; (Kapas) Air sejuk ( ) hingga 90 °C Mixed; (Campur) Air sejuk ( ) hingga 60 °C Quick 20; (Cepat) 30 °C Bedding; (Cadar Katil) Air sejuk ( ) hingga 40 °C Kapas putih dan berwarna dengan banyak kotoran. EWF10843, EWF12843: 8 kg EWF85743: 7.5 kg EWF80743: 7 kg Sintetik atau campuran item fabrik dengan kekotoran biasa. EWF10843, EWF12843: 4 kg EWF80743, EWF85743: 3.
www.electrolux.com EWF10843, Baju kapas bayi EWF12843: dan item knit 4 kg yang lembut dengan kekotoran EWF80743, normal. EWF85743: 3.5 kg EWF12843: EWF10843, Putih dan mudah luntur warna, kapas EWF12843: 8 kg dengan kotoran (Menjimatkan normal. Tetapkan Tenaga) EWF85743: program ini untuk 7.5 kg 40 °C dan mempunyai hasil cucian yang baik 60 °C 2) dan kurangkan penggunaan tenaga. EWF80743: Masa bagi program 7 kg pembasuhan dilanjutkan.
MELAYU 45 5. PENGGUNAAN HARIAN Pasangkan palam utama kepada soket utama. Buka bekalan arus air. 5.1 Panduan Mula Empat Langkah Langkah 1 - Memuat Cucian 1. PENTING! Pastikan tiada objek logam yang tertinggal di dalam kain cucian (cth. penyepit rambut, pin baju, jarum). Pastikan anda membasuh pengumpul lin secara berasingan daripada penghasil lin. Butangkan sarung bantal, tutup kancing zip, cangkuk dan butang ketap. Ikatkan tali pinggang atau pita yang panjang.
www.electrolux.com Langkah 2 - Menggunakan Detergen dan Perapi Tambahan 1. Laci Dispenser Detergen Kedudukan atas : untuk detergen serbuk (tetapan kilang). Apabila anda menggunakan detergen cecair: Dispenser Detergen dibahagikan kepada 2 ruang. - - - Jangan gunakan detergen cecair yang bergelatin atau pekat. Ruang “DETERGENT” Ruang ini digunakan untuk detergen pada semua program. - Jangan letakkan cecair lebih banyak daripada paras maksimum.
MELAYU - Jika perlu, tuangkan pelembut fabrik ke dalam bekas bertanda (jumlah yang digunakan mesti tidak melebihi tanda“MAX” di dalam petak). 47 Jika anda menggunakan pelembut pekat, disarankan agar mencairkannya dengan air dahulu. Selepas kitaran cucian selesai, sisa detergen, pelembut dan air mungkin berada di dalam kotak pendispens. Adalah disyorkan agar kotak pendispens dibersihkan dengan kerap untuk mengeluarkan sebarang sisa. - Tutup laci perlahan-lahan.
www.electrolux.com Langkah 4 - Memulakan program Untuk memulakan program, tekan pad sentuh Start/Pause ( lampu panduan yang berkaitan akan berhenti berkelip dan tempoh program akan dipaparkan pada skrin. ), CATATAN: Selepas memulakan program basuhan titik ( ) mula berkelip. Perkakas akan melaras secara automatik tempoh program yang dipilih mengikut jenis dan saiz muatan (selepas kira-kira 15 minit dari permulaan program).
MELAYU 5.6 Apabila Program Menbasuh Selesai, Tetapi Terdapat Air Di Dalam Dram (penggunaan Pilihan “Rinse Hold ”) Dram berputar secara kerap untuk mengelakkan renyuk pada pakaian. Penunjuk “Mula/Jeda” berkelip untuk mengingatkan anda untuk mengalirkan air. Penunjuk pintu kunci “ ” dihidupkan. Pintu akan tetap dikunci. Anda mesti mengeringkan air untuk membuka pintu. Untuk menyalurkan air: 1. Tekan pad sentuh “Mula/Jeda ”.
www.electrolux.com Anda tidak menggunakan perkakas selama 5 minit sebelum butang “Start/Pause” ditekan. Selepas 5 minit program basuh selesai. Tekan butang “On/Off” untuk mengaktifkan semula perkakas. Tekan butang “On/Off” untuk mengaktifkan semula perkakas. 6. PETUA MEMBASUH 6.1 Mengasingkan Pakaian Ikut simbol kod cucian pada setiap label pakaian dan arahan cucian pengilang. Asingkan pakaian seperti berikut: putih, berwarna, sintetik, bahan halus, bahan wul. 6.
MELAYU Membasuh pakaian dengan beban maksimum menghasilkan penggunaan air dan tenaga yang paling cekap. Bagi pakaian yang sangat kotor, kurangkan saiz muatan. 6.5 Menanggalkan Kotoran Tanda kotoran degil mungkin tidak dapat ditanggalkan hanya dengan air dan detergen. Oleh itu, adalah dinasihatkan untuk merawatnya terlebih dahulu sebelum membasuh. Darah: bersihkan kotoran yang masih baru dengan air sejuk.
www.electrolux.com 6.6 Detergen dan Perapi Tambahan Hasil cucian yang baik juga bergantung kepada pemilihan detergen dan penggunaan jumlah detergen yang betul untuk mengelakkan pembaziran dan melindungi alam sekitar. Meskipun detergen adalah mesra alam, ia mengandungi bahan yang, boleh menjejaskan keseimbangan alam, kalau digunakan dalam jumlah yang besar. Pemilihan detergen akan bergantung kepada jenis kain (bahan halus, bahan wul, kapas, dsb), warna, suhu cucian dan takat kotoran.
MELAYU 7. SIMBOL KOD BASUH ANTARABANGSA Simbol ini terdapat pada label pakaian, untuk membantu anda memilih cara terbaik membersih cucian anda. Cucian bertenaga Suhu Suhu Suhu Suhu maksimum maksimum maksimum maksimum cucian 95 °C cucian 60 °C cucian 40 °C cucian 30 °C Cucian tangan JANGAN cuci Cucian lembut Meluntur Meluntur dalam air sejuk JANGAN meluntur Menyeterika Seterika panas maks. 200 °C Seterika hangat maks. 150 °C Seterika suam maks.
www.electrolux.com 8. PENJAGAAN DAN PEMBERSIHAN AMARAN! Anda mesti MEMUTUSKAN SAMBUNGAN bekalan elektrik daripada perkakas, sebelum anda boleh menjalankan pembersihan atau kerja penyelenggaraan. 8.1 Pembersihan Luar Bersihkan perkakas hanya dengan sabun dan air suam. Keringkan semua permukaan sepenuhnya. AWAS! Jangan gunakan alkohol, pelarut atau produk bahan kimia. 8.2 Menanggalkan kesan kapur Air yang biasa kita gunakan mengandungi kapur.
MELAYU 55 8.6 Membasuh Bahagian Bawah Laci Setelah kitaran basuhan selesai, sisa pelembut dan air mungkin kekal di dalam pendispens pelembut. Disyorkan agar membersihkan bahagian bawah pendispens pelembut secara kerap bagi menanggalkan sebarang sisa. Untuk membersihkan bahagian bawah pendispens pelembut: 1. Setelah menarik keluar laci daripada lekuknya, pusingkan sisi bawah ke atas. 4. Tutup penudung bahagian bawah pendispens pelembut. 8.7 Membersih Ceruk Petak 2.
www.electrolux.com Untuk membersihkan penapis aliran air masuk: 1. Tutup pili air. 2. Keluarkan hos aliran air masuk daripada pili air. 3. Bersihkan penuras dalam hos dengan berus keras. 8.9 Bahaya Pembekuan Jika mesin terdedah kepada suhu di bawah 0°C, langkah pencegahan tertentu harus diambil. Adakah prosedur ini juga apabila anda mahu melakukan longkang kecemasan. Putuskan sambungan plag utama daripada soket utama. 4. Keluarkan hos aliran air masuk di belakang perkakas. 5.
MELAYU 57 9. PENYELESAIAN MASALAH Sesetengah masalah tertentu adalah berpunca daripada kurangnya penyelenggaraan yang mudah atau kesilapan yang boleh diselesaikan dengan mudah tanpa menghubungi seorang jurutera. Sebelum menghubungi Pusat Servis tempatan anda, sila jalankan pemeriksaan yang disenaraikan di bawah. Semasa mesin beroperasi mungkin lampu pandu Mula berkelip untuk menandakan mesin tidak berfungsi. Setelah masalah tersebut diselesaikan, tekan butang “START/PAUSE” untuk memulakan semula program.
www.electrolux.com Malfungsi Kemungkinan punca Terdapat air di atas lantai: Hasil cucian yang tidak memuas kan: Pintu tidak dapat dibuka: Mesin bergegar atau bunyinya bising: Penyelesaian Terlalu banyak detergen atau detergen tidak sesuai digunakan (mengeluarkan terlalu banyak buih). Kurangkan kuantiti detergen atau gunakan yang lain. Periksa sama ada terdapat kebocoran dari salah satu pemasangan hos air masuk.
MELAYU Malfungsi Masa kitaran lebih lama daripada yang dipaparkan: Putaran bermula lambat atau mesin tidak berputar: Mesin mengeluarkan bunyi pelik: Tiada air kelihatan di dalam dram: Kemungkinan punca 59 Penyelesaian Detergen melebihi dos. Kurangkan kuantiti detergen atau gunakan yang lain. Mesin tidak seimbang. Agihkan semula pakaian secara manual di dalam dram dam mulakan fasa putaran sekali lagi. Sila rujuk perenggan berkenaan dalam bahagian “Pemasangan”.
www.electrolux.com 10. DATA TEKNIKAL Dimensi (Tinggi / Lebar / Dalam) 85 x 60 x 56.8 cm 220-240 V / 50 Hz (untuk FILIPINA: 220 V / 60 Hz) Bekalan kuasa (Voltan / Frekuensi) 2000 W (untuk FILIPINA: 1700 W) Jumlah kuasa Perlindungan fius minimum 10 A Tekanan bekalan air (Maksimum / Minimum) Program: Beban (pakaian kering) maksimum Kelajuan putaran (Maksimum / Minimum) Cottons Mixed Quick 20 Bedding Delicates Wool/Handwash Baby Wear Energy Saving 0.8 MPa / 0.
MELAYU 61 11. PEMASANGAN 11.1 Mengeluarkan AWAS! 3. Keluarkan kotak dan plastik beg yang meliputi machineas seperti yang ditunjukkan pada gambar. Semua bolt pengangkutan dan bahan pembungkusan mesti dikeluarkan sebelum menggunakan perkakas. Anda dinasihatkan supaya menyimpan semua peranti pengangkutan supaya dapat dipasang semula jika mesin perlu diangkut lagi nanti. 1. Potong dan keluarkan empat memotong tali seperti yang ditunjukkan. 4. Buka pintu. Buang semua barang-barang dari dram. 2.
www.electrolux.com 5. Letakkan salah satu elemen bungkusan polisterin di atas lantai di belakang perkakas. Dengan berhati-hati letakkan perkakas dengan bahagian belakang di atasnya. 8. Keluarkan kabel bekalan kuasa dan hos saliran dan air masuk daripada pemegang hos (A) pada bahagian belakang perkakas. Pastikan tidak merosakkan hos. A 9. Longgarkan ketiga-tiga bolt. 10. Tarik keluar peruang plastik. 6. Tanggalkan dasar polisterin. 7. Tarik perkakas dalam kedudukan menegak.
MELAYU 11. Letakkan penutup plastik di dalam lubang. 63 1 Anda boleh menjumpai penutup ini di dalam beg manual pengguna. 2 3 11.2 Kedudukan mesin Penting untuk mesin basuh anda didudukan kukuh dan rata di atas lantai untuk memastikan operasi yang betul. Perkakas tidak boleh dipasang di belakang pintu boleh dikunci, pintu gelongsor atau pintu dengan selak pada sisi bertentangan pintu mesin basuh. Gunakan paras spirit pada atas dan sisi mesin basuh untuk memeriksa paras.
www.electrolux.com Jika ia bergoyang, laras semula kaki sehingga ia selaras dan tidak bergoyang. Hos air masuk tidak boleh dipanjangkan. Jika ia terlalu pendek dan anda tidak mahu mengalihkan pili air, anda perlu membeli hos baru yang lebih panjang dan yang dibuat khusus untuk kegunaan seperti ini. 11.4 Penyaliran Air Jangan letakkan kadbod, kayu atau bahan yang sama di bawah mesin untuk meratakan lantai. Pasangkan mesin di atas lantai yang rata dan keras.
MELAYU Terus ke dalam paip penyaliran keluar pada ketinggian tidak kurang daripada 60 cm dan tidak lebih daripada 90 cm. Hujung hos penyaliran air keluar mesti sentiasa berudara, cth. di dalam diameter paip penyaliran air keluar mesti lebih besar daripada diameter di luar hos. Hos air keluar tidak boleh terputar. Terletak di atas lantai; hanya bahagian berdekatan air keluar mesti ditinggikan.
www.electrolux.com 12. KEPRIHATINAN ALAM SEKITAR 12.1 Bahan Pembungkusan Bahan yang ditanda dengan simbol boleh dikitar semula. >PE<=polyethylene >PS<=polystyrene >PP<=polypropylene Ini bermakna bahan tersebut boleh dikitar semula dengan melupuskannya dengan cara yang betul di dalam bekas pemungutan yang sesuai. 12.2 Mesin Lama Gunakan tapak pelupusan yang disahkan bagi perkakas lama.
简体中文 67 目录 1 2 3 4 5 6 7 8 9 10 11 12 安全信息 ................................................................................................................... 68 产品图解 ................................................................................................................... 71 控制面板 ................................................................................................................... 72 首次使用前 .............................................................................................
1. www.electrolux.com 安全信息 使用条件 本机适合在家庭及类似场合使用,例如: 农舍 供酒店式公寓、度假公寓以及居住型环境的客人使用。 为了您的安全和确保正确使用洗衣机,在安装和首次使用本机前, 请仔细阅读本用户手册,包括相关的提示和警告。 为避免不必要的错误和意外,务必要确保本机的所有使用者都充分 熟悉其各项操作特性和安全特性。 请妥善保留本说明书,搬运或出售本机时,应确保随机附带本说明 书,以便机器使用寿命内的每位使用者都能适当了解机器的使用方 法和安全须知。 1.
简体中文 69 本机不适合身体残障、感官或精神功能减退以及缺乏相关经验和知识的人 员(包括儿童)使用,除非有负责其安全的人员对其使用本机给予监督或 指导。 不要使用洗衣机洗涤带坚硬部分的物品、未摺边或开线的衣物。 每次使用、清洁以及保养本机之后,始终要拔下电源插头并关闭水龙头。 在任何情况下,不应尝试自行维修洗衣机。由缺乏相关经验的人员维修洗 衣机可能会导致人身伤害或设备严重故障。 请联系您当地的维修服务中 心。 应始终坚持使用原厂备件。 1.
www.electrolux.com 1.3 使用 本机专为家庭使用而设计。除了专门设计的用途外,不得将本机用于其他 用途。 仅洗涤适宜机洗的衣物。请遵循每件衣服标签上的洗涤说明。 不得在本机内放入过量衣物。请参阅本用户手册的相关章节。 开始洗衣前,确保已掏空所有衣袋、扣紧纽扣并拉好拉链。避免洗涤有磨 损或破损的物品,并在洗衣前处理颜料、油墨、锈迹及草叶等污渍。 带钢 圈的胸罩不得机洗。 接触过挥发性石油产品的衣物不得机洗。 如果使用了挥发性的清洗液, 那么一定要注意确保先除去衣物上的清洗液,然后再放入洗衣机中。 从电源插座上拔下插头时,切勿拽拉电源线;始终应用手握住插头。 如果电源线、控制面板、工作台面或底座发生损坏而露出洗衣机内部,请 勿使用洗衣机。 1.
简体中文 71 2.
www.electrolux.com 3. 控制面板 3.
简体中文 5 选项 触控按钮( ) 如果希望使用特殊功能洗涤衣物, 根据需要按相应的选项触控按钮。 对应的指示灯将亮起。 根据选定的洗衣程序的不 同,可以组合使用各种不 同的功能。 Quick (快速) 使用该选项,您可以缩短程序持续 时间。该选项可用于带有轻土的衣 物或待翻新的衣服。 该选项将减少工作时间和漂洗 次数。 如果您需要增加更多的漂洗阶 段,同时按下“ ”+“ ”, 即可添加“漂洗增加”选项。 (请参见第 75 页) Vapour (蒸气) (对于模型: EWF85743, EWF10843, EWF12843) 选择此选项可以在洗衣周期内添加 时长约为 30-45 分钟的蒸汽洗涤 程序。蒸汽有助于打开衣料纤维间 的空隙,使洗涤剂可以祛除顽固污 渍。 此选项的标志将亮起。 注意: - 在蒸汽洗涤程序期间,蒸汽不一 定在滚筒内清晰可见。蒸汽将在 滚筒下方生成,然后自然上升并 渗入衣物中。 - 整个蒸汽洗涤期间可能都不会出 现蒸汽。 - 一半衣物量时,蒸汽洗涤功能效 果更佳。 - 蒸汽程序结束时,衣物将变得更 温暖、更柔软并从滚筒中脱离。 - 如果选择了蒸汽洗涤选项,漂洗 温度将会
www.electrolux.com Drain & Spin (排水+脱水) 7 此选项适用于很潮湿的衣服以除 去水和旋转。 如果还设置了“不脱水”( 选项,则设备只冲洗。 6 预约 触控按钮( 要中途停止正在运行的程序,请按 启动/暂停使洗衣机暂停运行。 要重新启动已暂停的程序,请再次 按“启动/暂停”。 ) 8 显示屏 注意: 显示屏将显示下列信息: 如果程序持续时间大于 3 小 时(最小值),则“延迟结束 ”选项的起始值为 4 小时。 所选程序的预计完成时间 按下“延迟结束”触摸板,选择您 想要的结束时间。 显示器显示时 数,触摸板上面的指示灯处于亮起 状态。 选择洗涤程序之后,必须 选择该选项,然后再按下“开始/ 暂停”触摸板。例如,如果您所选 程序的持续时间为 3.20 小时,可 将“延迟结束”时间定义为 6 小 时。 这意味着您的洗涤程序将在 6 小时内结束。 (请参见下图) “Delay End”时间:6 小时 倒计时 2.80 小时 按下 “开始/暂停” 工作周期为 3.
简体中文 75 选项选择不当 10 如果选择了与所设洗涤程序不兼容 的选项,显示屏将显示“ ” 字样并闪烁,此外还伴随 3 声连 续的短蜂鸣声。 9 童锁 选项 ( ) 额外漂洗 选项 ( ) 选择该选项,为该程序添加 2 次 漂洗。 此选项建议用于对洗涤剂过敏的 人群以及水质很软的地区。 此功能增加了节目的持续时 间。 要设置“额外漂洗”选项: 本机提供儿童安全锁功能,可以在 洗衣机无人看管时保持机门关闭, 从而不必担心洗衣机对儿童造成伤 害或本身发生损坏。 要启用此功能,请同时按“ ” 和 “ ” 触控按钮,直到 LED 举行的“ ”点亮。 按下“启动/暂停”后触摸板的设 置此选项。 要停用按这两个触摸板在同一时 间,直到 LED 的“ ”熄灭。 设定儿童安全锁选项: 即使关闭洗衣机,该功能依 然可用。 要启用此功能,请同时按“ ” 和 “ ” 触控按钮,直到 LED 举行的“ ”点亮。 在触摸板被锁定(除了 “开/关”( ) 按钮)。 要停用按这两个触摸板在同一时 间,直到 LED 的“ ”熄灭。 即使已切断洗衣机电源,此 功能仍会保持启用状态。 3.
www.electrolux.com 3.3 程序 + 选项 Cottons; 冷水 ( ) 至 90 °C 脏污程度严重 的白色和彩色 棉质织物。 EWF10843, EWF12843: 8 kg EWF80743: EWF80743, EWF85743: EWF10843, EWF12843: 4 kg EWF80743, EWF85743: 3.5 kg Quick 20; 30 °C Bedding; 冷水 ( ) 至 40 °C 化纤及混合面 料织物。脏污 程度较轻及需 要清洁除味的 衣物。 单件化纤毛毯 、被罩和床单 等用品的专用 程序。 EWF10843, EWF12843: 1.5 kg EWF80743, EWF85743: 1 kg EWF10843, EWF12843: 4 kg EWF80743, EWF85743: 3.
简体中文 Baby Wear; ) 冷水 ( 至 90 °C 脏污程度一般的 EWF10843, EWF12843: 棉质婴儿衣物和 4 kg 精致针织衣物。 EWF80743, EWF85743: 3.5 kg Energy Saving; EWF10843, EWF12843: 40 °C 和 60 °C 2) 脏污程度一般的 白色和不褪色棉 8 kg 质衣物。设定此 EWF85743: 程序可达到良好 7.
www.electrolux.com 5. 日常使用 将电源插头插入电源插座。 打开水龙头。 5.1 四步使用入门指南 步骤 1 - 放入衣物 重要信息! 请确保要洗的衣物里面没有任何 金属物体(如发夹、安全别针、 大头针等)。 请确保棉纤收集器与棉质衣物分 开洗涤。 检查并取出可能落入折边处的物件 (如果有的话)。 3. 将衣物放入滚筒内,每次放入一件 ,并尽量将衣物抖开。 扣上枕套,关上拉链、钩子和扣 子。 系紧任何带子或长绳子。 4. 确保门封和机门之间没有夹住任何 衣物。 是有风险的水泄漏或损坏衣 物。 在洗衣袋中洗涤胸罩、连裤袜和 其他精细织物,您可以在超市购 买洗衣袋。 2.
简体中文 79 步骤 2 - 使用洗涤剂和洗涤助剂 1. 洗涤剂投放抽屉盒 位置向上:适合投放粉状洗涤剂 (出厂设置)。 洗涤剂投放抽屉盒分为 2 个投放格。 - 货厢“洗衣粉” 此投放格用于投放所有洗衣程序使用 的洗涤剂。 - 货厢“柔软剂” 此投放格用于投放衣物柔顺剂和上浆 剂。 粉状或液体洗涤剂 ( )。 使用液体洗涤剂时: - 请勿使用胶状或粘稠的液体洗 涤剂。 - 投放的液体洗涤剂不得超过最 大液位线。 - 请勿设定预约功能。 2.
www.electrolux.com - 如果需要,可将衣物柔顺剂倒入 标有 的投放格中(用量不 得超过抽屉盒的最大标记 “MAX”)。 建议使用浓缩织物柔软剂时先 用水稀释柔软剂。 在洗涤程序完成后,洗涤剂、 织物柔软剂和水可能会沉积在 洗涤剂料盒里。建议经常清洗 洗涤剂料盒,以清除沉积物。 - 轻轻关上抽屉盒。 步骤 3 - 设定洗衣程序 1. 按下电源开关启动洗衣 机。对应的指示灯将亮 起。 2. 按下程序的触摸板, 要 选择您需要的洗涤程 序。 (有关洗涤程序的 更多信息,请第 76-77 页上看到的) - 对应的指示灯将亮起。 - 显示屏显示程序的持续时间。 3. 如果希望使用不同于洗 衣机建议的脱水速度和 温度洗涤衣物, 请反复按脱水“ ” 和温度“ ”触控按钮 更改脱水速度和温度。 4. 如果希望使用特殊功能洗 涤衣物,根据需要按相应 的选项触控按钮。对应的 指示灯将亮起。 根据选定的洗衣程序的不同 ,可以组合使用各种不同的 功能。 如果你想减少洗涤时间选择 Quick* 选项,以减少洗涤时 间 (* 适合于轻壤物品这个选项或 项目需要刷新) 5.
简体中文 81 步骤 4 - 启动程序 要启动程序,请按启动/暂停 ( ) 触控按钮,对应的指示 灯将停止闪烁,显示屏上将显示默认的程序持续时间。 开始洗涤程序后,指示灯 ( ) 开始闪烁。洗衣机将根据衣物 类型和衣物量自动调整选定的程序持续时间 (程序启动约 15 分钟后:)。当该阶段结束时,指示灯 ( ) 稳定发亮,显示 的三位数就是程序时间。 5.2 中断程序 要暂停程序,请按启动/暂停按钮。 对应的标志将开始闪烁。 再次按启动/暂停触控按钮。程序将 继续运行。 5.3 更改程序 要更改正在运行的程序,只能关闭洗衣 机电源。 按电源开/关按钮取消程序并关闭洗 衣机。 再次按电源开/关按钮启动洗衣机。 在此期间,洗衣机不会排水。 5.4 更改选项 程序启动后,只能更改部分选项。 1. 按启动/暂停触控按钮。对应的标 志将开始闪烁。 2. 更改选项。 3. 再次按启动/暂停触控按钮。程序 将继续运行。 5.
www.electrolux.com 5.6 洗衣程序已完成,但滚筒 内仍然有水(使用选项 “Rinse Hold ”) 滚筒将定时转动,以防止衣物 起皱。 该指标 “Start/Pause” 闪烁, 提醒您沥干水。 门锁标志“ ”将亮起。 机 门保持紧锁状态。 您必须将水排空才能打开机门。 要进行排水: 1. 按下“Start/Pause ”触摸 板。 洗衣机排水并按照所选程 序的最大脱干速度旋转。 或者,按“Start/Pause”触摸板 之前,您可以按下“Spin ”触 摸板改变旋转速度。如果您只想 排水,则可以选择“No Spin ” ,然后按下“Start/Pause”触摸 板。洗衣机将排水和旋转。 2. 程序结束时,门锁标志“ ” 将熄灭,这时可以打开机门。 3. 按下“ON/OFF 设备。 ”按钮关闭 大约 18 小时后,如果您不按 下“开始/暂停”触摸板, 洗衣机将自动排水和旋转 (除“羊毛/手洗”程序外)。 5.
简体中文 83 6. 洗衣提示 6.1 对衣物进行分类 请遵循每件服装标签上的洗衣代码 符号以及制造商的洗涤说明。对衣 物进行以下分类: 白色织物、彩色 织物、化纤织物、纤幼织物、羊毛 织物。 6.2 温度 脏污程度一般的白色棉麻 类织物(如茶巾、毛巾、 90°C 桌布、床单等)。 脏污程度一般且不褪色的 棉麻或化纤类衣物(如衬 60°C 衫、睡袍、睡衣等)或者 50°C 脏污程度较轻的白色棉质 衣物(如内衣裤)。 精致织物(如网眼窗帘) 40°C ,混合面料衣物(包括化 30°C 纤衣物)以及带“纯新羊 冷水 毛、可机洗、不缩水”标 签的羊毛衣物。 6.3 放入衣物之前 切勿将白色与彩色衣物一同洗涤。 白色衣物可能会在洗衣过程丧失洁 白度。 新的彩色衣物在初次洗涤时可能 会掉色,因此第一次应单独分开 洗涤。 确保衣物内没有留下任何金属物件 (如发夹、别针、饰针)。 扣好枕套、拉紧拉链,扣合钩扣和 按扣。系好所有腰带或长带子。 开始洗衣之前,先祛除顽固污渍。 可用专用洗涤剂或膏状洗涤剂擦洗 特别脏污的部位。应小心谨慎地处 理窗帘。可取下钩子或者将它们系 好后放入洗衣袋或洗衣网内。 6.
www.electrolux.com 唇膏:按上述方法用丙酮溶液 (*) 浸湿,然后用甲基化酒精进 行处理。用漂白剂去除白色织物 上残留的任何痕迹。 红酒:在溶有洗涤剂的水中浸泡, 漂洗后用醋酸或柠檬酸进行处理, 然后漂洗干净。用漂白剂处理所有 残留痕迹。 墨水:根据墨水类型的不同,先用 丙酮溶液 (*) 浸泡衣物,然后再 用醋酸浸泡;用漂白剂处理白色衣 物上残留的任何痕迹,然后彻底漂 洗干净。 焦油污渍:先用去污剂、甲基化酒 精或轻质汽油进行处理,然后用膏 状洗涤剂擦洗。 开始洗衣程序之前,必须将洗涤剂 和洗涤助剂放入洗涤剂投放抽屉盒 相应的投放格内。 在开启洗衣程序之前,先将液体洗 涤剂倒入标有“ ”的洗涤剂投 放抽屉格内。 衣物柔顺剂或上浆剂必须在开始洗 衣程序前倒入标有“ ”的投放 格内。 请遵循产品制造商建议的用量,不 要超过洗涤剂投放抽屉盒上标记的 最大用量。 不要将用于预处理污渍的产品(如 Preen)喷洒在洗衣机上或其附近, 因为这样会使塑性材料受到破坏, 缩短使用寿命。 (*) 不要对人造丝织物使用丙酮。 6.
简体中文 85 在以下情况下,应减少洗涤剂用量: 洗涤的衣物量较少, 衣物的脏污程度较轻, 洗衣期间会产生大量泡沫。 7.
www.electrolux.com 8. 保养和清洁 警告! 在进行任何清理或维护工作之 前,必须断开洗衣机与电源的 连接。 8.1 外部清洁 8.5 清洁投放抽屉盒 洗衣粉和洗涤助剂投放抽屉盒应 定期清洁。 向下按压卡钩并向外拉出,取下 抽屉盒。在水龙头下冲洗抽屉盒 内部,清除积聚的任何洗衣粉。 仅使用肥皂和温水清洁洗衣机。请 擦干所有表面。 小心! 不要使用酒精、溶剂或化学制 品。 8.2 除垢 日常使用的水中通常含有石灰。 因此最好定期在洗衣机内使用水 软化粉剂。 此项工作应与洗衣分开进行,并 应遵照水软化粉剂制造商的使用 说明。 这将有助于防止形成石灰质沉积 物。 8.3 每次洗衣后 将机门敞开一会。这样做有助于防 止洗衣机内部发霉和产生异味。在 洗衣后将机门敞开还有利于保持门 封的密封性。 8.
简体中文 8.6 清洗抽屉底部 洗涤周期结束后,残留的柔软剂和 水可能会留在柔软剂分发器中。 建议定期清洗柔软剂分发器底部, 以清除任何残留物。 87 3. 在水龙头下面使用旧牙刷清洗 分发器。 清洁柔软剂分发器底部的步骤: 1. 从其凹槽中拉出抽屉,将底部 向上翻起。 4. 关闭柔软剂底盖。 2. 推动扣件,拉出柔软剂底盖。 8.7 清洁抽屉盒的凹槽 取下抽屉盒后,使用小刷子清洁 凹槽,确保去除凹槽上部和下部 残留的所有洗衣粉。将抽屉盒放 回原位,然后滚筒内不放衣物, 空机运行一次漂洗程序。 8.
www.electrolux.com 要清洁进水管过滤器: 1. 关闭水龙头。 2. 从水龙头上卸下进水软管。 8.9 发生冻结的危险 如果洗衣机所处温度低于 0°C, 应采取一定的预防措施。 3. 使用硬毛刷清洁进水软管过滤器。 执行该程序还当你想做应急漏极。 从电源插座上拔下电源插头。 4. 卸下机背的进水软管。 5. 使用硬毛刷或毛巾清洁阀门中的 过滤器。 1. 关闭水龙头。 2. 松开进水软管的螺钉。 3. 将排水软管从后部的管托上取 下,然后从水槽或水龙头上摘 下。 4. 将疏水管和进水软管向前拉并 放在地面的碗型容器中,然后 将水排出。 6. 重新装好进水软管。确保连接牢 固以防止漏水。 5. 将进水软管装回原位并用螺 钉紧固,然后将疏水管放回 原位。 当您打算重新启动洗衣机时, 请确保室温在 0°C 以上。 厂家不承担任何由于低温的损 害。 45° 7.
简体中文 89 9.
www.electrolux.
简体中文 故障 可能的原因 电子失衡检测装置已断开,因 为滚筒内的衣物摆放不均匀。 91 解决方法 暂停运行洗衣机,重新手动 将衣物摆放均匀。 滚筒通过反向旋转重新摆放衣 物。 脱水功能启动 延迟或洗衣机 不脱水: 洗衣机发出异 常噪音: 滚筒内看不 到水: 这种情况可能会在失衡情况消 失前重复出现几次,然后才可 以恢复正常脱水。如果 10 分 钟后,滚筒内的衣物仍然无法 摆放均匀,洗衣机将不会进行 脱水。这种情况下,需要手动 重新将衣物摆放均匀,然后再 选择脱水程序。 洗衣机未正确安装。 确保洗衣机水平放置平稳。 请参见“安装”一节的相关 内容。 未拆除运输螺栓或包装物 确保拆除包装物和/或运输螺 栓。请参见“拆除包装”一 节的相关内容。 衣物量可能过少。 向滚筒内添加更多衣物。 洗衣机采用先进技术,非常 经济划算,用水极少又不影 响洗衣性能。 如果无法确定或解决问题,请与我们的 维修服务中心联系。在致电维修服务中 心之前,请记下您的洗衣机的型号、序 列号和购买日期: 维修服务中心需要 这些信息来为您解决问题。
www.electrolux.com 10. 技术参数 85 x 60 x 56.8 cm 尺寸(高 / 宽 / 深) 220-240 V / 50 Hz (对于菲律宾为: 220 V / 60 Hz) 电源(电压/频率) 吸收的总功率 2000 W (对于菲律宾为: 1700 W) 最小熔断保护 10 A 0.8 MPa / 0.05 MPa 供水压力(最大/最小) 程序 最大衣物量 (晾衣服) 脱水速度 (最快/最慢) Cottons Mixed Quick 20 Bedding Delicates Wool/Handwash Baby Wear Energy Saving 型号 型号 型号 EWF12843, EWF10843: EWF85743: EWF80743: 8 Kg 4 Kg 1.5 Kg 4 Kg 4 Kg 2.5 Kg 4 Kg 8 Kg 7.5 Kg 3.5 Kg 1 Kg 3.5 Kg 3.5 Kg 2 Kg 3.5 Kg 7.5 Kg 7.0 Kg 3.5 Kg 1 Kg 3.5 Kg 3.5 Kg 2 Kg 3.5 Kg 7.
简体中文 2. 取出所有聚苯乙烯泡沫包装材 料。 4. 打开机门。取出滚筒内的所有 物品。 5. 将其中一块聚苯乙烯泡沫包装放在 洗衣机后面的地面上。 3. 取下纸箱盒。撕掉洗衣机外覆的塑 料包装袋。 小心地将洗衣机背面朝下平放在地 面上。确保不要损坏水管。 6.
www.electrolux.com 7. 垂直向上拉起洗衣机。 8. 将电源线以及进水和排水软管从 洗衣机背部的管夹 (A) 上取下。 11. 在孔口处盖上塑料盖。您可以在 用户手册的包装袋中找到这些塑 料盖。 1 2 A 3 9. 拆下三个运输螺栓。 10. 拔出塑料垫片。 11.
简体中文 95 切勿在洗衣机底部放置纸板、木块 或类似物品来调节地面的不平整。 将洗衣机放置在平整坚实的地面 上。 确保地垫、地毯等不会阻碍 洗衣机周围的空气流通。 检查并确认洗衣机没有接触墙壁或 橱柜。 如果没有水平尺,可利用门框边 缘、纸板或台面作为参照物,检 查洗衣机是否处于水平状态。 可以松动或收紧底脚来调节水平。 正确调节洗衣机的水平情况,可防 止洗衣机在运行过程中出现振动、 噪音和位移。 11.
www.electrolux.com 进水软管不可延长。如果软管太 短而又不想移动水龙头,可另外 购买一根洗衣机进水专用的加长 软管。 11.4 排水 排水软管的末端可采用三种方式 放置: 使用随机附带的塑料软管导向套 吊装在洗手池边缘上方。 为使洗衣机能够正常工作,排水 软管必须卡在机背上部的适当管 托上。 11.
简体中文 97 12. 关注环保 12.1 包装材料 标有 符号的材料可以 循环利用。 >PE<=polyethylene >PS<=polystyrene >PP<=polypropylene 这表示此类材料如果正确放入适 当回收容器内处理,可以循环利 用。 12.2 废旧洗衣机 选择经过授权的废物处理点处置 您的废旧电器。请为保持环境整 洁贡献您的力量! 产品或产品包装上标记的 符 号表示此产品不可作为生活垃圾 处理。 而是应送至适当的收集点,作为 电气电子设备进行回收利用。 确保正确处置本产品将有助于防 止因本产品的不当废物处理而可 能对环境和人体健康造成的负面 影响。 有关回收利用本产品的更多详细 信息,请联系您当地的市政办公 机构、生活垃圾处理服务站或您 购买产品的商店。 12.
NOTE / NOTA / 备注
G0005843-004-807209768-042015 www.electrolux.