user manual Washing Machine EWG 14750 W
electrolux Electrolux. Thinking of you. Share more of our thinking at www.electrolux.
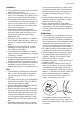
electrolux 3 Installation • This appliance is heavy. Care should be taken when moving it. • When unpacking the appliance, check that it is not damaged. If in doubt, do not use it and contact the Service Centre. • All packing and transit bolts must be removed before use. Serious damage can occur to the product and to property if this is not adhered to. See relevant section in the user manual.
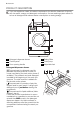
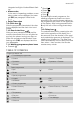
electrolux PRODUCT DESCRIPTION Your new appliance meets all modern requirements for effective treatment of laundry with low water, energy and detergent consumption. Its new washing system allows total use of detergent and reduces water consumption so saving energy. 1 2 3 4 5 6 1 Detergent dispenser drawer 2 Control panel 3 Door opening handle Detergent dispenser drawer Compartment for detergent used for prewash and soak phase or for stain remover used during the stain action phase (if available).
electrolux 5 CONTROL PANEL Below is a picture of the control panel. It shows the programme selector dial as well as the buttons, pilot lights and the display. These are presented by relevant numbers on the following pages.
electrolux Display 7.12 7.11 7.10 7.9 7.1 7.2 7.3 7.4 7.5 The display shows the following information: 7.1:Temperature value 7.2: Temperature icons , Cold . During the washing cycle the display shows the temperature icon animated to indicate that the appliance has started the heating phase of the water in the tub. 7.3: Spin value 7.4: Spin speed icons. • No spin • Rinse Hold • Night Cycle During the spinning phase the spiral is animated.
electrolux 7 integrated red light of button 8 start flashing. • Alarm codes In the event of operating problems, some alarm codes can be displayed, for example E20 (see paragraph «What to do if...»). • Delay Time value 7.9: Clock icon After the programme has started, the duration is displayed and the clock icon is animated. 7.10: Door locked icon After you have pressed button 8 and the machine has started, this icon is lighted on and only the phase running icon stays on.
electrolux FIRST USE • Ensure that the electrical and water connections comply with the installation instructions. • Remove the polystyrene block and any material from the drum. • Pour 2 litres of water into the main wash compartment of the detergent drawer in order to activate the ECO valve. Then run a cotton cycle at the highest temperature without any laundry in the machine, to remove any manufacturing residue from the drum and tub.
electrolux 9 to reset programme/Switching the machine off. At the end of the programme the selec, tor dial must be turned to position to switch the machine off. Caution! If you turn the programme selector dial to another programme when the machine is working, the red pilot light of button 8 will blink 3 times and the message Err is displayed to indicate a wrong selection. The machine will not perform the new selected programme.
electrolux Select the Delay Start by pressing button 6 Before you start the programme, if you wish to delay the start, press the button 6 repeatedly, to select the desired delay. The corresponding icon 7.12 will appear on the display in the upper part of the display. The selected delay time value (up to 20 hours) will appear on the display a few seconds, then the duration of the programme will appear again. You must select this option after you have set the programme and before you press button 8.
electrolux 11 Important! The Time Manager cannot be selected with the Economy programmes. The availability of these soil level icons change according to the type of fabric as shown in the following chart.
electrolux selector dial to to switch the machine off. Remove the laundry from the drum and carefully check that the drum is empty. If you do not intend to carry out another wash, close the water tap. Leave the door open to prevent the formation of mildew and unpleasant smells. Stand by : once the programme has finished after a few minutes the energy saving system will be enabled. The brightness of the display is reduced. By pressing any button the appliance will come out of the energy saving status.
electrolux 13 dab the stain with the fingertips and a cotton cloth. Rust: oxalic acid dissolved in hot water or a rust removing product used cold. Be careful with rust stains which are not recent since the cellulose structure will already have been damaged and the fabric tends to hole. Mould stains: treat with bleach, rinse well (whites and fast coloureds only). Grass: soap lightly and treat with bleach (whites and fast coloureds only).
electrolux WASHING PROGRAMMES Programme Maximum and Minimum Temperature Cycle Description Maximum Spin Speed Maximum Fabrics Load Type of Laundry Options Cottons 90° - Cold Main wash - Rinses Maximum spin speed 1400 rpm Max. load 6 kg - Red. load 3 kg 1) White and coloured cotton (normally soiled items). SPIN REDUCTION RINSE HOLD NO SPIN NIGHT CYCLE EASY IRON EXTRA RINSE TIME MANAGER Cottons + Prewash 90° - Cold Prewash - Main wash - Rinses Maximum spin speed 1400 rpm Max. load 6 kg - Red.
electrolux 15 Programme Maximum and Minimum Temperature Cycle Description Maximum Spin Speed Maximum Fabrics Load Type of Laundry Options Drain Draining of water Max. load 6 kg For emptying out the water of the last rinse in programmes with the Rinse Hold or Night cycle option selected. Rinses Rinses Maximum spin speed 1400 rpm Max. load 6 kg With this programme it is possible to rinse and spin cotton garments which have been washed by hand. The machine performs 3 rinses, followed by a final long spin.
electrolux Programme Maximum and Minimum Temperature Cycle Description Maximum Spin Speed Maximum Fabrics Load Type of Laundry Options Eco + Prewash 90 °- 40° Prewash - Main wash - Rinses Maximum spin speed 1400 rpm Max. load 6 kg White or coloured cottons with prewash phase. This programme can be selected for normally soiled cotton items with stains. The temperature will decrease and the washing time will be extended.
electrolux 17 Important! Do not use methylated spirits, solvents or similar products to clean the cabinet. Clean the chamber of dispenser drawer with a brush. Cleaning the dispenser drawer The detergent dispenser drawer should be cleaned regularly. The washing powder and additive dispenser drawer should be cleaned regularly. Remove the drawer by pressing the catch downwards and by pulling it out.
electrolux • the appliance does not empty and/or spin; • the appliance makes an unusual noise during draining due to objects such as safety pins, coins etc. blocking the pump; • a problem with water draining is detected (see chapter “What to do if...” for more details). 5. When no more water comes out, unscrew the pump cover (A) by turning it anti-clockwise and remove the filter. Use pliers, if necessary. Always keep a rag nearby to dry up any water spillages when removing the cover.
electrolux 19 7. Put the cap back on the emergency emptying hose and place the latter back in its seat. 8. Replace the filter into the pump by inserting it correctly into the special guides. Screw the pump cover firmly by turning it clockwise. 5. Unscrew the hose from the machine. Keep a rug nearby because some water may flow. 6. Clean the filter in the valve with a stiff brush or with the piece of cloth. 7. Screw the hose back to the machine and make sure the connection is tight. 8.
electrolux 6. replace the emergency emptying hose in its seat after having plugged it; 7. screw the pump again. Important! Every time you drain the water through the emergency emptying hose you must pour 2 litres of water into the main wash compartment of the detergent drawer and then run the drain programme. This will activate the ECO Valve device avoiding that part of the detergent remains unused at next washing.
electrolux 21 Problem Possible cause/Solution The machine does not empty and/or does not spin: The drain hose is squashed or kinked. • Check the drain hose connection. The drain filter is clogged. • Clean the drain filter. An option or a programme that ends with the water still in the tub or a that eliminates all the spinning phases has been selected. • Select the draining or spinning programme. The laundry is not evenly distributed in the drum. • Redistribute the laundry.
electrolux Problem Possible cause/Solution Spinning starts late or the machine does not spin: The electronic unbalance detection device has cut in because the laundry is not evenly distributed in the drum. The laundry is redistributed by reverse rotation of the drum. This may happen several times before the unbalance disappears and normal spinning can resume. If, after 10 minutes, the laundry is still not evenly distributed in the drum, the machine will not spin.
electrolux 23 Programme1) Energy consumption (KWh)2) Water consumption (litre)2) 0.25 58 Wool/ Handwash 30 °C 1) Refer to the display for the programme time. 2) The consumption information shown in this chart is indicative. It can vary depending on the quantity and the type of laundry, on the temperature of the water supply and on the ambient temperature.
electrolux 5. Fill the smaller upper hole and the two large ones with the corresponding plastic plug caps supplied in the bag containing the instruction booklet. Water inlet An inlet hose is supplied and can been found inside the machine drum. Do not use the hose from your previous machine to connect to the water supply. Important! This appliance must be connected to a cold water supply. 1. Open the porthole and extract the inlet hose. 2. Connect the hose with the angled connection to the machine.
electrolux 25 4. Connect the hose to a tap with a 3/4” thread. Always use the hose supplied with the appliance. Water drainage The end of the drain hose can be positioned in three ways. • Hooked over the edge of a sink using the plastic hose guide supplied with the machine. In this case, make sure the end cannot come unhooked when the machine is emptying. This could be done by tying it to the tap with a piece of string or attaching it to the wall. The inlet hose must not be lengthened.
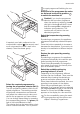
electrolux The drain hose may be extended to a maximum of 4 metres. An additional drain hose and joining piece is available from your local Service Centre. BUILDING IN This appliance has been designed to be built into the kitchen furniture. The recess should have the dimensions shown in picture A. B 6 A 1 4 7 5 3 2 Preparation and assembly of the door The machine is originally prearranged for the assembly of a door opening from right to left.
electrolux 27 C (6) (steel disk + rubber ring) into the inner side of the door. Its position must correspond to the magnet (4) on the appliance (see picture D). D 6 4 b) Hinges To mount the hinges it is necessary to drill two holes (dia. 35 mm, depth 12.5-14 mm depending on the depth of door furniture) on the inner side of the door. The distance between the holes hobs fixing centres must be 416 mm.
electrolux Connect the machine to an earthed socket. The manufacturer does not accept any responsibility for damage or injury through failure to comply with the above safety precaution. Should the appliance power supply cable need to be replaced, this must be carried out by a Service Centre. The power supply cable must be easily accessible after installing the machine. ENVIRONMENT CONCERNS The symbol on the product or on its packaging indicates that this product may not be treated as household waste.
electrolux 29
electrolux
electrolux 31
www.electrolux.