EWP 127307 W ................................................ .............................................
electrolux Electrolux. Thinking of you. Share more of our thinking at www.electrolux.com CONTENTS Safety information Frost precaution Environment concerns Product description Technical data Special accessories for installation Installation 2 4 4 5 5 6 6 First use 10 Personalisation 10 Daily use 11 Washing programmes 20 Consumption values 22 Care and cleaning 23 What to do if… 26 Subject to change without notice. SAFETY INFORMATION Important! Read carefully and keep for future reference.
electrolux 3 Centre. Always insist on genuine spare parts. INSTALLATION • This appliance is heavy. Care should be taken when moving it. • All packing and transit bolts must be removed before use. Serious damage can occur to the product and to property if this is not adhered to. See relevant section in the user manual. • This appliance is free standing only. DO NOT build it in under a counter and DO NOT remove the worktop for any reason.
electrolux • • • • struction concerning use of the appliance by a person responsible for their safety. Children should be supervised to ensure that they do not play with the appliance. The packaging components (e.g. plastic film, polystyrene) can be dangerous to children - danger of suffocation! Keep them out of children’s reach. Keep all detergents in a safe place out of children’s reach. Make sure that children or pets do not climb inside the drum.
electrolux 5 This means that they can be recycled by disposing of them properly in appropriate collection containers. ECOLOGICAL HINTS To save water, energy and to help protect the environment, we recommend that you follow these tips: • Normally soiled laundry may be washed without prewashing in order to save detergent, water and time (the environment is protected too!). • The machine works more economically if it is fully loaded.
electrolux Maximum Load Cotton 7 kg Spin Speed Maximum 1200 rpm 1) Connect the water inlet hose to a water tap with a 3/4'' thread. SPECIAL ACCESSORIES FOR INSTALLATION RUBBER FEET KIT (4055126249) Available from your authorized dealer. The rubber feet are particularly recommended on floating, slippery and wooden floors. Mount the rubber feet to prevent vibration, noises and displacement of the appliance during operation. Read carefully the instructions supplied with the kit.
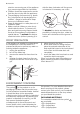
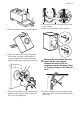
electrolux 7 1 2 • Return appliance to the upright position. • Open the door and remove the plastic hose guide, the bag containing the instruction booklet, the water inlet hose and the plastic plug caps from the drum. • Remove the power supply cable and the draining hose from the hose holders on the rear of the appliance. • Unscrew the three bolts and remove the hose holders. • Slide out the relevant plastic spacers. Warning! Do not remove the drain hose from the rear support.
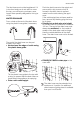
electrolux WATER INLET An inlet hose is supplied and can been found inside the machine drum. Do not use the hose from your previous machine to connect to the water supply. POSITIONING AND LEVELLING Level the appliance by raising or lowering the feet. The appliance MUST be level and stable on a flat hard floor. If necessary, check the setting with a spirit level. Any necessary adjustment can be made with a spanner. Important! This appliance must be connected to a cold water supply. 1.
electrolux 9 The inlet hose must not be lengthened. If it is too short and you do not wish to move the tap, you will have to purchase a new, longer hose specially designed for this type of use. WATER DRAINAGE Form a hook at the end of the drain hose using the plastic hose guide, if necessary. Push the drain hose onto the spigot and secure with a clip, ensure a loop is formed in the drain hose to prevent waste from the sink entering the appliance.
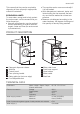
electrolux CONNECTIONS OVERVIEW 0.5 bar (0.05 MPa) 8 bar (0.8 MPa) max. 100 cm min. 60 cm min. 60 cm max. 100 cm ~max.400 cm ELECTRICAL CONNECTION • The appliance must be earthed. • Make sure that the electrical information on the rating plate agree with your domestic power supply. • Always use a correctly installed shockproof socket. • Do not use multi-way plugs, connectors and extension cables. There is a risk of fire. • Do not replace or modify the mains cable yourself.
electrolux 11 There are two different ways to set this option: 1. Before pressing button 8: it will be impossible to start the appliance. 2. After pressing button 8: it will be impossible to change any other programme or option. To enable or disable this option press simultaneously for about 6 seconds buttons 3 and 4 until on the display, the icon pears or disappears.
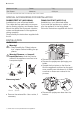
electrolux OPEN THE DOOR BY CAREFULLY PULLING THE DOOR HANDLE OUTWARDS LOAD THE LAUNDRY Place the laundry in the drum, one item at a time, shaking them out as much as possible. MAXIMUM LOADS Recommended loads are indicated in the «Washing Programmes». General rules: • Cotton, linen: drum full but not too tightly packed; • Synthetics: drum no more than half full; • Delicate fabrics and woollens: drum no more than one third full.
PU SH RE TO MOV CL E EA N electrolux 13 Warning! If you wish to carry out the prewash, pour the detergent among washing items into the drum. SH PU BLEACH Alternatively the softener, it is also possible to use a bleach agent in the compartment in the programmes for white cottons. Proceed as follows: • Put the bleach in the compartment . Do not exceed the «MAX» mark in the detergent dispenser drawer. • Run a programme for white cottons. • At the end of the programme, run the RINSE programme.
electrolux • Remove the drawer. Push the drawer edge outwards where indicated by the arrow (PUSH) to facilitate drawer removal. The flap is down and you wish to use powder detergent: • Rotate the flap upwards. Ensure to fit the flap completely in. • Carefully put the drawer back. PO TER R DE W DE packing and ensure that the detergent can be poured in the drawer. • Pour the liquid detergent in the compartment without exceeding the limit indicated in the flap.
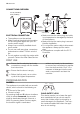
electrolux 15 CLOSE THE DETERGENT DISPENSER DRAWER SET YOUR WASHING PROGRAMME The control panel permits to select a washing programmes and different options. When an option button is selected, the corresponding pilot light is on. Otherwise it is off. For compatibility among washing programmes and options, see the "Washing Programmes". If an incorrect option is selected, the integrated red pilot light of the button 8 flashes 3 times and the display shows the message Err.
electrolux Temperature button 90° 60° 40° 2 30° Temp. Spin reduction and Antipiega option 1200 700 3 Centrifuga Rapido 4 Extra Risciacquo Temp. Rapido Push the temperature button to select the most suitable temperature for washing your laundry . Cold: Cold wash. Riduzione Centrifuga By selecting a programme, the appliance proposes automatically the maximum spin speed provided for that programme.
electrolux 17 Display 5 5.1 5.2 5.3 The display shows the following information: 5.1 Delay Start icon 5.2 Child safety lock This device permits you to leave the appliance unattended during it's functioning. 5.3 • Duration of the selected programme After selecting a programme, the duration is displayed in hours and minutes (for example ). The duration is calculated automatically on the basis of the maximum recommended load for each type of fabric.
electrolux Delay 6 The programme can be delayed from 30 min - 60 min 90 min, 2 hours and then by 1 hour up to a maximum of 20 hours by means of this button. Before you start the programme, if you wish to delay the start, press this button to select the desired delay. The selected delay time value will appear on the display for a few seconds, then the duration of the programme will appear again. You must select this option after you have set the programme and before you start the programme.
electrolux 19 Avvio/Pausa 8 Start the programme by pressing the button 8 • To start the selected programme, press the button 8, the corresponding green pilot light stops flashing. The pilot light 7.1 illuminates to indicate that the appliance starts operating and the door is locked. If you have chosen a delayed start, the appliance will begin the countdown. • To interrupt a programme which is running, press the button 8: the corresponding green pilot light starts flashing.
electrolux DOOR SEAL At the end of every cycle, check from the door seal and remove objects that could be trapped in the fold. WASHING PROGRAMMES Programme - Maximum and Minimum Temperature - Cycle Description - Maximum Spin Speed - Maximum Fabrics Load - Type of Laundry Options - COTONI (Cold) 90°Main wash - Rinses - Maximum spin speed at 1200 rpm Max. load 7 kg - Reduced load 3.5 kg1) White, coloured cotton and linen. Normally soiled items.
electrolux 21 Programme - Maximum and Minimum Temperature - Cycle Description - Maximum Spin Speed - Maximum Fabrics Load - Type of Laundry Options - DELICATI (Cold) 40°Main wash - Rinses - Maximum spin speed at 700 rpm Max. load kg 3.5 - Reduced load 2 kg1) Delicate fabrics: acrylics, viscose, polyester . Normally soiled items. ANTIPIEGA , RAPIDO, DELAY, EXTRA RISCIACQUO - LANA / - A MANO 40°(Cold) Main wash - Rinses - Maximum spin speed at 1200 rpm Max.
electrolux Programme - Maximum and Minimum Temperature - Cycle Description - Maximum Spin Speed - Maximum Fabrics Load - Type of Laundry Options - 5 CAMICIE 30° Main wash - Rinses - Maximum spin speed at 700 rpm Synthetics and mixed fabrics. Suitable for 5 - 6 shirts lightly soiled. ANTIPIEGA , DELAY - MINI 30 30° Main wash - Rinses - Maximum spin speed at 700 rpm Max. load 3 kg Synthetics and delicates. Lightly soiled items or which only needs freshening up.
electrolux 23 Model Off Mode (W) Left On Mode (W) 0.05 0.05 EWP127307W CARE AND CLEANING Warning! Switch the appliance off and remove the mains plug from the socket before any cleaning action. MAINTENANCE WASH With the use of low temperature washes it is possible to get a build up of residues inside the drum. We recommend that a maintenance wash be performed on a regular basis. To run a maintenance wash: • The drum should be empty of laundry. • Select the hottest cotton wash programme.
electrolux After having cleaned the dispenser and the drawer recess, replace it. CLEANING THE DRAIN FILTER The filter permits to hold fluff or foreign bodies left unawares in the laundry. The pump must be cleaned regularly. To clean the filter, proceed as follows: • Tturn programme selector dial to position . • Unplug the appliance.; • Open the door. • Turn the drum and align the filter cover (FILTER) with the arrow on the door seal.
electrolux 25 • Close the filter cover. • Insert the mains plug again. • If necessary, place the filter cover in the right position again. • Open the filter cover and insert the filter again. CLEANING THE WATER INLET FILTERS Important! If the appliance doesn't fill, it takes a long time to fill with water, the starting button flashes red or the display (if available) shows the relevant alarm (see chapter "What to do if..." for more details), check if the water inlet filters are blocked .
electrolux • Screw the hose back to the appliance and make sure the connection is tight. • Turn on the water tap. WHAT TO DO IF… The appliance does not start or stops during operation. Certain problems are due to lack of simple maintenance or oversights, which can be solved with the help of the indications described in the charts, without calling out an engineer.
electrolux 27 Fault code and malfunction Possible cause / Solution The door has not been closed or is not closed properly. • Close firmly the door. Door open The appliance does not start or stops during operation without any visible alarm. Malfunction The appliance does not start: The appliance fills then empties immediately: Before contacting your local Service Centre, please carry out the checks listed below. Possible cause / Solution The plug is not properly inserted in the power socket.
electrolux Malfunction Possible cause / Solution The appliance vibrates noisily: The transit bolts and packing have not been removed. • Check the correct installation of the appliance. The appliance is not levelled correctly. • Adjust the feet. The laundry is not evenly distributed in the drum. • Redistribute the laundry. Maybe there is very little laundry in the drum. • Load more laundry.
electrolux 29
electrolux
electrolux 31
www.electrolux.