EWP10742 EWP85742 EWP85752 ................................................... ........................................................
www.electrolux.com CONTENTS 1 2 3 4 5 6 7 8 9 10 11 12 SAFETY INFORMATION .............................................................................................. 3 PRODUCT DESCRIPTION ........................................................................................... 5 CONTROL PANEL ...................................................................................................... 6 BEFORE FIRST USE ......................................................................................
ENGLISH 1. 3 SAFETY INFORMATION Conditions of use This appliance is intended to be used in household and similar applications such as: - Farm houses - By clients in serviced apartments, holiday apartments and residential type environments. In the interest of your safety and to ensure the correct use, before installing and first using the appliance, read this user manual carefully, including its hints and warnings.
www.electrolux.com After having installed the appliance, check that it is not standing on the inlet and drain hose and the worktop is not pressing the electrical supply cable. If the machine is situated on a carpeted floor, please adjust the feet in order to allow air to circulate freely. Always be sure, that there is no water leakage from hoses and their connections after the installation. Any plumbing work required to install this appliance should be carried out by a qualified plumber.
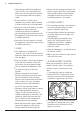
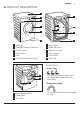
ENGLISH 5 2. PRODUCT DESCRIPTION 1 7 3 2 9 4 11 8 5 10 12 6 7 Mains Cable 1 Worktop 2 Detergent/Softener Dispenser 8 Water Inlet Hose 9 Water Drain Hose 3 Control Panel 4 Door Handle 10 Hose Support 5 Door 6 Level Adjustment Feet (Front) 11 Transit Bolts 12 Back Feet ACCESSORIES Plastic caps 15 14 13 13 Door Blocking button 14 Rating Plate 15 Drain Filter To close the holes on the rear side of the cabinet after the removal of the transit bolts.
www.electrolux.com 3.
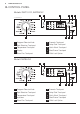
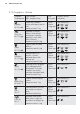
ENGLISH 3.1 Program Selector Knob Turn this knob to set a program. The washing machine will propose a temperature and automatically select the spin value provided for the program you have chosen. The selector knob can be turned either clockwise or anticlockwise. Position “ ” to reset program/ switching OFF the machine. At the end of the program the selector dial must be turned to position “ ”, to switch the machine off. 3.
www.electrolux.com 3.5 Indicators 3.8 Delay Start Touchpad (For Model EWP85752) (For models : EWP10742, EWP85742) - This option makes it possible to delay the start of the washing program by 30 min, 60 min or 90 min and then by every hour from 2 to 20 hours. - Door lock indicator. LED on, you cannot open the door. LED off, you can open the door. Washing end indicator. Child lock indicator. 3.
ENGLISH If you wish to add laundry in the machine during the delay time press Start/Pause touchpad to put the machine in pause mode. Add laundry, close the door and press Start/Pause touchpad again. You can cancel the delay time at any moment, by pressing ‘Delay Start’ touchpad repeatedly till the LED light disappear, then press the Start/Pause touchpad. 3.10 Quick Touchpad This option can be used for lightly soiled in order to obtain a good washing result in a short time.
www.electrolux.com 3.14 Programs + Options Program; Temperature Regular; 90 °C to Easy Iron; 60 °C to Color; 60 °C to Delicates; 40 °C to Wool; 40 °C to Heavy Duty; 90 to 40 °C Silk; 30 °C Fast’ 20; 30 °C Type of load; Max. weight of load Cycle description Options can be combined White and coloured cotton with heavy level of soil; maximum load 7 kg.
ENGLISH Program; Type of load; Temperature Max. weight of load Sensitive Plus; 60 °C to For people with sensitive skin - Wash - Rinses or allergies, white and - Short spin coloured cottons designed for high rinsing efficiency, especially for solid particles; maximum load 5 kg. This program allows you to soak heavily soiled clothes. There is a water in the drum when the program is completed. To drain the water refer paragraph “To empty out the water” ; maximum load 7 kg.
www.electrolux.com 4. BEFORE FIRST USE 1. Ensure that the electrical and water connections comply with the installation instructions. 2. Put 2 litres of water in the detergent compartment for washing phase. This activates the drain system. 3. Select a Regular cycle at 90 °C, without any laundry in the machine, to remove any manufacturing residue from the drum and tub. Pour 1/2 a measure of detergent into the dispenser drawer and start the machine. 5.
ENGLISH 3. Press the option touchpads, if you want your laundry to be washed with special functions. Different functions can be combined which is dependent on the program selected. 4. If you want to delay the start of the washing program, press the ‘Delay Start ’ option touchpad repeatedly to choose your washing machine delay time. When these touchpads are pressed, the corresponding pilot lights come on. When they are pressed again, the pilot lights go out. Step 2 - Loading The Laundry 1.
www.electrolux.com 4. Make sure that no laundry remains between the seal and the door. 5. Close the door. Step 3 - Using Detergent And Additives 1. Detergent Dispenser Drawer Powder or liquid detergent. 1 The detergent dispenser is divided into three compartments. Compartment ‘MAIN WASH’ This compartment is used for detergent on all programs. Detergent flap Flap for powder or liquid detergent. Compartment ‘PREWASH’ This compartment is only used for detergent when a Prewash is selected.
ENGLISH When you use the liquid detergent: - Do not use gelatinous or thick liquid detergents. - Do not put more liquid than the maximum level. - Do not set the PREWASH phase. - Do not set the DELAY START. 15 - If you wish to carry out the “Prewash” phase, pour it into the compartment marked . - If required, pour fabric softener into the compartment marked (the amount used must not exceed the “MAX” mark in the drawer). 2.
www.electrolux.com 5.2 Interruption Of A Program - To pause press Start/ Pause. The indicator will start flashing. - Press the Start/Pause again. The program will continue. 5.3 Changing A Program Changing a running program is possible only by resetting it. 1. Turn the program selector knob to the position ‘ ’ to cancel the program and to turn off the appliance. 2. Turn the program selector knob to the new program position and set the new option, then press ‘Start/Pause’ touchpad again.
ENGLISH 3. Press the touchpad Start/Pause. The appliance will drain the water. 4. When the program is completed and the door lock indicator ‘ ’ disappear, you can open the door. 5. Turn the program selector knob to the position ‘ ’ to deactivate the appliance. 17 5.8 Stand by mode 5 minutes after the washing program ends, if you do not deactivate the appliance, the energy saving function activates. The energy saving function decreases the energy consumption when the appliance is in the stand by mode.
www.electrolux.com 6. WASHING HINTS 6.1 Sorting The Laundry Follow the wash code symbols on each garment label and the manufacturer’s washing instructions. Sort the laundry as follows: whites, coloureds, synthetics, delicates, woollens. 6.2 Temperatures For normally soiled white cottons and linen 90°C (e.g. teacloths, towels, tablecloths, sheets...). For normally soiled, colourfast garments (e.g. 60°C shirts, night dresses, 50°C pyjamas....
ENGLISH Rust: oxalic acid dissolved in hot water or a rust removing product used in cold water. Be careful with rust stains which are not recent since the cellulose structure will already have been damaged and the fabric tends to hole. Mould stains: treat with bleach, rinse well (whites and fast coloureds only). Grass: soap lightly and treat with bleach (whites and fast coloureds only). Ball point pen and glue: moisten with acetone (*), lay the garment on a soft cloth and dab the stain.
www.electrolux.com Any fabric softener or starching additives must be poured into the compartment marked ‘ ’ before starting the wash program. Follow the product manufacturer’s recommendations on quantities to use and do not exceed the MAX mark in the detergent dispenser drawer. Do not spray stain pre-treatment products (e.g. Preen) on or near the machine, as it can attack plastic materials reducing its life. 6.
ENGLISH 7. INTERNATIONAL WASH CODE SYMBOLS These symbols appear on fabric labels, in order to help you choose the best way to treat your laundry. Energetic wash Max. wash Max. wash temperature temperature 95 °C 60 °C Max. wash temperature 40 °C Max. wash temperature 30 °C DO NOT wash at all Hand wash Delicate wash Bleaching Bleach in cold water Ironing Hot iron max. 200 °C Dry cleaning Dry cleaning in all solvents DO NOT bleach Warm iron max. 150 °C Lukewarm iron max.
www.electrolux.com 8. CARE AND CLEANING WARNING! You must DISCONNECT the appliance from the electricity supply, before you can carry out any cleaning or maintenance work. 8.1 External Cleaning Clean the appliance only with soap and warm water. Fully dry all the surfaces. CAUTION! Do not use alcohol, solvents or chemical products. 8.2 Descaling The water we use normally contains lime. It is a good idea to periodically use a water softening powder in the machine.
ENGLISH 23 To aid cleaning, the top part of the additive compartment should be removed. 8.6 Cleaning The Drawer Recess Having removed the drawer, use a small brush to clean the recess, ensuring that all washing powder residue is removed from the upper and lower part of the recess. Replace the drawer and run the rinse program without any clothes in the drum. WARNING! Disconnect the mains plug from the mains socket.
www.electrolux.com 2. Open the filter cover by pressing the special hook and by rotating the cover upwards. 4. Hold filter securly and pull upwards to remove it from its position. 5. Clean the filter under the water tap. 3. Remove eliminate the eventual fluff or small objects (if there is any) around the filter. 6. After cleaning the filter, open the filter cover and insert the filter back to its position.
ENGLISH 7. IMPORTANT! 25 8. Close the filter cover. The filter is inserted correctly when the indicator on this top is visible and you will hear “Click” sound. 9. Insert the mains plug again. WARNING! Do not start washing clothes without the filter in its place. 8.8 Cleaning The Water Inlet Filter If your water is very hard or contains traces of lime deposit, the water inlet filter may become clogged. 5. Clean the filter in the valve with a stiff brush or a towel.
www.electrolux.com 8.9 The Dangers Of Freezing If the machine is exposed to temperatures below 0°C, certain precautions should be taken. Do this procedure also when you want to do the emergency drain. Disconnect the mains plug from the mains socket. 1. Turn off the water tap. 2. Unscrew the inlet hose. 3. Remove the drain hose from the rear support and unhook it from sink or spigot. 4. Put the ends of the drain and inlet hose in a container. Let the water flow out of the hoses. 5.
ENGLISH 27 9. TROUBLESHOOTING Certain problems are due to lack of simple maintenance or oversights, which can be solved easily without calling out an engineer. Before contacting your local Service Centre, please carry out the checks listed below. During machine operation it is possible that the RED Start/Pause pilot light flashes to indicate that the machine is not working. Once the problem has been eliminated, press the Start/Pause button to restart the program.
www.electrolux.com Malfunction Possible cause Solution The drain filter is clogged. The machine does not empty and/or does not spin: There is water on the floor: Unsatisfactory washing results: The door will not open: The machine vibrates or is noisy: Display model: Error code: . None-Display model: Washing End ‘ LED and ‘Start/Pause’ LED flashing. Clean the drain filter. ’ The option ‘Rinse Hold ’ or ‘No Spin ’ has been selected.
ENGLISH Malfunction Cycle time longer than displayed: Possible cause 29 Solution Detergent over dose. Reduce the detergent quantity or use another one. Machine unbalance. Redistribute laundry manually in the drum and start the spin phase again. Refer to relevant paragraph in “Positioning” section. The electronic unbalance detection device has cut in because the laundry is not evenly distributed in the drum. Pause the machine and redistribute laundry manually.
www.electrolux.com 10. TECHNICAL DATA Dimensions Power supply (voltage/frequency) Width 59.6 cm Height 84.7 cm Depth 55.3 cm 220-240 V/50 Hz (60 Hz for PHILIPPINES) Total power absorbed 2200 W (2000 W for PHILIPPINES) Minimum fuse protection Water supply pressure Maximum load Spin speed 10 A Maximum 0.8 MPa Minimum 0.05 MPa Programs Model Regular, Heavy Duty, Energy Saving, Rinse, Spin, Drain EWP10742, EWP85742, EWP85752 7.0 Kg Sensitive Plus EWP10742, EWP85742, EWP85752 5.
ENGLISH 31 11 .INSTALLATION 11.1 Positioning It is important that your washing machine stands firm and level on the floor to ensure correct operation. That the appliance must not be installed behind a lockable door, a sliding door or a door with a hinge on the opposite side to that of the washing machine door is restricted. When the washing machine is levelled, try to rock it from corner to corner. If it does rock, adjust the legs again until it is levelled and does not rock.
www.electrolux.com The end of the drain hose must always be ventilated, i.e. the inside diameter of the drain pipe must be larger than the outside diameter of the drain hose. 60 cm The inlet hose must not be lengthened. If it is too short and you do not wish to move the tap, you will have to purchase a new, longer hose specially designed for this type of use. The drain hose must not be kinked. Run it along the floor; only the part near the drainage point must be raised. 90 cm 32 11.
ENGLISH Should the appliance power supply cable need to be replaced, this should be carried out by our Service Centre. When the appliance is installed the power supply cable must be easily accessible. 33 If this appliance is supplied from a cord extension set or electrical portable outlet device, the cord extension set or electrical portable device must be positioned so that it is not subject to splashing or ingress of moisture. 12. ENVIRONMENT CONCERNS 12.
www.electrolux.co.th สารบัญ 1 2 3 4 5 6 7 8 9 10 11 12 ขอมูลดานความปลอดภัย .................................................................................................. 35 รายละเอียดของผลิตภัณฑ ................................................................................................. 37 แผงควบคุมการทำงาน ..................................................................................................... 38 กอนการใชงานครั้งแรก ..........................................................
1. ภาษาไทย ขอมูลดานความปลอดภัย เงื่อนไขการใชงาน เครื่องซักผานี้ผลิตขึ้นสำหรับใชในครัวเรือน หรือ ในลักษณะใกลเคียง เชน - ในบาน - ในอพารทเมนท คอนโดมิเนียม เพื่อความปลอดภัย และการใชงานอยางถูกตอง กอนติดตั้ง และใชเครื่องเปนครั้งแรก ขอใหอาน คูมือการใชงานเลมนี้ รวมถึงเคล็ดวิธีการใชงาน และคำเตือนตางๆ อยางละเอียด.
www.electrolux.co.
2.
3. www.electrolux.co.
ภาษาไทย 3.1 ลูกบิดเลือกโปรแกรม หมุนลูกบิดนี้เพื่อเลือกโปรแกรม เครื่องซักผา จะกำหนดอุณหภูมิ และเลือกคาการปนหมาด สำหรับโปรแกรมที่เลือก โดยอัตโนมัติ ลูกบิดนี้สามารถหมุนตามหรือทวนเข็มนาิกา ก็ได ตำแหนง “ ” เพื่อเริ่มโปรแกรมใหม หรือ ปดเครื่อง เมื่อสิ้นสุดโปรแกรม ลูกบิดเลือกโปรแกรม ตองหมุนกลับ มาที่ตำแหนง “ ” เพื่อทำ การปดเครื่อง 3.
www.electrolux.co.th 3.5 ไฟแอลอีดีแสดงสถานะการทำงาน ในรุน: EWP85752 3.8 หนวงเวลาเริ่มการทำงาน (ระบบสัมผัส) ในรุน: EWP10742, EWP85742 - - สัญลักษณแสดง การล็อคประตู ไฟติดสวาง คุณจะไมสามารถ เปดประตูเครื่ีองได ไฟดับอยู คุณจะสามารถเปด ประตูเครื่องได สัญลักษณแสดง การสิ้นสุดการ ทำงาน สัญลักษณแสดง การล็อคปองกันเด็ก 3.
ภาษาไทย ทานสามารถเลือกตัวเลือกนี้ หลังจากที่ได เลือกโปรแกรมการทำงานที่ตองการแลว และกอนที่จะกดปุมเริ่ม/หยุดชั่วคราว (Start/Pause) หากตองการเพิ่มผาในเครื่อง ระหวางหนวง เวลาใหกดปุมเริ่ม/หยุดชั่วคราว (Start/Pause) เพื่อใหเครื่องหยุดการ ทำงานของเครื่องชั่วคราว เปดประตูเพิ่มผาแลวปดประตู จากนั้นกดปุม เริ่ม/หยุดชั่วคราว (Start/Pause) อีกครั้ง สามารถยกเลิกการหนวงเวลาไดทุกเมื่อ โดยกดปุมสัมผัส "Delay" ซ้ำๆ จนกระทั่ง ไฟแอลอีดีที่เวลาที่เลือกดับลง จากนั้นกดปุม สัมผัส Start/Pause 3.
www.electrolux.co.th 3.14 โปรแกรม + ตัวเลือกเสริม โปรแกรม; อุณหภูมิ ประเภทผา; น้ำหนักสูงสุด Regular ผาฝายขาวหรือสี (ผาที่สวมใสประจำ); ที่มีคราบสกปรกมาก; 90 องศาเซลเซียส น้ำหนักสูงสุด 7 กก.
ภาษาไทย โปรแกรม; อุณหภูมิ ประเภทผา; น้ำหนักสูงสุด Sensitive สำหรับผูที่มีผิวบอบบางหรือแพงาย Plus ผาฝายขาวและสี โปรแกรมถูก (บอบบางพิเศษ); ออกแบบมาให ลางคราบออกได 60 องศาเซลเซียส อยางมีประสิธิภาพ โดยเฉพาะ ถึง พวกเม็ดฝุน เม็ดดิน; น้ำหนักสูงสุด 5 กก.
4. www.electrolux.co.th กอนการใชงานครั้งแรก 1. ตรวจสอบใหแนใจวาจุดเชื่อมตอทางไฟฟา และระบบน้ำเปนไปตามคำแนะนำในการติดตั้ง 2. เติมน้ำ 2 ลิตร ในชองเติมผงซักฟอกในชอง ซักหลัก เพื่อกระตุนการทำงานของระบบ ระบายน้ำ 3. เลือกรอบการทำงานสำหรับผาฝาย (Regular) ที่ 90°C, โดยไมตองบรรจุผา เพื่อนำสิ่งตกคาง จากการผลิตออกจากถังซักและจุดตางๆ 5.
ภาษาไทย 3. สัมผัสสัญลักษณตัวเลือกเสริม หากตองการ ใหซักผาโดยใชฟงกชั่นพิเศษ ตัวเลือกเสริมแตละฟงกชั่น สามารถเลือกได ขึ้นอยูกับโปรแกรมการทำงานแตละโปรแกรม 45 4. หากตองการหนวงเวลาเริ่มตนการทำงานของ โปรแกรมที่เลือก สัมผัสสัญลักษณ ‘Delay’ ซ้ำๆ เพื่อเลือกระยะเวลาที่ตองการหนวงเวลา เริ่มตนการทำงาน เมื่อสัมผัสสัญลักษณเหลานี้แลว ไฟสัญญาณ ที่เกี่ยวของจะติดสวางขึ้น เมื่อกดซ้ำอีกครั้ง ไฟสัญญาณจะดับลง ขั้นตอนที่ 2 - การบรรจุผา 1.
www.electrolux.co.th 4. อยาใหมีผาหลงเหลือระหวางยางรองขอบ ประตูและประตูเครื่อง 5. ปดประตู ขั้นตอนที่ 3 - การใชสารซักฟอกและน้ำยาปรับสภาพ 1.
ภาษาไทย - หากคุณใชน้ำยาซักผา ใหปฏิบัติ ดังนี้: อยาใชน้ำยาซักผาที่เปนเจลหรือ เหนียวขน อยาเติมมากกวาระดับสูงสุดที่กำหนด อยาเลือกตัวเลือกเสริม ‘Prewash’ อยาตั้งคาหนวงเวลาเริ่มตนการทำงาน ‘Delay’ 47 - หากตองการ "เพิ่มรอบการซัก" ใหเทน้ำยาในชองที่ระบุเปน - ถาตองการเติมน้ำยาปรับผานุม ใหเท น้ำยาปรับผานุม ลงในชองที่มีเครื่องหมาย (ปริมาณที่ใช ตองไมเกิน ขีด “MAX” ในชอง) - เลื่อนชองเติมสารซักฟอกปดเบาๆ 2.
www.electrolux.co.th 5.2 หยุดการทำงานของโปรแกรม - เพื่อหยุดการทำงานกด ‘Start/ Pause’ ไฟแอลอีดีจะกระพริบ กด ‘Start/ Pause’ อีกครั้ง โปรแกรมจะกลับ มาทำงาน 5.3 การเปลี่ยนโปรแกรมการทำงาน สามารถเปลี่ยนโปรแกรมไดก็ตอเมื่อ เริ่มการทำงาน ของเครื่องใหมเทานั้น 1. หมุนลูกบิดเลือกโปรแกรมไปที่ตำแหนง ‘ ’ เพื่อยกเลิกโปรแกรมและเพื่อปดเครื่อง 2. หมุนลูกบิดเลือกโปรแกรมไปที่ตำแหนง โปรแกรมใหมและเลือกฟงกชั่นใหม จากนั้นกด "Start/Pause" อีกครั้ง หากมีน้ำในถังซัก เครื่องจะยังไม ทำการระบายน้ำ 5.
ภาษาไทย 5.7 ขณะโปรแกรมการซักเสร็จสิ้น แตมีน้ำเหลืออยูในถัง - ถังจะหมุนตามปกติเพื่อปองกันรอยยับ ที่ผา สัญลักษณล็อคประตู ‘ ’ จะแสดงที่ จอแสดงผล (รุนที่มีจอแสดงผล) หรือ ไฟแอลอีดีติดสวางอยู (รุนที่ไมมีจอ แสดงผล) แสดงถึงประตูเครื่องยังคง ล็อคอยู คุณจะตองทำการระบายน้ำออกเพื่อเปด ประตูเครื่อง ทำการระบายน้ำโดย 1. เลือกโปรแกรม “Spin” หรือ “Drain” 2. ในกรณีที่จำเปน ใหลดรอบการปนหมาด 3. กดปุมสัมผัส Start/Pause เครื่องจะ ระบายน้ำและปนหมาด 4.
6. www.electrolux.co.th คำแนะนำในการซัก 6.1 การแยกประเภทผาที่จะซัก ปฏิบัติตามสัญลักษณการซัก บนฉลากผา แตละชิ้น และคำแนะนำการซักจากผูผลิต แยกชนิดของผาดังนี้: ผาขาว, ผาสี, ผาใยสังเคราะห, ผาเนื้อบอบบาง, ผาขนสัตว 6.2 อุณหภูมิ สำหรับผาฝาย และผาลินินขาว ที่สกปรกปานกลาง (เชน 90°C ผาชุดรองน้ำชา ผาขนหนู ผาปูโตะ ผาปูที่นอน...) สำหรับผาสีจำพวกผาลินิน ผาฝาย หรือผาใยสังเคราะห 60°C ที่สกปรกปานกลาง (เชน เสื้อเชิ้ต 50°C ชุดราตรี ชุดนอน....
ภาษาไทย สนิมเหล็ก: ใชกรดออกซาลิกละลายใน น้ำรอน หรือใชผลิตภัณฑกำจัดคราบสนิม เหล็กที่ใชกับน้ำเย็น ระวังรอยสนิมที่ติด แนนมานาน เพราะโครงสรางเซลลูโลส ถูกทำลายไปแลว และผาอาจเปนรูได คราบเชื้อรา: ใชน้ำยาฟอกขาว แลวลาง ออกใหหมด (ใชกับผาขาวและผาที่สีไมตก เทานั้น) หญา: ถูดวยสบูเล็กนอย และใชน้ำยาฟอก ขาว (ใชกับผาขาวและผาที่สีไมตกเทานั้น) ปากกาลูกลื่นและกาว: ทาดวยอะซิโตน (*) วางผาลงบนผานุมๆ แลวซับรอยเปอน ลิปสติก: ทาดวยอะซิโตน (*) แลวถูรอย เปอนดวยเหลา แลวขจัดรอยเปอนตกคาง บนผ
www.electrolux.co.th ตองเทน้ำยาปรับผานุม และน้ำยาลงแปง ลงในชอง ‘ ’ กอนเริ่มตนโปรแกรม การซัก ใชปริมาณตามคำแนะนำของผูผลิต และอยา เติมเกินเครื่องหมาย ‘MAX’ ในชองจาย น้ำยาซักผา อยาพนน้ำยาขจัดคราบ บนหรือใกลกับเครื่อง เนื่องจากอาจสงผลตอวัสดุพลาสติกและอายุ การใชงาน 6.
ภาษาไทย 7.
8. www.electrolux.co.th การดูแลรักษาและทำความสะอาด คำเตือน ! ตองถอดปลั๊กไฟออกทุกครั้ง กอนทำความ สะอาดหรือดูแลรักษา 8.1 การทำความสะอาดภายนอก ทำความสะอาดเครื่องดวยสบูและน้ำอุน เทานั้น เช็ดพื้นผิวทั้งหมดใหแหง ขอควรระวัง ! หามใชแอลกอฮอล สารละลาย หรือ สารเคมีทำความสะอาดเครื่อง ตวงสารซักฟอกในปริมาณปกติ ตองใช ผงซักฟอกชีวภาพเทานั้น 8.
ภาษาไทย 8.6 การทำความสะอาดชองใสถาด จายสารซักฟอก 55 การทำความสะอาดตัวกรองสวนระบาย: คำเตือน! อยาทำความสะอาดตัวกรองระบาย หากน้ำในเครื่องรอนอยู 1. หมุนถังและใหคำวา FILTER บนฝาครอบ ตัวกรอง ไดตำแหนงตรงกับลูกศรของยาง รองขอบประตูเครื่องซักผา หลังจากนำถาดจายออก ใหใชแปรงเล็กๆ เพื่อทำความสะอาดชองดานใน โดยใหแนใจ วาผงซักฟอกทั้งหมดไมเหลือเปนคราบ ตกคางดานบนและที่ดานลางของชอง ติดตั้งถาดรองกลับเขาที่จากนั้นเดินโปรแกรม ลางผาโดยไมตองบรรจุผาในถังซัก 8.
www.electrolux.co.th 5. ทำความสะอาดตัวกรองใตกอกน้ำ 3. นำเศษใยผาหรือสิ่งแปลกปลอมเล็กๆ (ถามี) บริเวณตัวกรองออก 6. หลังจากทำความสะอาดตัวกรอง ใหเปด ฝาครอบตัวกรองขึ้น จากนั้นใสตัวกรอง กลับเขาที่ตำแหนงเดิม 4. จับตัวกรองใหแนนแลวดึงขึ้น เพื่อนำ ออกจากตำแหนงเก็บ 7.
ภาษาไทย 8. ปดฝาครอบตัวกรอง 9. เสียบปลั๊กไฟกลับเขาที่ คำเตือน! อยาใชงานเครื่องซักผาโดยไม ติดตั้งตัวกรอง 8.8 การทำความสะอาดตัวกรอง ทอน้ำเขา หากน้ำกระดางมากหรือมีคราบหินปูน ตัวกรอง ที่ทอน้ำเขาอาจอุดตันได แนะนำใหทำความสะอาดเปนระยะ ๆ 5. ทำความสะอาดตัวกรองที่วาลวโดยใช แปรงแข็งหรือผาขนหนู การทำความสะอาดตัวกรองทอ น้ำเขา: 1. ปดกอกน้ำ 2. หมุนทอน้ำเขาออกจากกอกน้ำ 3. ทำความสะอาดตัวกรองในทอน้ำเขา ดวยแปรงแข็ง 6. ติดตั้งทอน้ำเขากลับเขาที่ หมุนใหแนน เพื่อปองกันน้ำรั่วไหล 45° 4.
www.electrolux.co.th 8.9 อันตรายจากการเยือกแข็ง ถาเครื่องตั้งอยูในสภาวะที่อุณหภูมิแวดลอม ต่ำกวา 0 องศาเซลเซียส ใหปฏิบัติตาม ขั้นตอนตอไปนี้ ทำตามขั้นตอนนี้เชนกันหากตองการ ระบายน้ำฉุกเฉิน ตรวจดูใหแนใจวา ไดปลดสายไฟ จากเตาจายไฟฟาแลว 1. ปดกอกน้ำ 2. หมุนทอน้ำเขาออก 3. นำทอระบายออกจากฐานรองดานหลัง แลวปลดขอออกจากซิงคหรือหัวกอก 4. วางปลายทอระบายน้ำและทอน้ำเขาไว บนภาชนะรองน้ำที่พื้น แลวปลอยใหน้ำ ระบายออก 5.
9.
www.electrolux.co.
ภาษาไทย ความผิดปกติที่เกิด เวลาการทำงาน ที่ใชจริง นานกวา ที่แสดงไว: การปนหมาด เริ่มทำงานชา หรือเครื่องไม ปนหมาด: เครื่องสงเสียง ดังผิดปกติ: ไมเห็นน้ำในถังซัก: สาเหตุที่เปนไปได ผง/น้ำยาซักผามากเกินไป เครื่องไมไดสมดุล อุปกรณตรวจสอบความสมดุลทางอิเล็กทรอนิกส ทำงานคลาดเคลื่อน เนื่องจากผาไมกระจายตัว อยูในถังซักอยางทั่วถึง เครื่องจะทำการกระจายผา โดยการหมุนกลับไป กลับมา ขั้นตอนเชนนี้อาจทำงานหลายครั้ง จนกวาผาจะ กระจายตัวอยูในถังซักอยางทั่วถึง จากนั้นจึงจะ เขาสูขั้นตอนการปนตามปกติ
www.electrolux.co.th 10. ขอมูลทางเทคนิค 59.6 เซนติเมตร กวาง สูง ลึก ขนาด 84.7 เซนติเมตร 55.3 เซนติเมตร แหลงจายไฟ (แรงดันไฟฟา/ความถี่) 220-240 โวลต / 50 เฮิรตซ (60 เฮิรตซ สำหรับประเทศฟลิปปนส) กำลังไฟทั้งหมด ฟวสปองกันขั้นต่ำ 2200 วัตต (2000 วัตต สูงสุด ต่ำสุด แรงดันน้ำ ผาที่บรรจุ ไดสูงสุด ความเร็ว รอบ ในการ ปนหมาด สำหรับประเทศฟลิปปนส) 10 แอมป 0.8 เมกะปาสคาล 0.
11 . ภาษาไทย การติดตั้ง 11.
ไมควรตอทอน้ำใหยาวขึ้น หากทอสั้น เกินไปและทานไมตองการยายกอกน้ำ ทานตองซื้อทอน้ำใหมที่ยาวกวาเดิม ซึ่งออกแบบมา เพื่อใชงานดานนี้โดย เฉพาะ 11.
ภาษาไทย 12. 65 ขอมูลเพื่อการรักษาสิ่งแวดลอม 12.1 วัสดุบรรจุภัณฑ วัสดุที่มีเครื่องหมาย สามารถ นำกลับมาใชไดอีก >PE<=โพลีเอทิลีน >PS<=โพลีสไตรีน >PP<=โพลีโพรพิลีน สัญลักษณนี้หมายความวา วัสดุนี้สามารถ นำมารีไซเคิลได โดยตองทิ้งในภาชนะ ที่เหมาะสม 12.
NOTE / บันทึก
807209719-B-062013 www.electrolux.co.