EWS 86110W EWS 106110W ................................................ .............................................
electrolux Electrolux. Thinking of you. Share more of our thinking at www.electrolux.com CONTENTS Safety information Product description Control panel First use Daily use Helpful hints and tips Washing programmes 2 4 5 7 7 9 11 Care and cleaning 13 What to do if… 16 Technical data 18 Consumption values 19 Installation 19 Electrical connection 22 Environment concerns 22 Subject to change without notice. SAFETY INFORMATION Important! Read carefully & keep for future reference.
electrolux 3 • When unpacking the appliance, check that it is not damaged. If in doubt, do not use it and contact the Service Centre. • All packing and transit bolts must be removed before use. Serious damage can occur to the product and to property if this is not adhered to. See relevant section in the user manual. • After having installed the appliance, check that it is not standing on the inlet and drain hose and the worktop is not pressing the electrical supply cable against the wall.
electrolux PRODUCT DESCRIPTION Your new appliance meets all modern requirements for effective treatment of laundry with low water, energy and detergent consumption. Its new washing system allows total use of detergent and reduces water consumption so saving energy.
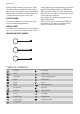
electrolux 5 2. Put in the new programme guide. CONTROL PANEL Below is a picture of the control panel. It shows the programme selector dial as well as the buttons and the pilot lights. These are presented by relevant numbers on the following pages. 1 1 2 3 4 PROGRAMME selector dial SPIN reduction button OPTIONS button EXTRA RINSE button PROGRAMME SELECTOR DIAL It allows you to switch the appliance on/off and/or to select a programme.
electrolux extra quantity of water (extra rinse), select this option. Some additional rinses will be performed. This option is recommended for people who are allergic to detergents, and in areas where the water is very soft. START PAUSE This button allows you to start or to interrupt the selected programme. DELAY START The start of the programme can be delayed by 3, 6 or 9 hours by means of this button. When switching on the appliance, both pilot lights 7.1 (Prewash/Wash) and 7.
electrolux 7 FIRST USE • Ensure that the electrical and water connections comply with the installation instructions. • Ensure that the drum is empty. • Pour 2 liters of water into the main of the deterwash compartment gent drawer in order to activate the ECO valve. Then run a cotton cycle at the highest temperature without any laundry in the machine, to remove any manufacturing residue from the drum and tub. Pour 1/2 a measure of detergent into the main wash compartment and start the machine.
electrolux Caution! If you turn the programme selector dial to another programme when the machine is working, the red pilot light of button 5 will blink 3 times to indicate a wrong selection. The machine will not perform the new selected programme. REDUCE THE SPIN SPEED BY PRESSING BUTTON 2 By selecting a programme, the appliance proposes automatically the maximum spin speed provided for that programme.
electrolux 9 by pressing the button 5 again. The washing water in the tub will be not emptied out. INTERRUPTING A PROGRAMME Press the button 5 to interrupt a programme which is running, the corresponding green pilot light starts blinking. Press the button again to restart the programme. CANCELLING A PROGRAMME to cancel a proTurn the selector dial to gramme which is running. You can select now a new programme.
electrolux Remove persistent stains before washing. Rub particularly soiled areas with a special detergent or detergent paste. Treat curtains with special care. Remove hooks or tie them up in a bag or net. REMOVING STAINS Stubborn stains may not be removed by just water and detergent. It is therefore advisable to treat them prior to washing. Blood: treat fresh stains with cold water. For dried stains, soak overnight in water with a special detergent then rub in the soap and water.
electrolux 11 suggest you to add a water softener following always the manufacturer’s instructions. When the degree of hardness is soft, readjust the quantity of the detergent. WASHING PROGRAMMES Programme - Maximum and Minimum Temperature Cycle Description - Maximum Spin Speed - Maximum Fabrics Load - Type of Laundry COTTONS 90° - 60° Main wash - Rinses - Spin Spin at maximum 800 rpm (EWS86110W) Spin at maximum 1000 rpm (EWS106110W) Max.
electrolux Programme - Maximum and Minimum Temperature Cycle Description - Maximum Spin Speed - Maximum Fabrics Load - Type of Laundry DELICATES 40° - 30° Main wash - Rinses - Spin Spin at maximum 700 rpm Max. load kg 3 - Reduced load kg 1,5 Delicate fabrics: acrylics, viscose, polyester. WOOL 40° - 30° - Cold Main wash - Rinses - Spin Spin at maximum 800 rpm (EWS86110W) Spin at maximum 1000 rpm (EWS106110W) Max.
electrolux 13 2) If you select the SUPER QUICK option by pressing button 3, we recommend that you reduce the maximum load as indicated. Full loading is possible however with somewhat reduced cleaning results. 3) Available for model EWS86110W only. CARE AND CLEANING Warning! You must disconnect the appliance from the electricity supply, before you can carry out any cleaning or maintenance work. The washing powder and additive dispenser drawer should be cleaned regularly.
electrolux WASHING DRUM Rust deposits in the drum may occur due to rusting foreign bodies in the washing or tap water containing iron. 1. Open the pump door. Important! Do not clean the drum with acidic descaling agents, scouring agents containing chlorine or iron or steel wool. 1. Remove any rust deposits on the drum with a cleaning agent for stainless steel. 2. Run a washing cycle without any washing to clean off any cleaning agent residues.
electrolux 15 7. Remove fluff and objects from the pump. 8. Make sure that the impeller of the pump can turn. If this does not occur, contact the service centre. 9. Clean the filter under the water tap and put it back in the pump into the special guides. 10. Make sure that you tighten correctly the filter to prevent leakages. refitting the pump cover, ensure it is securely re-tightened so as to stop leaks and young children being able to remove it.
electrolux 6. press the two levers and pull forward the drainage duct to let the water flow out; 7. when the container is full of water, put the drainage duct back again and empty the container; repeat this operation until water stops flowing out; 8. if necessary clean the pump (refer to the section ‘Drain pump’ ); 9. close the drain pump door. When you drain the water with the emergency drain procedure, you must activate again the drain system: 1.
electrolux 17 Problem Possible cause/Solution The washing machine does not start: The door has not been closed (the button 5 red light blinks). • Close the door firmly. The plug is not properly inserted in the power socket. • Insert the plug into the power socket. There is no power at the socket. • Please check your domestic electrical installation. The main fuse has blown. • Replace the fuse. The programme selector dial is not correctly positioned and the button 5 has not been pressed.
electrolux Problem Possible cause/Solution The door will not open: The programme is still running. • Wait the end of washing cycle. The door lock has not been released. • Wait until the door is released before opening the door. There is water in the drum. • Select drain or spin programme to empty out the water. The machine vibrates is noisy: The transit bolts and packing have not been removed. • Check the correct installation of the appliance.
electrolux 19 CONSUMPTION VALUES Programme Energy consumption (KWh)1) Water consumption (litre)1) Programme duration (Minutes)1) White Cottons 90 °C 2.1 62 180 Cottons 60 °C 1.3 59 170 Cottons 40 °C 0.75 59 145 Synthetics 40 °C 0.5 45 95 Delicates 40 °C 0.55 55 77 Wool/ Handwash 30 °C 0.3 50 55 1) The consumption information shown in this chart is indicative.
electrolux 3. Unscrew the three bolts. Any necessary adjustment can be made with a spanner. Accurate levelling prevents vibration, noise and displacement of the machine during operation. 2 1 Caution! Never place cardboard, wood or similar materials under the machine to compensate for any unevenness in the floor. 4. Slide out the relevant plastic spacers. WATER INLET Warning! This appliance must be connected to a cold water supply. 5.
electrolux 21 2. The other end of the inlet hose which connects to the machine can be turned as showed in the picture. Do not place the inlet hose downwards. Angle the hose to the left or right depending on the position of your water tap. • Hooked over the edge of a sink using the plastic hose guide supplied with the machine. In this case, make sure the end cannot come unhooked when the machine is emptying. This could be done by tying it to the tap with a piece of string or attaching it to the wall.
electrolux ELECTRICAL CONNECTION Information on the electrical connection is given on the rating plate on the inner edge of the appliance door. Check that your domestic electrical installation can take the maximum load required, also taking into account any other appliances in use. Connect the machine to an earthed socket. injury through failure to comply with the above safety precaution. The power supply cable must be easily accessible after installing the machine.
electrolux 23
www.electrolux.