EWS 1064 EDW EN Washing Machine User Manual
www.electrolux.com CONTENTS 1. SAFETY INFORMATION....................................................................................3 2. SAFETY INSTRUCTIONS..................................................................................4 3. PRODUCT DESCRIPTION................................................................................ 6 4. CONTROL PANEL............................................................................................. 6 5. PROGRAMMES ....................................
ENGLISH 1. 3 SAFETY INFORMATION Before the installation and use of the appliance, carefully read the supplied instructions. The manufacturer is not responsible for any injuries or damages that are the result of incorrect installation or usage. Always keep the instructions in a safe and accessible location for future reference. 1.
www.electrolux.com • • • • • The appliance is to be connected to the water mains using the new supplied hose-sets. Old hose sets must not be reused. If the mains power supply cable is damaged, it must be replaced by the manufacturer, its Authorised Service Centre or similarly qualified persons to avoid an electrical hazard. Before any maintenance operation, deactivate the appliance and disconnect the mains plug from the socket.
ENGLISH • • • Do not touch the mains cable or the mains plug with wet hands. Do not pull the mains cable to disconnect the appliance. Always pull the mains plug. This appliance complies with the E.E.C. Directives. 2.3 Water connection • • • Do not cause damage to the water hoses. Before connection to new pipes, pipes not used for a long time, where repair work has been carried out or new devices fitted (water meters, etc.), let the water flow until it is clean and clear.
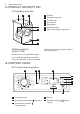
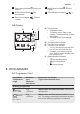
www.electrolux.com 3. PRODUCT DESCRIPTION 3.1 Appliance overview 1 2 1 2 3 4 5 6 7 3 4 5 Worktop Detergent dispenser Control panel Door handle Rating plate Drain pump filter Feet for levelling the appliance 6 7 3.2 Fixing plate kit (4055171146) Read carefully the instructions supplied with the accessory. Available from your authorised dealer. If you install the appliance on a plinth, secure the appliance in the fixing plates. 4. CONTROL PANEL 4.
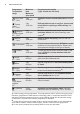
ENGLISH 6 Delay start touchpad старта) (Oтсрочка 9 Start/Pause touchpad Пауза) 7 Extra rinse touchpad полоскание) (Доп. 10 Time Manager touchpads 8 Easy iron touchpad глажка) 7 (Старт/ (Легкая 4.2 Display A B E D C A. The time area: • Programme time. • The alarm codes. Refer to the chapter “Troubleshooting” for their description. • The level of the Time Manager . B. The Delay Start indicator. C. The Child Lock indicator. D. The Door Lock indicator: • It is on, you cannot open the door.
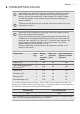
www.electrolux.com Programme Temperature range Maximum load Maximum spin speed Programme description (Type of load and soil level) Синтетика 60° - Cold 3 kg 1000 rpm Synthetic items or mixed fabric items. Normal soil. Тонкие ткани 40° - Cold 3 kg 1000 rpm Delicate fabrics such as acrylics, viscose and mixed fabrics requiring a mild washing. Nor‐ mal soil.
ENGLISH 6. CONSUMPTION VALUES Stated values are obtained in laboratory conditions with relevant stand‐ ards. Different causes can change the data: the quantity and type of laundry and ambient temperature. Water pressure, the supply voltage and the temperature of inlet water may also affect the washing pro‐ gramme duration. Technical specifications may be changed without prior notice to improve the quality of product.
www.electrolux.com 7. OPTIONS 7.1 Температура 7.4 Oтсрочка старта Set this option to change the default temperature. With this option you can delay the start of a programme from 30 minutes to 20 hours. Indicator = cold water. The indicator of the set temperature comes on. 7.2 Отжим With this option you can change the default spin speed. The display shows the related indicator. 7.5 Доп. полоскание With this option you can add some rinses to a washing programme.
ENGLISH indica‐ tor 3) 1) 11 1) ■4) ■4) ■4) ■4) ■4) ■4) 1) If available. 2) Shortest: to freshen the laundry. 3) Longest: Increasing the programme du‐ ration gradually decreases the energy con‐ sumption. The optimized heating phase saves energy and the longer duration main‐ tains the same washing results (specially for normal soil). 4) Defaullt duration for all programmes. 8. SETTINGS • 8.1 Child Lock With this option you can prevent that the children play with the control panel.
www.electrolux.com 10. DAILY USE WARNING! Refer to Safety chapters. Washing heavily oiled, greasy stains could cause damage rubber parts of the washing machine. 10.1 Loading the laundry 1. Open the appliance door 2. Shake the items before you put them in the appliance. 3. Put the laundry in the drum, one item at a time. Make sure not to put too much laundry in the drum. 4. Close the door firmly. 10.2 Using detergent and additives 1. Measure out the detergent and the fabric conditioner. 2.
ENGLISH 13 10.4 Liquid or powder detergent A 1. 2. B 3. 4. • Position A for powder detergent (factory setting). • Position B for liquid detergent. When you use the liquid detergent: • Do not use gelatinous or thick liquid detergents. • Do not put more liquid then the maximum level. • Do not set the prewash phase. • Do not set the delay start. 10.5 Setting a programme 1. Turn the programme knob and set the programme: flashes.
www.electrolux.com After approximately 15 minutes from the start of the programme: • The appliance adjusts automatically the programme duration agree with the laundry load. • The display shows the new value. 10.7 Starting a programme with the delay start 1. Press again and again until the display shows the delay you want to set. The related indicator comes on the display. 2. Press : • The appliance starts the countdown. • When the countdown is completed, the programme starts automatically.
ENGLISH 10.12 At the end of the programme • • The appliance stops automatically. The acoustic signal operates (if it is activated). comes on. • In the display • The indicator of the goes off. • The door lock indicator flashes for a few minutes, then goes off. • You can open the door. • Remove the laundry from the appliance. Make sure that the drum is empty. • Close the water tap. • Turn the programme knob to position ВКЛ/ВЫКЛ to deactivate the appliance.
www.electrolux.com • small and/or delicate items (e.g. underwired bras, belts, tights, etc. ). A very small load can cause balance problems with the spin phase. If this occurs, adjust manually the items in the tub and start the spin phase again. • • 11.2 Stubborn stains For some stains, water and detergent is not sufficient. We recommend that you pre-treat these stains before you put the items in the appliance. Special stain removers are available.
ENGLISH 17 12.4 Door seal Always obey the instructions that you find on the packaging of the product. 12.3 Maintenance wash With the low temperature programmes it is possible that some detergent stays in the drum. Perform a maintenance wash regularly. To do this: • • Regularly examine the seal and remove all objects from the inner part. Remove all laundry from the drum. Select the cotton programme with the highest temperature with a small quantity of detergent. 12.
www.electrolux.com 12.6 Cleaning the drain filter Do not clean the drain filter if the water in the appliance is hot. Regularly check the drain pump filter and make sure that it is clean. Repeat the steps 2 and 3 until the water stops to flowing out. 1. 2. 180° 3. 4. 2 2 1 1 5. 6.
ENGLISH 7. 19 8. 1 2 Always keep a rag nearby to dry up any water spillage. 12.7 Cleaning the inlet hose and the valve filter 1. 2. 1 2 3 3. 4. 45° 20° 12.8 Emergency drain Because of a malfunction, the appliance cannot drain the water. If this occurs, do steps (1) through (8) of 'Cleaning the drain filter'. If necessary, clean the pump.
www.electrolux.com When you drain the water with the emergency drain procedure, you must activate the drain system again: 1. Put 2 litres of water in the main wash compartment of the detergent dispenser. 2. Start the programme to drain the water. 2. Close the water tap. 3. Put the two ends of the inlet hose in a container and let the water flow out of the hose. 4. Empty the drain pump. Refer to the emergency drain procedure. 5. When the drain pump is empty, install the inlet hose again.
ENGLISH Problem Possible solution • • • The appliance does not • fill with water properly. • • • The appliance does not • fill with water and drain immediately. • • • • The appliance does not drain the water. • • • You cannot open the appliance door. Make sure that the water tap is open. Make sure that the pressure of the water supply is not too low. For this information, contact your local water authority. Make sure that the water tap is not clogged.
www.electrolux.com Problem Possible solution The appliance makes an unusual noise. • • • Make sure the levelling of the appliance is correct. Refer to 'Installation instruction'. Make sure that the packaging and/or the transit bolts are removed. Refer to 'Installation instruction'. Add more laundry in the drum. The load may be too small. The cycle is shorter • than the time displayed. The appliance calculates a new time according to the laundry load. See the ‘Consumption Values’ chapter.
ENGLISH Spin Speed Maximum 23 1000 rpm 1) Connect the water inlet hose to a water tap with a 3/4'' thread. 15. ENVIRONMENTAL CONCERNS Recycle the materials with the symbol . Put the packaging in applicable containers to recycle it. Help protect the environment and human health and to recycle waste of electrical and electronic appliances. Do not dispose appliances * marked with the symbol with the household waste. Return the product to your local recycling facility or contact your municipal office.
132918423-A-192017 www.electrolux.