EWS 1066EDW EWS 1266EDW EN Washing Machine User Manual
www.electrolux.com CONTENTS 1. SAFETY INFORMATION....................................................................................3 2. SAFETY INSTRUCTIONS..................................................................................4 3. PRODUCT DESCRIPTION................................................................................ 6 4. CONTROL PANEL............................................................................................. 7 5. PROGRAMMES ....................................
ENGLISH 1. 3 SAFETY INFORMATION Before the installation and use of the appliance, carefully read the supplied instructions. The manufacturer is not responsible for any injuries or damages that are the result of incorrect installation or usage. Always keep the instructions in a safe and accessible location for future reference. 1.
www.electrolux.com areas for communal use in blocks of flats or in launderettes. Do not exceed the maximum load of 6 kg (refer to the "Programme chart" chapter). The operating water pressure at the water entry point from the outlet connection must be between 0.5 bar (0.05 MPa) and 8 bar (0.8 MPa). The ventilation opening in the base must not be covered by a carpet, mat, or any floor covering.
ENGLISH • • • • • • Make sure that there is air circulation between the appliance and the floor. When the appliance is in its permanent position, check if it is levelled correctly with the aid of a spirit level. If it is not, adjust the feet accordingly. Do not install the appliance directly above a floor drain. Do not spray water on the appliance and do not expose it to excessive humidity. Do not install the appliance where the appliance door cannot be fully opened.
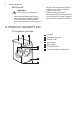
www.electrolux.com 2.6 Disposal • WARNING! Risk of injury or suffocation. • • • Disconnect the appliance from the mains electrical and water supplies. Cut off the mains electrical cable close to the appliance and dispose of it. Remove the door catch to prevent children or pets from becoming trapped in the drum. Dispose of the appliance in accordance with local requirements for the disposal of Waste Electrical and Electronic Equipment (WEEE). 3. PRODUCT DESCRIPTION 3.
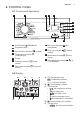
ENGLISH 7 4. CONTROL PANEL 4.1 Control panel description 1 2 3 4 5 6 7 Температура 8 Отжим 9 (Отжим) 4 Temperature touchpad (Температура) 5 Display 6 Prewash touchpad стирка) 11 10 (Доп. 9 Easy iron touchpad глажка) (Легкая 10 Start/Pause touchpad Пауза) (Старт/ 11 Time Manager touchpads (Time Manager) (Предв. 7 Delay start touchpad старта) Старт/Пауза 8 Extra rinse touchpad полоскание) 1 On/Off button (ВКЛ/ВЫКЛ) 2 Programme knob 3 Spin reduction touchpad TimeManager (Oтсрочка 4.
www.electrolux.com • F. : the No Spin indicator • : the Rinse Hold indicator • : the Extra Silent indicator. • • • : the Door locked indicator Indicator on: the appliance door is locked. You cannot open the door. Indicator flashing: the appliance door is opening. Wait a few minutes until the door unlocks. Indicator off: the appliance door is unlocked. You can open the door. 5. PROGRAMMES 5.
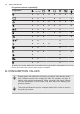
ENGLISH Programme Temperature range Полоскание 9 Programme description (Type of load and soil level) Maximum load Maximum spin speed To rinse and spin the laundry. All fabrics, except woollens and very delicate fabrics. Reduce the spin speed accordingly to the type of laundry. 6 kg 1000 rpm for model EWS 1066EDW; 1200 rpm for model EWS 1266EDW Отжим/Слив 3)To spin the laundry and to drain the water in the drum. All fab‐ rics, except woollens and delicate fabrics.
www.electrolux.com Programme options compatibility Programme 1) ■ ■ ■ ■ ■ ■ ■ ■ ■ ■ ■ ■ ■ ■ ■ ■ ■ ■ ■ ■ ■ ■ ■ ■ ■ ■ ■ ■ ■ ■ ■ ■ ■ ■ ■ ■ ■ ■ ■ ■ ■ ■ ■ ■ ■ ■ ■ ■ ■ ■ ■ ■ ■ ■ ■ ■ ■ ■ ■ ■ ■ ■ ■ ■ ■ ■ ■ ■ ■ 1) Set the spin speed. Make sure it is suitable for the type of fabric being washed. If you set the No Spin option then only the drain phase is available. 6.
ENGLISH 11 At the start of the programme, the display shows the programme dura‐ tion for the maximum load capacity. During the washing phase the programme duration is automatically cal‐ culated and can be greatly reduced if the laundry load is lower than the maximum load capacity (e.g. Cotton 60°C, maximum load capacity 6 kg, the programme duration exceeds 2 hours; actual load 1 kg, the pro‐ gramme duration will be less than 1 hour).
www.electrolux.com 7. OPTIONS 7.1 Температура • Indicator The display shows the indicator . To drain the water refer to ‘At the end of the programme’. Set this option to change the default temperature. = cold water. The display shows the set temperature. 7.3 Предв. стирка 7.2 Отжим With this option you can add a prewash phase to a washing programme. With this option you can decrease the default spin speed. Use this option for heavy soil.
ENGLISH In‐ di‐ ca‐ tor 2) 1) ■ ■ ■ ■ ■ ■ ■ ■ ■ ■ ■3) ■3) ■ ■ 1) In‐ di‐ ca‐ tor 4) ■ ■ ■ ■ ■ ■ ■ ■ ■ ■ ■3) ■ ■ 13 1) ■ ■ ■3) ■3) ■ 1) ■3) 1) If available. 2) Shortest: to fresh the laundry. 3) Programme default duration. 4) Longest: Increasing the programme du‐ ration gradually decreases the energy con‐ sumption. The optimized heating phase saves energy and the longer duration main‐ tains the same washing results (specially for normal soil). ■ 8. SETTINGS • 8.
www.electrolux.com 10. DAILY USE WARNING! Refer to Safety chapters. 10.1 Loading the laundry 1. Open the appliance door 2. Shake the items before you put them in the appliance. 3. Put the laundry in the drum, one item at a time. Make sure not to put too much laundry in the drum. 4. Close the door firmly. Washing heavily oiled, greasy stains could cause damage rubber parts of the washing machine. 10.2 Using detergent and additives 1. Measure out the detergent and the fabric conditioner. 2.
ENGLISH 15 Compartment for liquid additives (fabric conditioner, starch). Flap for powder or liquid detergent. 10.4 Liquid or powder detergent • • When you use the liquid detergent: • Do not use gelatinous or thick liquid detergents. • Do not put more liquid then the maximum level. • Do not set the prewash phase. • Do not set the delay start. Position A for powder detergent (factory setting). Position B for liquid detergent. A 1. 2. B 3. 4. 10.
www.electrolux.com options. When you activate an option, the indicator of the set option comes on. If you set something incorrect, the display shows the message You can cancel or change the set of the delay start before you press the cancel the delay start: • . • 10.7 Starting a programme without the delay start Press . • The indicator of and stays on. • The indicator starts to flash on the display. The programme starts, the door locks, the display shows the • • stops to flash .
ENGLISH 2. Wait about 2 minutes until the door lock indicator goes off. 3. Open the door. 4. Close the door. stops flashing and The drum turns regularly to prevent the creases in the laundry. • The door lock indicator is on. The door stays locked. You must drain the water to open the door. • 5. Press again. The indicator appears again on the display. The delay start continues to operate. 10.
www.electrolux.com 11. HINTS AND TIPS WARNING! Refer to Safety chapters. 11.3 Detergents and additives • 11.1 The laundry load • • • • • • • • • • • • Divide the laundry in: white, coloured, synthetics, delicates and wool. Obey the washing instructions that are on the laundry care labels. Do not wash white and coloured items together. Some coloured items can discolour with the first wash. We recommend that you wash them separately for the first times.
ENGLISH To know the water hardness in your area, contact your local water authority. 19 Use the correct quantity of the water softener. Obey the instructions that you find on the packaging of the product. 12. CARE AND CLEANING 12.3 Maintenance wash WARNING! Refer to Safety chapters. With the low temperature programmes it is possible that some detergent stays in the drum. Perform a maintenance wash regularly. To do this: 12.1 External cleaning Clean the appliance with soap and warm water only.
www.electrolux.com 3. 4. 12.6 Cleaning the drain filter Do not clean the drain filter if the water in the appliance is hot. Regularly check the drain pump filter and make sure that it is clean. Repeat the steps 2 and 3 until the water stops flowing out. 1. 2. 180° 3. 4.
ENGLISH 5. 6. 7. 8. 1 2 Always keep a rag nearby to dry up any water spillage. Make sure that the impeller of the pump can rotate. If it does not rotate, contact the Authorised Service Centre. Make sure also that you tighten the filter correctly to prevent leakages. 12.7 Cleaning the inlet hose and the valve filter 1. 2.
www.electrolux.com 3. 4. 45° 20° 12.8 Emergency drain Because of a malfunction, the appliance cannot drain the water. If this occurs, do steps (1) through (8) of 'Cleaning the drain filter'. If necessary, clean the pump. When you drain the water with the emergency drain procedure, you must activate the drain system again: 1. Put 2 litres of water in the main wash compartment of the detergent dispenser. 2. Start the programme to drain the water.
ENGLISH 23 WARNING! Deactivate the appliance before you do the checks. 13.2 Possible failures Problem Possible solution • The programme does not start. • • • • • • • • The appliance does not • fill with water properly. • • • The appliance does not • fill with water and drain immediately. • • • • The appliance does not drain the water. • • • Make sure that the mains plug is connected to the mains socket. Make sure that the appliance door is closed.
www.electrolux.com Problem Possible solution • • Set the spin option. Set the drain option if you set an option which ends with water in the drum. Make sure that the drain filter is not clogged. Clean the filter, if necessary. Refer to 'Care and cleaning'. Adjust manually the items in the tub and start the spin phase again. This problem may be caused by balance problems. • Make sure that the couplings of the water hoses are tight and there is not water leakages.
ENGLISH 25 14.
www.electrolux.
ENGLISH 27
132921865-A-252018 www.electrolux.