Problem The door can not open : Spinning starts late or the laundry is not spun enough : Possible cause The program is still running and the drum is turning. The door lock has not yet released. The water level is above the bottom edge of the door. The machine is heating the water, and the water temperature is higher than 55 The door can only be opened when the relevant light has gone out. The electronic unbalance detection device has cut in because the laundry is not evenly distributed in the drum.
Something is not working? 3 12 13 - 14 4 4 15 4 16 5 17 5 5 5 6 6 17 17 17 17 18 18 18 6 7 7 Problems which you can resolve yourself During machine operation it is possible that one of the End light starts to flash: 4 flashes= the door has not been closed 2 flashes= the machine does not empty 1 flash= the machine does not fill. Once the problem has been eliminated, press the START/PAUSE button to restart the programme.
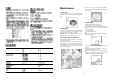
6. Emergency emptying out Remove any objects from the pump impeller by rotating it. If the water is not discharged , proceed as follows to empty out the machine: Pull out the plug from the power socket; Close the water tap; If necessary, wait until the water has cooled down; Open the pump door; Place a bowl on the floor and place the end of the emergency emptying hose into the bowl. Remove its cap. The water should drain by gravity into the bowl.Whe the bowl is full,put the cap back on the hose.
Maintenance Detergent can also accumulate inside the drawer recess: clean it with an old toothbrush. Refit the drawer after cleaning. 1. Door seal Check from time to time the door seal and eliminate eventual possible objects that could be trapped in the fold. PE PS PP 4. Drain pump The drain pump should be inspected if: The machine does not empty and/or spin. The machine makes an unusual noise during draining due to objects such as safety pins,coins etc. blocking the pump.
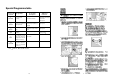
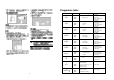
Special Programme table Programme selector dial position 11 Cold wash Programme description programme For cotton and Synthetic Wash with cold water 7 Additional functions Prewash Anti-allergic rinse,Super quick wash Spin speed 12 Refresh This programme can be 1 rinse,with fabric softener,if reused for softening hand quired short spin (Cannot use washed garments detergent) 13 Rinses For rinsing hand washed items 3 rinses with liquid additive,if required short spin at max.
60 90cm Programme table Fabrics/programme temperature 220V/50Hz 1 Cotton White cotton 2 Cotton White and coloured cotton 3 Cotton White and coloured cotton Prewash Anti-allergic rinse Economy Super quick wash Spin speed Prewash Anti-allergic rinse Economy Super quick wash Spin speed Prewash Anti-allergic rinse Economy Super quick wash Spin speed Prewash Anti-allergic rinse Economy Super quick wash Spin speed Prewash Anti-allergic rinse Economy Super quick wash Spin speed shirts,blouse, underwear,
12. Open the door during the cycle of a program First set the machine to Pause by pressing the Start/ Pause button. The door can be opened when the door locked light has gone out. If the door does not open, this means that the water temperature is above 55 , that the water level is above the bottom edge of the door or that the drum is turning.
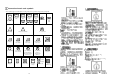
Operating sequence. Before washing your first load of laundry we recommend that you run a cotton cycle at 60 with the machine empty, in order to remove any manufacturing residue from the drum and tub. 1. Place the laundry in drum 1 2 3 4 5 6 5. Select required spin speed or No s pin / Ri ns e hold option Open the door. Place the laundry in drum, one item at a time,shaking them out as much as possible. Close the door. 3 7 8 Turn the spin speed selector dial to the desired position.
International wash code symbols 8 12 8 These symbols appear on fabric labels, in order to help you choose the best way to treat your laundry. 4 2 Energetic wash 95 60 40 30 Max. wash temperature 95 C Max. wash temperature 60 C Max. wash temperature 40 C Max.
Ink: depending on the type of ink, moisten the fabric first with acetone ( ), then with acetic acid; treat any residual marks on white fabrics with bleach and then rinse thoroughly. Tar stains: first treat with stain remover, methylated spirits or benzine, then rub with detergent paste. ( ) do not use acetone on artificial silk.
Laundry weight Washing hints The following weights are indicative: Bathrobe Napkin Quilt cover Sheet Pillow case Tablecloth Towelling towel Tea cloth Night dress Ladies’ brief Man’s work shirt Man’s shirt Man’s pyjamas Blouse Men’s underpants Sorting the laundry Follow the wash code symbols on each garment label and the manufacture’s washing instructions. Sort the laundry as follows: Whites, coloureds , synthetics, delicates, woolens.
95 95 C 60 40 60 C 60 30 40 C 40 40 30 C Yo u c a n c a n c e l t h e d e l a y t i m e a t a n y moment, before you press the Start/Pause button. If you have already pressed the Start/Pause button, and you wish to cancel the delay time, proceed as follows: Set the washing machine to Pause by pressing the Start/Pause button; Press the Delay start button once, the light relevant to the selected delay goes off . Press the Start/Pause button again to start the programme.
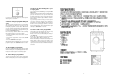
Use 4 Control panel description 1 1 2 3 4 5 6 1. Detergent dispenser Drawer and 7 8 programme chart To restart the programme from the point at which it was interrupted, press the Start/Pause button again. Programme option buttons 4. Economy Depending on the programme, different functions can be combined. These must be selected after choosing the desired programme and before depressing the start/Pause button. When these buttons are pressed, the corresponding pilot lights come on.
7 Your new washing machine 10 This new washing machine incorporates all the latest functions and wash technology from Europe and is built according to the highest manufacturing and quality standards, thus giving you optimal wash performance, lowest energy & water consumption and specially designed fabric care options: 8 SUPER QUICK WASH if you are in a hurry. Down to 23min option is available if you choose to wash with cold water. LOW NOISE is ensured by our stable and high quality structure.
When connect the waving junctures with inlet valve, please aviod leakage and loose for joint deviation of screw thread. Pay attention to avoid the damage for over-bending. Directly into a drain pipe at a height of not less than 60cm and not more than 90cm.The end of the drain hose must be always ventilated and the inside diameter of the drainpipe must be larger than the outside diameter of the drain hose. The drain hose must not be kinked. The inlet hose must not be lengthened.
7. Plug the open holes with the plugs, which you will find in the plastic envelope containing the instruction booklet. Installation Unpacking All transit bolts and packing must be removed before using the appliance. You are advised to keep all transit devices so that they can be refitted if the machine ever has to betrantransported again. 1. Using a spanner, unscrew and remove the rear right-hand bolt and lay the machine to its back, taking care not to squash the hoses.
Disposal Packaging materials The materials marked with the symbol clable. PE PS PP When the appliance is to be scrapped, cut off the electrical supply cable and destroy the plug with the remaining cable. Disable the door catch in order to prevent children from becoming trapped . are recy- 1 polyethylene polystyrene polypropylene This means that they can be recycled by disposing of them properly in appropriate collection containers. 4 Machine Use authorised disposal sites for you old appliance.
6 Always unplug the appliance and shut the water tap after use. Warnings General safety Installation 7 All internal packing must be removed before using the appliance. Serious damage may be caused to the machine or adjacent furniture if the protective transit devices are not removed or are not completely removed. Refer to the relevant paragraph in the instruction book. Any electrical work required to install the appliance must be carried out by a qualified electrician.
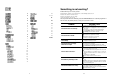
Programme table Special programme table Maintenance Contents Warnings 3 Disposal 4 Tips for environmental protection 4 Technical specifications 4 Installation 5 Unpacking Positioning and levelling 5 Water inlet 5 Water drainage 6 Electrical connection 6 Your new washing machine Description of the appliance 7 Detergent dispenser drawer 7 Control panel Control panel description Washing hints Sorting the laundry Temperatures for washing Detergent dispenser drawer 17 Drain pump 17 Wa
Dear customer, Please read these operating instructions carefully and pay particular attention to the safety notes indicated in the first pages. We recommend that you keep this instruction booklet for future reference and pass it on to any future owners. Transport damages When unpacking the appliance, Check that it is not damaged. If in doubt, do not use it and contact the Service Centre.