EWW 168543 W ................................................ .............................................
electrolux Electrolux. Thinking of you. Share more of our thinking at www.electrolux.com CONTENTS Safety information Product description Control panel First use Personalisation Daily use Use - Drying Use - Washing & Drying Helpful hints and tips Drying Hints 2 4 5 8 8 8 11 12 13 15 Washing programmes Drying Programmes Care and cleaning What to do if… Technical data Consumption values Installation Electrical connection Environment concerns 16 18 19 22 25 25 26 28 29 Subject to change without notice.
electrolux 3 may cause injury or serious malfunctioning. Contact your local Service Centre. Always insist on genuine spare parts. INSTALLATION • This appliance is heavy. Care should be taken when moving it. • When unpacking the appliance, check that it is not damaged. If in doubt, do not use it and contact the Service Centre. • All packing and transit bolts must be removed before use. Serious damage can occur to the product and to property if this is not adhered to. See relevant section in the user manual.
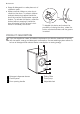
electrolux • Keep all detergents in a safe place out of children’s reach. • Make sure that children or pets do not climb into the drum. To prevent children and pets becoming trapped inside the drum the machine incorporates a special feature. To activate this device, rotate the button (without pressing it) inside the door clockwise until the groove is horizontal. If necessary use a coin.
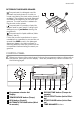
electrolux 5 DETERGENT DISPENSER DRAWER Compartment for detergent used for prewash and soak phase or for stain remover used during the stain action phase (if available). The prewash and soak detergent is added at the beginning of the wash programme. The stain remover is added during the stain action phase. Compartment for powder or liquid detergent used for main wash. If using liquid detergent pour it just before starting the programme. Compartment for liquid additives (fabric softener, starch).
electrolux PROGRAMME SELECTOR DIAL It allows you to switch the appliance on/off and/or to select a programme. TEMPERATURE This button allows you to increase or decrease the washing temperature. SPIN REDUCTION By pressing this button you can change the spin speed of the selected programme.
electrolux 7 Rinse Hold: the water of the last rinse is not emptied out to prevent the fabrics from creasing. At the end of the programme on the display the icon 2.8 is still on: the door is locked to indicate that the water must be emptied out. Night Cycle: the machine will not drain the water of the last rinse, so as not to wrinkle the laundry. As all spinning phases are suppressed, this washing cycle is very noiseless and it can be selected at night or in times with a more economical power rate.
electrolux • Drain • Spin When you set the washing programme, all washing programme phase icons are shown. After the programme has started, the only icon of the running phase stays on. FIRST USE • Ensure that the electrical and water connections comply with the installation instructions. • Remove the polystyrene block and any material from the drum.
electrolux 9 If required, pour fabric softener into the compartment marked (the amount used must not exceed the «MAX» mark in the drawer). Close the drawer gently. SELECT THE REQUIRED PROGRAMME BY TURNING THE PROGRAMME SELECTOR DIAL (1) Turn the programme selector dial to the required programme. The washing machine will propose a temperature and automatically select the maximum spin value provided for the programme you have chosen. You can change these values by operating the corresponding buttons.
electrolux 3. press button 8 again to start the programme. Important! The selected delay can be changed only after selecting the washing programme again. The Delay Start can not be selected with the draining programme. START THE PROGRAMME BY PRESSING BUTTON 8 To start the selected programme, press the button 8, the green pilot light of the button 8 stops blinking. The icon 2.8 appears on the display to indicate that the appliance starts operating and the door is locked.
electrolux 11 After closing the door, it is necessary to select the programme and options again and to press button 8. AT THE END OF THE PROGRAMME The machine stops automatically. Three ) appear on the disblinking zeros ( play. The pilot light of button 8 goes off. Some acoustic signals sound for a few minutes. If a programme or an option that ends with water left in the tub has been set, the icon 2.8 remains displayed to indicate that the water must be emptied out before opening the door.
electrolux 7. At the end of the programme, the buzzer sounds. Three blinking «0.00» zeros appear on the display. The door locked icon 2.8 is on. During the last 10 minutes of the drying cycle the appliance performs an anticrease phase. Through this time the door is locked. The display shows three flashing zeros «0.00». At the end of the anti-crease phase the door locked icon 2.8 disappears.
electrolux 13 3. Select the required options by pressing the relevant buttons. If possible, do not select a spin speed lower than that proposed by the appliance to avoid too long a drying time therefore saving energy. In any case the reduction of the spin speed is only possible after selecting drying. The lowest values you can select are the following: – 900 r.p.m. for cottons and synthetics and 700 r.p.m. for delicate fabrics – 900 r.p.m. ( or 1000 r.p.m. depending on the model) for wool.
electrolux New coloured items may run in the first wash; they should therefore be washed separately the first time. Make sure that no metal objects are left in the laundry (e.g. hair clips, safety pins, pins). Button up pillowcases, close zip fasteners, hooks and poppers. Tie any belts or long tapes. Remove persistent stains before washing. Rub particularly soiled areas with a special detergent or detergent paste. Treat curtains with special care. Remove hooks or tie them up in a bag or net.
electrolux 15 • liquid detergents, preferably for low temperature wash programmes (60°C max) for all types of fabric, or special for woollens only. The detergent and any additives must be placed in the appropriate compartments of the dispenser drawer before starting the wash programme. If using liquid detergents, a programme without prewash must be selected. Your appliance incorporates a recirculation system which allows an optimal use of the concentrated detergent.
electrolux • • • = Drying at high temperature = Drying at reduced temperature = Do not tumble dry. DRYING CYCLE DURATION The drying time may vary depending on: • speed of the final spin • dryness degree required (iron dry, store dry) • type of laundry • weight of the load size . The average drying time for a timed drying are indicated in the «Drying programmes» chapter. The experience will help you to dry your laundry in a more suitable way, according to the different fabrics.
electrolux 17 Programme - Maximum and Minimum Temperature - Cycle Description - Maximum Spin Speed Maximum Fabrics Load - Type of Laundry Options Seda 30° - Cold Main wash - Rinses Maximum spin speed at 700 rpm Max. load 1 kg Delicate washing programme suitable for silk and mixed synthetic items. SPIN REDUCTION NIGHT CYCLE RINSE HOLD NO SPIN Rinse Rinse - Long spin Spin at the maximum speed Max.
electrolux Programme - Maximum and Minimum Temperature - Cycle Description - Maximum Spin Speed Maximum Fabrics Load - Type of Laundry Detergent Compartment Options Secado - Sintéticos Drying synthetic programme. It can be used with timed drying or with automatic drying (dryness degree: store dry). Secado - Algodón Drying cotton programme. It can be used with timed drying or with automatic drying (dryness degree: extra dry, store dry, iron dry).
electrolux 19 Degree of Drying Drying Load Type of Fabric Spin Speed (rpm) Suggested drying time (minutes) Hints for test institute Test performance, in accordance with EN 50229, must be carried out with the a first drying load of 5 kg (load composition : pillowcase and towels) by selecting the TIMED DRYING programme for Cotton and setting 120 minutes.
electrolux DRAIN PUMP Regularly examine the drain pump and make sure that it is clean. Clean the pump regularly and/or if: • The appliance does not drain the water. • The drum cannot turn. • The appliance makes an unusual noise because of the blockage of the drain pump. • A problem with water draining is detected (see chapter “What to do if...” for more details). Clean the chamber of dispenser drawer with a brush.
electrolux 21 4. When the container is full of water, put the drainage duct back again and empty the container. Do steps 3 and 4 again and again until no more water flows out from the drain pump. 10. Make sure that you tighten correctly the filter to prevent leakages. 1 2 11. Close the drain pump door. 5. Pull back the drainage duct. 6. Unscrew the filter and remove it. 1 2 7. Remove fluff and objects from the pump. 8. Make sure that the impeller of the pump can turn.
electrolux 5. Unscrew the hose from the machine. Keep a rug nearby because some water may flow. 6. Clean the filter in the valve with a stiff brush or with the piece of cloth. 7. Screw the hose back to the machine and make sure the connection is tight. 8. Turn on the water tap. EMERGENCY EMPTYING OUT If the appliance cannot drain the water, proceed as follows to empty out the machine: 1. pull out the plug from the power socket; 2. close the water tap; 3.
electrolux 23 Problem The washing machine does not start: The machine does not fill: Possible cause/Solution The door has not been closed. • Close the door firmly. The plug is not properly inserted in the power socket. • Insert the plug into the power socket. There is no power at the socket. • Please check your domestic electrical installation. The main fuse has blown. • Replace the fuse. The selector dial is not correctly positioned and/or the button 8 has not been pressed.
electrolux Problem Possible cause/Solution Unsatisfactory washing results: Too little detergent or unsuitable detergent has been used. • Increase the detergent quantity or use another one. Stubborn stains have not been treated prior to washing. • Use commercial products to treat the stubborn stains. The correct temperature was not selected. • Check if you have selected the correct temperature. Excessive laundry load. • Reduce the laundry load. The door will not open: The programme is still running.
electrolux 25 Problem Possible cause/Solution The laundry is full of different colored fluff: The fabrics washed in the previous cycle released fluff of a different color . • The drying phase helps to eliminate some fluff. • Clean the clothes with a fluff remover. In case of an excessive amount of fluff in the drum run the special programme to clean it (refer to “FLUFF IN THE FABRICS” for more details). If you are unable to identify or solve the problem, contact our service centre.
electrolux The consumption data shown on this chart is to be considered purely indicative, as it may vary depending on the quantity and type of laundry, on the inlet water temperature and on the ambient temperature. INSTALLATION UNPACKING All transit bolts and packing must be removed before using the appliance. You are advised to keep all transit devices so that they can be refitted if the machine ever has to be transported again. 1.
electrolux 27 6. Fill the smaller upper hole and the two large ones with the corresponding plastic plug caps supplied in the bag containing the instruction booklet. The rubber feet are particularly recommended on floating, slippery and wooden floors. Mount the rubber feet to prevent vibration, noises and displacement of the appliance during operation. Read carefully the instructions supplied with the kit. WATER INLET Warning! This appliance must be connected to a cold water supply. 1.
electrolux longer hose specially designed for this type of use. Important! Before connecting up the machine to new pipework or to pipework that has not been used for some time, run off a reasonable amount of water to flush out any debris that may have collected in the pipes. WATER DRAINAGE The end of the drain hose can be positioned in three ways. • Hooked over the edge of a sink using the plastic hose guide supplied with the machine.
electrolux 29 The power supply cable must be easily accessible after installing the machine. must be carried out by a Service Centre. Should the appliance power supply cable need to be replaced, this ENVIRONMENT CONCERNS The symbol on the product or on its packaging indicates that this product may not be treated as household waste. Instead it should be taken to the appropriate collection point for the recycling of electrical and electronic equipment.
electrolux
electrolux 31
www.electrolux.