EWX 12550 W ................................................ .............................................
electrolux Electrolux. Thinking of you. Share more of our thinking at www.electrolux.com CONTENTS Safety information Safety instructions Product description Control panel First use Personalisation Daily use Use - Drying Helpful hints and tips 2 3 5 5 9 9 9 12 14 Programmes 15 Drying Programmes 17 Consumption values 18 Care and cleaning 18 What to do if… 21 Technical data 23 Installation 24 Building in 26 Environment concerns 28 Subject to change without notice.
electrolux 3 • Do not change the specification of this appliance. • Obey the maximum load volume of 6 kg (refer to the “Programme chart” chapter). • If the supply cord is damaged, it must be replaced by the manufacturer, its service agent or similarly qualified persons in order to avoid a hazard. • The operating water pressure (minimum and maximum) must be between 0,5 bar (0,05 MPa) and 8 bar (0,8 MPa) • The ventilation openings in the base (if applicable) must not be obstructed by a carpet.
electrolux • The appliance is to be connected to the water mains using the new supplied hose-sets. Old hose sets must not be reused. • Before you connect the appliance to new pipes or pipes not used for a long time, let the water flow until it is clean. • The first time you use the appliance, make sure that there is no leakage. USE Warning! Risk of injury, electrical shock, fire, burns or damage to the appliance. • Use this appliance in a household only.
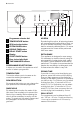
electrolux 5 PRODUCT DESCRIPTION Your new appliance meets all modern requirements for effective treatment of laundry with low water, energy and detergent consumption. Its new washing system allows total use of detergent and reduces water consumption so saving energy. 1 2 7 8 9 3 4 5 10 6 1 Detergent dispenser drawer 2 Control panel 3 Door opening handle 4 Rating Plate 5 Drain pump 6 Adjustable feet CHILD SAFETY DEVICE When you activate this device, you cannot close the door.
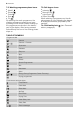
electrolux 1 1 2 3 4 5 6 7 8 9 10 2 Programme selector dial TEMPERATURE button SPIN reduction button EXTRA RINSE button DRYING TIME button DELAY START button Display START/PAUSE button Door locked pilot light TIME MANAGER buttons PROGRAMME SELECTOR DIAL It allows you to switch the appliance on/off and/or to select a programme. TEMPERATURE This button allows you to increase or decrease the washing temperature.
electrolux 7 START PAUSE This button allows you to start or to interrupt the selected programme. TIME MANAGER These buttons allows you to modify the programme duration automatically proposed by the appliance. • light on: the door cannot be opened. The machine in working or has stopped with water left in the tub. • light off: the door can be opened. The programme is finished or the water has been emptied out.
electrolux 7.2: Washing programme phase icons • Wash • Rinses • Drain • Spin • Dry By selecting the wash programme, the washing programme phase icons corresponding to the various phases making up the programme are shown in the bottom part of the display. After having pressed button 8 only the icon of the running phase stays on. 7.
electrolux 9 = Time Manager buttons FIRST USE • Ensure that the electrical and water connections comply with the installation instructions. • Remove the polystyrene block and any material from the drum. • Before the first wash, run a cotton cycle at the highest temperature without any laundry in the machine, to remove any manufacturing residue from the drum and tub. Pour 1/2 a measure of detergent into the main wash compartment and start the machine.
electrolux must not exceed the «MAX» mark in the drawer). Close the drawer gently. SELECT THE REQUIRED PROGRAMME BY TURNING THE PROGRAMME SELECTOR DIAL (1) Turn the programme selector dial to the required programme. The washing machine will propose a temperature and automatically select the maximum spin value provided for the programme you have chosen. You can change these values by operating the corresponding buttons. The green pilot light of the button 8 starts to flash.
electrolux 11 2. Press button 6 once until the symbol 0’ is displayed 3. Press button 8 again to start the programme. Important! The selected delay can be changed only after selecting the washing programme again. The Delay Start can not be selected with DRAIN programme. START THE PROGRAMME BY PRESSING BUTTON 8 To start the selected programme, press the button 8, the green pilot light of the button 8 stops blinking.
electrolux INTERRUPTING A PROGRAMME Press the button 8 to interrupt a programme which is running, the corresponding green pilot light starts blinking. Press the button again to restart the programme. CANCELLING A PROGRAMME to cancel a proTurn the selector dial to gramme which is running. You can select now a new programme. OPENING THE DOOR After the programme has started (or during the delay time) the door is locked, if you need to open it, set first the machine to PAUSE by pressing the button 8.
electrolux 13 4. If you wish to select a timed drying, press button 5 until the time you want appears on the display (see the «Drying Programmes» table). Every time you press this button the drying time increases by 5 minutes. Note! The programme time will automatically increase by some minutes. 5. Press button 8 to start the programme. After the programme has started, the time remaining is updated every minute.
electrolux (new sponge, sweatshirt especially) and vice versa. • To air-dry this type of fabrics when they are washed the first time. • To clean the filter. • Perform one or more rinse cycles to wash the drum between the washing and drying of fabrics with different colours. • After the drying phase, thoroughly clean the empty drum, the gasket and the door with a wet rag.
electrolux 15 • liquid detergents, preferably for low temperature wash programmes (60°C max) for all types of fabric, or special for woollens only. The detergent and any additives must be placed in the appropriate compartments of the dispenser drawer before starting the wash programme. If using liquid detergents, a programme without prewash must be selected. Your appliance incorporates a recirculation system which allows an optimal use of the concentrated detergent.
electrolux Programme - Maximum and Minimum Temperature - Cycle Description - Maximum Spin Speed Maximum Fabrics Load - Type of Laundry Options DELICATES 40° - Cold Main wash - Rinses Maximum spin speed 700 rpm Max. load kg 3 - Red. load kg 1,5 1) Delicate fabrics: acrylics, viscose, polyester. RINSE HOLD NO SPIN EXTRA RINSE TIME MANAGER SYNTHETICS EASY IRON 60° - Cold Main wash - Rinses Maximum spin speed 900 rpm Max.
electrolux 17 Programme - Maximum and Minimum Temperature - Cycle Description - Maximum Spin Speed Maximum Fabrics Load - Type of Laundry Detergent Compartment Options WOOL 40° - Cold Main wash - Rinses Maximum spin speed 900 rpm Max. load 2 kg Washing programme for machine washable wool as well as for hand washable woollens and delicate fabrics3). SPIN RINSE HOLD NO SPIN COTTONS ECONOMY 90° - 40° Main wash - Rinses Maximum spin speed 1200 rpm Max. load 6 kg White and fast coloured cotton.
electrolux CONSUMPTION VALUES Programme Energy consumption (KWh) Water consumption (litres) 2.1 57 Cottons 60° 1.2 53 Cotton Eco 60° 1) 1.02 42 Cottons 40° 0.7 53 Synthetics 40° 0.5 40 Delicates 40° 0.55 56 Wool/ Handwash 30° 0.25 58 White Cottons 90° Programme duration (Minutes) For the duration of the programmes, please refer to the display on the control panel.
electrolux 19 1 2 2. Run a washing cycle without any washing to clean off any cleaning agent residues. Programme: Short Cotton Programme at maximum temperature and add approx. 1/4 measuring cup of detergent. DOOR SEAL Check from time to time the door seal and eliminate eventual possible objects that could be trapped in the fold. Flush it out under a tap, to remove any traces of accumulated powder. To aid cleaning, the top part of the additive compartment should be removed. Clean all parts with water.
electrolux 4. Pull out the emergency emptying hose (B), place it in the container and remove its cap cover. 7. Put the cap back on the emergency emptying hose and place the latter back in its seat. 8. Screw the pump fully in. 1 5. When no more water comes out, unscrew the pump cover (A) and remove it. Always keep a rag nearby to dry up spillage of water when removing the pump. 1 2 6. Remove any objects from the pump impeller by rotating it.
electrolux 21 3. Place the end of the emergency emptying hose and that of the inlet hose in a bowl placed on the floor and let water drain out. 4. Screw the water inlet hose back on and reposition the emergency emptying hose after having put the cap on again. 5. When you intend to start the machine up again, make sure that the room temperature is above 0°C. EMERGENCY EMPTYING OUT If the water is not discharged, proceed as follows to empty out the machine: 1. pull out the plug from the power socket; 2.
electrolux Problem Possible cause/Solution The machine fills then empties immediately: The end of the drain hose is too low. • Refer to relevant paragraph in «water drainage» section. The machine does not empty and/or does not spin: The drain hose is squashed or kinked. E20 • Check the drain hose connection. The drain filter is clogged. E20 • Clean the drain filter. An option or a programme that ends with the water still in the tub or that eliminates all the spinning phases has been selected.
electrolux 23 Problem Possible cause/Solution Spinning starts late or the machine does not spin: The electronic unbalance detection device has cut in because the laundry is not evenly distributed in the drum. The laundry is redistributed by reverse rotation of the drum. This may happen several times before the unbalance disappears and normal spinning can resume. If, after 10 minutes, the laundry is still not evenly distributed in the drum, the machine will not spin.
electrolux Water Supply Pressure Minimum Maximum 0,05 MPa 0,8 MPa Maximum Load Cotton 6 kg Maximum Dry Load Cotton Cotton Big Capacity Synthetic 3 Kg 4 Kg 2 Kg Spin Speed Maximum 1200 rpm INSTALLATION UNPACKING All transit bolts and packing must be removed before using the appliance. You are advised to keep all transit devices so that they can be refitted if the machine ever has to be transported again. 1.
electrolux 25 POSITIONING Install the machine on a flat hard floor. Make sure that air circulation around the machine is not impeded by carpets, rugs etc. Check that the machine does not touch the wall or other kitchen units. Level the washing machine by raising or lowering the feet. The feet may be tight to adjust as they incorporate a self locking nut, but the machine MUST be level and stable. If necessary, check the setting with a spirit level. Any necessary adjustment can be made with a spanner. 2.
electrolux water tap off and refer to your Service Centre to replace the hose. A WATER DRAINAGE The end of the drain hose can be positioned in three ways. • Hooked over the edge of a sink using the plastic hose guide supplied with the machine. In this case, make sure the end cannot come unhooked when the machine is emptying. This could be done by tying it to the tap with a piece of string or attaching it to the wall. • In a sink drain pipe branch.
electrolux 27 The appliance is originally prearranged for the assembly of a door opening from right to left (Fig. 2). Fig. 4 Fig. 2 1 a) Door The dimensions of the door should be: - width 595-598 mm - thickness 16-22 mm The height X depends on the height of the adjacent furniture's base (Fig. 3). 2 c) Mounting the door Fix the hinges to the appliance by means of the M5x15 screws. The hinges can be adjusted to compensate for possible uneven thickness of the door.
electrolux Warning! Do not remove the screw B. Fig. 6 A Fig. 7 B D A C If the door has to be opened from left to right, invert the position of the plates E, the magnet D and the plate C. Mount the counter-magnet D and the hinges A as previously described (Fig. 7). C E B ENVIRONMENT CONCERNS Recycle the materials with the symbol . Put the packaging in applicable containers to recycle it. Help protect the environment and human health and to recycle waste of electrical and electronic appliances.
electrolux 29
electrolux
electrolux 31
www.electrolux.