User Manual Washer-dryer Downloaded From WashingMachine-Manual.
Downloaded From WashingMachine-Manual.
electrolux 3 Welcome to the world of Electrolux Thank you for choosing a first class product from Electrolux, which hopefully will provide you with lots of pleasure in the future. The Electrolux ambition is to offer a wide variety of quality products that make your life more comfortable. You find some examples on the cover in this manual. Please take a few minutes to study this manual so that you can take advantage of the benefits of your new machine.
contents electrolux Contents Safety information..............................5 Product description ...........................8 Control panel .....................................9 Use..................................................12 Washing .....................................12 Drying.........................................17 Washing and drying hints ................19 Washing programmes......................23 Programme information ...................25 Drying time ...............................
safety information electrolux 5 Safety Information In the interest of your safety and to ensure the correct use, before installing and first using the appliance, read this user manual carefully, including its hints and warnings. To avoid unnecessary mistakes and accidents, it is important to ensure that all people using the appliance are thoroughly familiar with its operation and safety features.
electrolux safety information ● ● ● If the appliance is installed in a location subject to frost, please read the “dangers of freezing”chapter. Any plumbing work required to install this appliance should be carried out by a qualified plumber or competent person. Any electrical work required to install this appliance should be carried out by a qualified electrician or competent person. Use This appliance is designed for domestic use.
safety information electrolux 7 Child safety ● This appliance is not intended for use by person (including children) with reduced physical sensory or mental capabilities or lack of experience and knowledge unless they have been given supervision or instruction concerning use of the appliance by a person responsible for their safety. ● The packaging components (e.g.
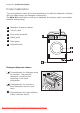
electrolux product description Product description Your new appliance meets all modern requirements for effective treatment of laundry with low water, energy and detergent consumption. The New Jet system allows total use of detergent and reduces water consumption therefore saving energy. 1 Detergent dispenser drawer 2 Control panel 3 Door opening handle 4 Rating plate 5 Drain pump 6 Adjustable feet Detergent dispenser drawer Compartement for detergent used for prewash.
electrolux control panel Control panel Below is a picture of the control panel. It shows the programme selector dial as well as the buttons, pilot lights and the display. These are presented by relevant numbers on the following pages. 1 2 3 4 5 6 7 8 10 9 1 Programme selector dial 2 Temperature button (Temp.) 3 Spin reduction button (Centrifug.
electrolux control panel Display (7) 7.3 7.4 7.1 2.05 7.2 7.1 Duration of selected programme/ After selecting a programme, the duration is displayed in hours and minutes (for example 2.05). The duration is calculated automatically on the basis of the maximum recommended load for each type of fabric. After the programme has started, the time remaining is updated every minute.
control panel electrolux 11 7.2 Washing phase icons By selecting the wash programme, the washing programme phase icons corresponding to the various phases making up the programme are shown in the bottom of the display. = washing = rinsing = draining = spinning = drying After the machine has started, only the running icon stays on. When the programme has finished, the flashing zero (0.00) is displayed.
electrolux use Use First Use ● ● ● Ensure that the electrical and water connections comply with the installation instructions. Remove the polystyrene block and any material from the drum. Run a cotton cycle at 90° or 95°C, without any laundry in the machine, to remove any manufacturing residue from the drum and tub. Pour 1/2 a measure of detergent into the main wash compartment and start the machine.
use electrolux 13 C0064 If required, pour fabric softener into the compartment marked (the amount used must not exceed the “MAX” mark in the drawer). Close the drawer gently. C0065 Select the required programme by turning the programme selector dial (1) Turn the programme selector dial to the required programme. The light of button 8 starts to flash and the display shows the duration of the selected programme. The selector dial can be turned either clockwise or anticlockwise.
electrolux use dryer. The relevant light will light up. When you select a programme, the machine automatically proposes the maximum spin speed provided for the programme. Rinse Hold: by selecting this option the water of the last rinse is not emptied out to prevent the fabrics from creasing. When the programme has finished the display shows 0.00 flashing, the pilot light 9 is on, the light of button 8 is off and the door is locked to indicate that the water must be emptied out.
use electrolux 15 Selecting the delayed start. • Select the programme and the required options. • Select the delay start. • Press button 8: the machine starts its hourly countdown. The programme will start after the selected delay has expired. Cancelling the delayed start after having started the machine • Press button 8. • Press button 6 once until the symbol 0’ is displayed. • Press button 8 again. The Delay Start can not be selected with Drain programme.
electrolux use Altering an option or a running programme It is possible to change some options before the programme carries it out. Before you make any change, you must pause the washer-dryer by pressing button 8. (Only the Time Manager option cannot be modified after the programme has started. ) Changing a running programme is possible only by resetting it. Turn the programme selector dial to O and then to the new programme position. Start the new programme by pressing button 8 again.
drying electrolux 17 Use - Drying DRYING ONLY The recommended loads size is 3 kg for cottons and linen, and 2 kg for synthetics. Note! It is also possible to dry up to 4 kg of cotton items (see the drying time table). The water tap must be open and the drain hose must be positioned in the sink or connected to the drain pipe. 1. Load the laundry. 2. Select the drying programme (for Cottons or Synthetics in the Drying sector). 3.
electrolux drying 1. Load the laundry. 2. Add detergent and fabric softener. 3. Switch the machine on by turning the selector dial to the selected washing programme/fabric. 4. Select the required options by pressing the relevant buttons. Note! If possible, do not select a spin speed lower than that proposed by the appliance to avoid too long a drying time therefore saving energy. In any case the reduction of the spin speed is only possible after selecting drying.
washing hints and drying hints electrolux 19 Washing and Drying hints Sorting the laundry Follow the wash code symbols on each garment label and the manufacturer’s washing instructions. Sort the laundry as follows: whites, coloureds, synthetics, delicates, woollens. Temperatures for normally soiled white cottons and linen (e.g. tea 90°/95° cloths, towels, tablecloths, sheets...) for normally soiled, colour fast garments (e.g. shirts, night dresses, pyjamas....
electrolux washing hints and drying hints Important As a dryer, the machine works on the condensation principle. Therefore, the water tap must be open and the drain hose must drain water into a sink or into the drain pipe, even during the drying cycle. Maximum loads Recommended loads are indicated in the programme charts. General rules: Cotton, linen: drum full but not too tightly packed; Synthetics: drum no more than half full; Delicate fabrics and woollens: drum no more than one third full.
washing hints and drying hints electrolux 21 Ink: depending on the type of ink, moisten the fabric first with acetone (*), then with acetic acid; treat any residual marks on white fabrics with bleach and then rinse thoroughly. Tar stains: first treat with stain remover, methylated spirits or benzine, then rub with detergent paste. (*) do not use acetone on artificial silk.
electrolux washing hints and drying hints Preparing the drying cycle As a dryer, the machine works on the condensation principle. Therefore, the water tap must be open and the drain hose must drain water into a sink or into the drain pipe, even during the drying cycle. Attention! Before starting the drying programme, reduce the loads of washed laundry, in order to obtain good performances.
washing programmes electrolux 23 Washing programmes Programme/ Temperature Type of laundry Options Description of programme Main wash Cottons (Katoen) 90° - COLD SPIN REDUCTION/NIGHT White and coloured CYCLE/RINSE HOLD, Rinses Max. spin at 1400 rpm cotton (normally EXTRA RINSE, TIME Max. load kg 6 soiled items) MANAGER* * Red. load kg 3 Cottons + Prewash (Voorwas) 90°- COLD Prewash/Main wash SPIN REDUCTION/NIGHT Rinses White and coloured CYCLE/RINSE HOLD, Max.
electrolux washing programmes Washing programmes Programme/ Temperature Type of laundry Options Description of programme Drain (Pompen) For emptying out the last rinse water in programmes with the Rinse Hold and Night Cycle option Rinses (Spoelen) Separate rinse SPIN REDUCTION/NIGHT Rinses cycle for cotton CYCLE/RINSE HOLD Max. spin at 1400 rpm hand washed items EXTRA RINSE Max. load kg 6 Silk Draining of water Main wash Rinses Max. spin at 700 rpm Max. load kg 1 Main wash Rinses Max.
programme information electrolux 25 Programme information Wool and Handwash Washing programme for machine washable wool as well as for hand washable woollens and delicate fabrics with the “hand washing” care symbol . Note: A single or bulky item may cause imbalance. If the appliance doesn’t perform the final spin phase, add more items, redistribute the load manually and then select the spinning programme. Silk Delicate washing programme suitable for silk and mixed synthetic items.
electrolux Drying time Drying Time Degree of drying Type of fabric Cotton and linen Suitable for items (bathrobes, bath towels, to put away with- etc) out ironing Synthetics and mixed fabrics Suitable for ironing Cotton and linen (sheets, tablecloths, shirts, etc.) Max load Spin Speed Suggested drying time in mins 4 kg 1400 150 - 170 3 kg 1400 100 - 110 1.5 kg 1400 65 - 75 2 kg 900 100 - 110 1 kg 900 60 - 70 4 kg 1400 120 - 140 3 kg 1400 80 - 90 1.
care and cleaning electrolux 27 Care and cleaning You must DISCONNECT the appliance from the electricity supply, before you can carry out any cleaning or maintenance work. Descaling The water we use normally contains lime. It is a good idea to periodically use a water softening powder in the machine. Do this separately from any laundry washing, and according to the softening powder manufacturer's instructions. This will help to prevent the formation of lime deposits.
electrolux care and cleaning Cleaning the drawer recess Having removed the drawer, use a small brush to clean the recess, ensuring that all washing powder residue is removed from the upper and lower part of the recess. Door seal Check the door seal from time to time and remove any objects that could be trapped in the fold. P1050 P0038 Insert the detergent dispenser drawer in the guide rails and push it in.
care and cleaning electrolux 29 • Pull out the emergency emptying hose (B), place it in the container and remove its cap. BI0005 BI0002 • When no more water comes out, unscrew the pump cover (A) and remove it. Always keep a rag nearby to dry up spillage of water when removing the cover. • Put the cap back on the emergency emptying hose and place the latter back in its seat. • Screw the pump cover fully in. BI0006 Warning! BI0003 • Remove any objects from the pump impeller by rotating it.
electrolux care and cleaning Cleaning the water inlet filter If your water is very hard or contains traces of lime deposit, the water inlet filter may become clogged. It is therefore a good idea to clean it from time to time. P1231 Turn off the water tap. Unscrew the water inlet hose. Clean the filter using a hard bristle brush. Refit the inlet hose. The dangers of freezing If the machine is exposed to temperatures below 0°C, certain precautions should be taken. • Turn off the water tap.
what to do if... electrolux 31 What to do if... Certain problems are due to lack of simple maintenance or oversights, which can be solved easily without calling out an engineer. Before contacting your local Service Centre, please carry out the checks listed below.
electrolux what to do if... Malfunction Possible cause Solution Refer to relevant paragraph in “water drainage” section. ● Check the drain hose The machine does not ● The drain hose is empty and/or does not squashed or kinked. E20 connection. spin: ● Clean the drain pump. ● The drain pump is clogged. E20 ● Select the Drain or Spin ● The Rinse Hold or Night programme. Cycle option has been selected. ● The laundry is not evenly ● Redistribute the laundry. distributed in the drum.
what to do if... electrolux 33 Malfunction Possible cause Solution Wait until the end of washing cycle. ● Wait until the pilot light 9 goes off. ● Select drain or spin programme to empty out the water. The door will not open: ● The programme is still running. ● The door lock has not been released. ● There is water in the drum. ● The machine vibrates or is noisy: ● The transit bolts and packing have not been removed. ● The support feet have not been adjusted.
electrolux what to do if... Malfunction Possible cause The machine makes an unusual noise: ● No water is visible in the drum: ● No water is visible in the drum: Solution The machine is fitted with a type of motor which makes a different noise compared with other traditional motors. This new motor ensures a softer start and more even distribution of the laundry in the drum when spinning, as well as increased stability of the machine.
technical data electrolux 35 Technical data Dimensions Width 60 cm Height 82 cm Depth 54 cm Electrical connection Voltage - Overall power Fuse Information on the electrical connection is given on the rating plate on the inner edge of the appliance door Water supply pressure Minimum 0,05 MPa Maximum 0,8 MPa Maximum Load Cotton 6 kg Maximum Dry Load Cotton Cotton Big capacity Synthetics 3 kg 4 kg 2 kg Spin Speed Maximum 1400 rpm Consumption values Water consumption (in litres) Energy
electrolux installation Installation Unpacking All transit bolts and packing must be removed before using the appliance. You are advised to keep all transit devices so that they can be refitted if the machine ever has to be transported again. 1. After removing all the packaging, carefully lay machine on it’s back to remove the polystyrene base from the bottom. A BI0009 4. Unscrew and remove the two large rear bolts B and the six smaller bolts C. C BI0010 C B B 5.
installation electrolux 37 6. Fill the smaller upper hole and the two large ones with the corresponding plastic plug caps supplied in the bag containing the instruction booklet that you will find inside the drum. levelled the machine, tighten the lock nuts. BI0008 BI0013 Positioning Install the machine on a flat hard floor. Make sure that air circulation around the machine is not impeded by carpets, rugs etc. Check that the machine does not touch the wall or other kitchen units.
electrolux installation 3. Set the hose correctly by loosening the ring nut. After positioning the inlet hose, be sure to tighten the ring nut again to prevent leaks. 4. Connect the hose to a tap with a 3/4” thread. Always use the hose supplied with the appliance. Water drainage The end of the drain hose can be positioned in three ways: Hooked over the edge of a sink using the plastic hose guide supplied with the machine.
installation electrolux 39 The drain hose may be extended to a maximum of 4 metres. An additional drain hose and joining piece is available from your local Service Centre. Electrical connection Information on the electrical connection is given on the rating plate on the inner edge of the appliance door. Check that your domestic electrical installation can take the maximum load required, also taking into account any other appliances in use. Connect the machine to an earthed socket.
electrolux installation B ,5 22+1 600 98 595-5 600 120 176,5 416 818 160 8 195 1 54 P0422 min. 570 820 min 596 515 165 90 0 49 P0965 A Preparation and assembly of the door The machine is originally pre-arranged for the assembly of a door opening from right to left. In this case it is sufficient to screw in the hinges (1) and the counter-magnet (6) provided with the appliance, at the right level (Fig. B).
installation electrolux 41 d) Counter-magnet (6) The appliance is pre-arranged for a magnetic closure of the door. To enable a correct operation of this device, it is necessary to screw the counter-magnet (6) (steel disk + rubber ring) into the inner side of the door. Its position must correspond to the magnet (4) on the appliance (see picture D). 6 4 D P0984 If the door has to be opened from left to right, invert the position of the plates (7), the magnet (4) and the plate (5) (Fig. B and E).
electrolux environment concerns Environment concerns Packaging materials The materials marked with the symbol are recyclable. >PE<=polyethylene >PS<=polystyrene >PP<=polypropylene This means that they can be recycled by disposing of them properly in appropriate collection containers. Old machine Use authorised disposal sites for your old appliance. Help to keep your country tidy! The symbol on the product or on its packaging indicates that this product may not be treated as household waste.
Downloaded From WashingMachine-Manual.
www.electrolux.be Downloaded From WashingMachine-Manual.