user manual Dishwasher EX601SC
electrolux Electrolux. Thinking of you. Share more of our thinking at www.electrolux.
electrolux 3 they have been adequately supervised by a responsible person to ensure that they can use the appliance safely. Young children should be supervised to ensure that they do not play with the appliance. • Keep all the packaging away from children. There is a risk of suffocation. • Keep all detergents in a safe area. Do not let children touch the detergents. • Keep children and pets away from the appliance when the door is open.
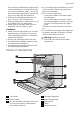
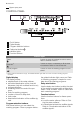
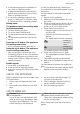
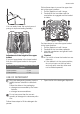
electrolux 9 Upper spray arm CONTROL PANEL 1 2 3 4 5 6 On/off button Digital display Program selection buttons Delay start button Indicator lights Function buttons Indicator lights Tablet Comes on when the multitab function is active. Refer to 'Multitab function'. Rinse aid 1) Comes on when it is necessary to fill the rinse aid container. Refer to 'Use of rinse aid'. End-of-program Comes on when the washing program is completed.
electrolux 5 • to activate/deactivate the multitab function. Refer to 'Multitab function'. • to deactivate/activate the rinse aid dispenser when multitab function is active. Refer to 'Multitab function'. • to cancel the washing program in progress or a delay start in progress. Refer to 'Select and start a washing program'. Setting mode The appliance must be in setting mode for these operations: • To set a washing program. • To set the water softener level. • To deactivate/activate the audible signals.
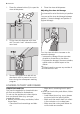
electrolux 1. Press the release button (A) to open the rinse aid dispenser. 4. Close the rinse aid dispenser. Adjusting the rinse aid dosage The rinse aid is set at the factory at position 4. You can set the rinse aid dosage between position 1 (lowest dosage) and position 6 (highest dosage). 2. Fill the rinse aid dispenser with rinse aid. The mark 'max.' shows the maximum level. Turn the rinse aid dial to increase or decrease the dosage.
electrolux 7 – Make sure that cutlery and dishes do not cover other cutlery and dishes. – Make sure that glasses do not touch other glasses. – Put small objects in the cutlery basket. • Plastic items and pans with non-stick coatings can retain water droplets. Plastic items do not dry as well as porcelain and steel items. • Put light items in the upper basket. Make sure that the items do not move. Caution! Make sure that the spray arms can move freely before you start a washing program.
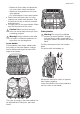
electrolux Use the cutlery grids. If the dimensions of the cutlery prevent use of the cutlery grids, you can easily hide them. The cutlery basket has two parts. You can use these parts separately for more loading flexibility. To disassemble the parts, move them horizontally in opposite directions and pull them apart. To assemble the parts, put them together and move horizontally to each other. Upper basket The upper basket is for saucers, salad bowls, cups, glasses and lids.
electrolux 9 Follow these steps to move the upper basket to the upper position: 1. Pull the basket out until it stops. 2. Carefully lift the two sides until the mechanism is engaged and the basket is stable. You can easily lower the central rows of prongs to improve loading flexibility. Do these steps to move the upper basket to the lower position: 1. Pull the basket out until it stops. 2. Carefully lift the two sides upwards. 3. Hold the mechanism and guide it back down slowly.
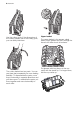
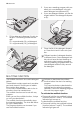
electrolux 3. If you use a washing program with prewash, put more detergent in the prewash detergent compartment (B). 4. If you use detergent tablets, put the detergent tablet in the detergent dispenser (A) . 2. Fill the detergent dispenser (A) with detergent. The marking shows the dosage: 20 = approximately 20 g of detergent 30 = approximately 30 g of detergent. A B 5. Close the lid of the detergent dispenser. Press the lid until it locks into position.
electrolux 11 Follow these steps if the drying results are not satisfactory: 1. Fill the rinse aid dispenser with rinse aid. 2. Activate the rinse aid dispenser. 3. Set the rinse aid dosage to position 2. • You can only activate or deactivate the rinse aid dispenser when the multitab function is activated. To activate/deactivate the rinse aid dispenser: 1. Switch on the appliance. 2. Make sure that the appliance is in setting mode. 3. Press and hold function buttons B and C.
electrolux Warning! Only interrupt or cancel a washing program if necessary. Open the door carefully. Hot steam and water can escape. Interrupting a washing program 1. Open the appliance door. The washing program stops. 2. Close the appliance door. The washing program continues from the point of interruption. Cancelling a washing program 1. Press and hold function buttons B and C until all the program lights come on. 2. Release function buttons B and C to cancel the washing program.
electrolux 13 Program Rinse Degree of soil Type of load Any Partial load (to be completed later in the day). Program description 1 cold rinse (to prevent food scraps to bond). Detergent is not necessary with this program. 1) The Anti+bac program provides a sanitising final rinse. 2) During the Auto program, the soil level of the dishes is given by how cloudy the water is. The program duration and consumptions can change.
electrolux 3. To unlock the filter system, turn the handle on the microfilter (B) approximately 1/4 anticlockwise. If the holes in the spray arms become clogged, remove remaining parts of soil with a cocktail stick. External cleaning Clean the external surfaces of the appliance and control panel with a damp soft cloth. Only use neutral detergents. Do not use abrasive products, scouring pads or solvents (acetone etc.). Internal cleaning Do an inspection at intervals of 3 months.
electrolux 15 Warning! Switch the appliance off before you do the suggested corrective actions. Fault code and malfunction Possible cause and solution • intermittent audible signal, • the digital display shows The appliance does not fill with water • The water tap is blocked or restricted with limescale. Clean the water tap. • The water tap is closed. Open the water tap. • The filter in the water inlet hose is blocked. Clean the filter. • The installation of the water inlet hose is not correct.
electrolux The cleaning results are not satisfactory There are streaks, milky spots or a bluish coating on glasses and dishes • Decrease the rinse aid dosage. Dry water drop stains on glasses and dishes • Increase rinse aid dosage. • The detergent can be the cause.
electrolux 17 Warning! Make sure that mains plug is disconnected from the mains socket during installation. Install the appliance under a counter (kitchen worktop or sink). If a repair is necessary, the appliance must be easily accessible for the engineer. Put the appliance adjacent to a water tap and drain. For the venting of the appliance only water hoses and mains cable openings are necessary. The appliance has adjustable feet to allow the adjustment of its height.
electrolux 2. Use the supplied screws to secure the appliance in position (upwards or sideways). Make sure the screws are tightened. • A notched continuous panel is necessary to prevent door swing interference and to keep kick-panel alignment with adjacent units. • Cut a notch in the kick-panel sufficient to let the door swing freely under the appliance. • Make a check for interference. Open and close the door slowly. If the door touches the kick-panel, trim to prevent interference.
electrolux 19 The water pressure must be in the limits (refer to 'Technical data'). Make sure that the local water authority gives you the average mains pressure in your area. Make sure that there are no kinks in the water inlet hose and that the water inlet hose is not squashed or entangled. Fit the hose nut correctly to prevent water leaks. Caution! Do not connect the appliance to new pipes or pipes that have been not used for a long time. Let the water run for some minutes, then connect the inlet hose.
electrolux The appliance has a security feature to prevent dirty water going back into the appliance. If, the spigot of the sink has a 'non-return valve', this valve can cause the appliance to drain incorrectly. Remove the non-return valve. Caution! Make sure that the water couplings are tight to prevent water leakage. Ensure that hoses are not crushed or kinked under or behind the appliance. Once connected the inlet hose to the water tap, turn the tap on and check that there are no leaks.
electrolux 21 WARRANTY FOR SALES IN AUSTRALIA AND NEW ZEALAND APPLIANCE: DISHWASHER This document sets out the terms and conditions of the product warranties for Electrolux Appliances. It is an important document. Please keep it with your proof of purchase documents in a safe place for future reference should you require service for your Appliance. 1.
electrolux 6. Proof of purchase is required before you can make a claim under this warranty. 7. You may not make a claim under this warranty unless the defect claimed is due to faulty or defective parts or workmanship.
electrolux 23 FOR SERVICE or to find the address of your nearest state service centre in Australia Please call 13 13 4 9 For the cost of a local call (Australia on- SERVICE AUSTRALIA ELECTROLUX HOME PRODUCTS www.electrolux.com.
www.electrolux.