Website: www.mideaaircon.com Service manual CAUTION - BEFORE SERVICING THE UNIT, READ THE SAFETY - PRECAUTIONS IN THIS MANUAL. - ONLY FOR AUTHORIZED SERVICE PERSONNEL.
GD Midea Refrigerant Equipment Co. Ltd Service manual for Electrolux split Series CONTENTS 1. PREFACE 1.1 SAFETY PRECAUTIONS........................................................................................................................1 1.2 INSULATION RESISTANCE TEST.........................................................................................................1 1.3 FEATURES...................................................................................................................
LED lamp: 1.3 FEATURES Error self diagnosis function. POWER Anti-icing function at cooling mode. AUTO Anti-cold air function at heating mode. TIMER Auto-defrosting and heating recovering function DEFROST at heating mode. Outdoor unit overload current protection. Remote controller: Temperature protection of the outdoor LCD display compressor top. Mode button: Select the operation mode, AUTO, COOL, DRY, HEAT (Reverse cycle Restart protection for the compressor. models only) and FAN.
GD Midea Refrigerant Equipment Co. Ltd Service manual for Electrolux split Series Size C indoor units: 1.5 OUTSIDE DIMENSIONS 1.5.
GD Midea Refrigerant Equipment Co.
GD Midea Refrigerant Equipment Co. Ltd Service manual for Electrolux split Series 2 INSTALLATION 2.2 ITEMS REQUIRED FOR INSTALLING THE 2.1 TOOLS NEEDED FOR INSTALLATION UNIT Level gauge No. Screwdriver 1 Installation Plate 1 Electric drill 2 Self-tapping Screw ST3.9x25 8 Hole core drill ( φ85mm or φ115mm depending Name of Accessories Quantity (Type “A”) on Model) 3 Plastic Expansion Sheath 8 Flaring tool set 4 Drain Joint 1 Specified torque wrenches: 1.8kgm, 4.
GD Midea Refrigerant Equipment Co. Ltd Service manual for Electrolux split Series Typical installation 6. The indoor unit should be installed on the wall at a height of 1.7 meters or more from the floor but less than 2.3 meters from the floor. 7. Directions A, B and C should be free from obstructions. 2.3 INSTALLATION OF INDOOR UNIT AND OUTDOOR 2.3.1 Indoor unit ● Do not expose the indoor unit to heat or steam. ● Select a place where there are no obstacles in front or around the unit.
GD Midea Refrigerant Equipment Co. Ltd Service manual for Electrolux split Series ● Ensure that the clearance around the back of GAS the unit is more than 20cm and left side is more Piping than 10cm. LIQUID ● The front of the unit should have more than 3/8” 1/2” 5/8” 9.53mm 12.7mm 16.0mm 1/4” 1/4” 3/8” 6.35mm 6.35mm 9.53mm 100cm of clearance and the connection side (right Standard Length(m) 5 5 5 side) should have more than 60cm of clearance. Max.
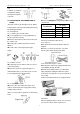
GD Midea Refrigerant Equipment Co. Ltd Service manual for Electrolux split Series side. 2.4.1.4 Flaring work 2. Always use wall hole conduit when drilling metal grid, metal plate or the like. ● Carry out flaring work using flaring tool as 2.4 FLARING WORK AND CONNECTION OF shown below. PIPING The main cause for gas leakage is due to defects Out diameter in flaring work. Carry out correct flaring work using the following procedure. 1/4” (6.35mm) 3/8” (9.53mm) 1/2” (12.7mm) 5/8” (16.0mm) 2.4.
GD Midea Refrigerant Equipment Co. Ltd Service manual for Electrolux split Series adjacent diagram for example). This will allow piping and cable routing to be completed without damaging the unit. 2.4.2.1 For rear right piping Note: When viewed from the front of the indoor unit. 2.4.2.1.6 Locating the indoor unit ● Hook the indoor unit onto the upper portion of the installation plate (Engage the hooks of the installation plate into the openings at the rear top of the indoor unit).
GD Midea Refrigerant Equipment Co. Ltd Service manual for Electrolux split Series adjacent diagram. indoor unit from the outdoor unit through the piping hole. ● Do not connect the cable to the indoor unit. ● Make a small loop with the cable for easy connection later. 2.4.2.2.3 Tape the drain hose and the connecting 2.4.2.1.8 Wrap the insulation material around the cable. Be sure that the drain hose is located at the connecting portion. lowest side of the bundle.
GD Midea Refrigerant Equipment Co. Ltd Service manual for Electrolux split Series wrapping them with vinyl tape over the range within which they fit into the rear piping housing section. ● Tighten the flare nut with a wrench, in accordance with the following table. 2.4.2.2.8 Set the piping and the drain hose to the back of the chassis with the tubing holder. ● Set the tubing retainer into position and tighten screw. Tightening Additional Torque Tightening (Kg.m) Torque (Kg.m) 1/4” (6.35mm) 1.6 2.
GD Midea Refrigerant Equipment Co. Ltd Service manual for Electrolux split Series sufficiently tighten the flare nut by hand. 2.5 CONNECTING THE CABLE BETWEEN INDOOR UNIT AND OUTDOOR UNIT CAUTION Ensure that all electrical work complies with relevant Standards and Supply Authority 2.4.3.2 Finally, tighten the flare nut with torque Service Rules. wrench until the wrench clicks. An individual branch Circuit Breaker/Fuse must ● Tighten the flare nut with a wrench, in be used with this Air Conditioner.
GD Midea Refrigerant Equipment Co. Ltd Service manual for Electrolux split Series those of the indoor unit.) specifically for the air conditioner. As for the 1. Lift the front panel up and remove the method of wiring, be guided by the circuit window cover from the indoor unit by diagram posted on the inside of control cover. loosening the screw. 2) The screws which fasten the wiring in the 2.
GD Midea Refrigerant Equipment Co. Ltd Service manual for Electrolux split Series 2.6.2.2 In cases where the outdoor unit is installed 2.6 CHECKING THE DRAINAGE AND below the indoor unit perform the following. FORMING THE PIPE 2.6.1 Checking the drainage ● Tape the piping, drain hose and connecting 2.6.1.1 To remove the front panel from the indoor cable from down to up. unit.
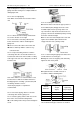
GD Midea Refrigerant Equipment Co. Ltd Service manual for Electrolux split Series Indoo r unit 2.7 AIR PURGING 2.7.1 Air purging Air and moisture remaining in the refrigerant system have undesirable effects as indicated below. Ou tdoor u nit ● Pressure in the system rises. ● Operating current rises. ● Cooling (or heating if applicable) efficiency drops. ● Moisture in the refrigerant circuit may freeze and block capillary tubing.
GD Midea Refrigerant Equipment Co. Ltd Service manual for Electrolux split Series Indoor unit on the indoor unit connection or outdoor unit connections using a soft brush to check for leakage of the connecting points of the piping. 2. If bubbles come out, the pipes have leakage. Note: Outdoor unit A: Lo stop valve B: Hi stop valve C and D: connections to the indoor unit. M anifold set Pre s sure gau ge 2.7.2.
GD Midea Refrigerant Equipment Co. Ltd Service manual for Electrolux split Series 2.8 TEST RUNNING if the system is not going to be used for a long 1. Check that all tubing and wiring have been period. properly connected. 2.8.3 Operating the unit with the switch on the 2. Check that the gas and liquid side service indoor unit valves are fully open. 1. Open and lift the front panel up to angle until it 2.8.1 Settlement of outdoor unit remains fixed with a clicking sound.
GD Midea Refrigerant Equipment Co. Ltd Service manual for Electrolux split Series PUMP DOWN This is performed when the unit is to be relocated or the refrigerant circuit is serviced. Pump Down means collecting all refrigerant in the outdoor unit without loss of refrigerant gas. CAUTION: Be sure to perform Pump Down procedure with the unit in cooling mode. Pump Down Procedure 1. Connect a low-pressure gauge manifold hose to the charge port on the gas side service valve. 3.
3 TROUBLESHOOTING GUIDE 3.
3.2 TROUBLESHOOTING GUIDE In general, possible trouble is classified in three kinds. One is called Starting Failure which is caused from an electrical defect, another is ineffective Air Conditioning caused by a defect in the refrigeration circuit and improper application, and the other is called the Structure Damage.
GD Midea Refrigerant Equipment Co. Ltd Service manual for Electrolux split Series The following tables will help to find where error happened (LED on indoor unit): For models adopting electrical function (part I) (cooling only models): Operation Timer lamp lamp ☆ X ☆ On X ☆ EEPROM error On ☆ No over-zero signal ☆ ☆ Failure phenomenon Indoor fan speed has been out of control for over 1 minute Indoor room temp.
GD Midea Refrigerant Equipment Co. Ltd Service manual for Electrolux split Series Cur r ent protectio n (LED indi cates) Check t he indoor air filt er. Check the out door condenser. Che ck t he positio n and wiring of tem p sen sor (all of the m). Check sp eed of in door motor. Yes Does ind oor heat ex chan g er frosted? If wro ng, t he unit w ill result in current prote ction, not tem p.
GD Midea Refrigerant Equipment Co. Ltd Service manual for Electrolux split Series Abnorm al n oise from the indoor unit Check t he swing mo to r. Yes Yes Does it happ en with aut o swing? Does it happ e n in Fan On ly mod e? No No Check t he swing lou ver . Does it just happ en in th e beginning of coolin g or heat in g mode? Chec k t he fa n motor . Yes No It is b ecause of the h eat rub be tween plastics parts. It is n orma l. Check the inp ut and output pip e. Check t he cross flow fan .
GD Midea Refrigerant Equipment Co. Ltd PROBLEM CAUSE Outdoor transformer Insufficient cooling or Service manual for Electrolux split Series failure REMEDY Replace if failure. Indoor PCB failure Replace the PCB if the photon coupling on indoor PCB is failure. Indoor PCB failure Replace after checked failure. heating. Lack of refrigerant Compressor protection Open or short circuit of outdoor temperature sensor evap temp sensor open or short circuit any leakage in the refrigerant system.
GD Midea Refrigerant Equipment Co. Ltd PROBLEM Service manual for Electrolux split Series CAUSE Air filter Unit undersized Condenser and Evaporator Room structure Air flow Sunlight REMEDY Clean or replace if restricted. Determine if the unit is properly sized for the area to be cooled or heated. Clean or replace if restricted. Take proper measures to make the door and windows sealed well if gap is found. Clean or remove if any barrier is found to block the inlet/outlet wind flow of the unit.
GD Midea Refrigerant Equipment Co. Ltd Service manual for Electrolux split Series 4 WIRING DIAGRAM 4.1 WIRING DIAGRAM FOR INDOOR UNITS 4.1.
GD Midea Refrigerant Equipment Co. Ltd Service manual for Electrolux split Series 4.1.
GD Midea Refrigerant Equipment Co. Ltd Service manual for Electrolux split Series 4.1.
GD Midea Refrigerant Equipment Co. Ltd Service manual for Electrolux split Series 4.1.7 For models: EL-KF90GW/Y-A(B) EL-KFR90GW/Y-A(B) AU-KF85GW/Y-A(B) AU-KF85GW/Y-A(B) EL-KF90GW/SY-A(B) WIRING D IAGRAM (INDOOR UNIT) CN 5 CN1 UNIT1 CN9 P2 P3 RT1 CN7 P1 CODE PART NAME CN 3 UNIT1 UNIT2 FAN1 MAIN CONTROL PCB DISPLAY PCB INDOOR FAN SWING SWING MOTOR TRANS1 RT1 TRANSFORMER ROOM TEMPERATURE SENSOR RT2 PIPE TEMPERATURE SENSOR FUSE 3.
GD Midea Refrigerant Equipment Co. Ltd Service manual for Electrolux split Series 4.1.
GD Midea Refrigerant Equipment Co. Ltd Service manual for Electrolux split Series 4.1.
GD Midea Refrigerant Equipment Co. Ltd Service manual for Electrolux split Series 4.2 WIRING DIAGRAM FOR OUTDOOR UNITS 4.2.1 For models: EL-KF20GW/N2Y-A(B) EL-KF26GW/N2Y-A(B) EL-KF36GW/N2Y-A(B) EL-KF20GW/Y-A(B) EL-KF26GW/Y-A(B) EL-KF32GW/Y-A(B) EL1-KF20GW/Y-A(B) EL1-KF26GW/Y-A(B) EL1-KF32GW/Y-A(B) EL1-KF20GW/N2Y-A(B) EL1-KF26GW/N2Y-A(B) EL1-KF35GW/N2Y-A(B) SEL-KF20GW/Y-A(B) SEL-KF26GW/Y-A(B) SEL-KF32GW/Y-A(B) SEL1-KF26GW/Y-A(B) SEL1-KF36GW/Y-A(B) EL-KF36GW/Y-A(B) 4.2.
GD Midea Refrigerant Equipment Co. Ltd Service manual for Electrolux split Series 4.2.3 For models: EL-KF50GW/N2Y-A(B) EL-KF50GW/Y-A(B) EL-KT3F53GW/Y-T2 EL-KT3F53GW/Y-T1 SEL-KF53GW/Y-A(B) INDOOR UNIT OUTDOOR UNIT Y&G RED BLACK BLACK OVERLOAD RELAY BLACK FAN MOTOR COMPRESSOR C BLUE R RED S WHITE Y/G BLUE COMPRESSOR CAPACITOR FAN CAPACITOR 4.2.
GD Midea Refrigerant Equipment Co. Ltd Service manual for Electrolux split Series 4.2.5 For models: EL-KF61GW/N2Y-A(B) EL-KF70GW/N2Y-A(B) EL-KF61GW/Y-A(B) EL-KF70GW/Y-A(B) SEL-KF61GW/Y-A SEL-KF70GW/Y-A EL-KT3F70GW/Y-T1 EL-KT3F70GW/Y-T2 KM1 M FAN2 BLACK RED WHITE RED BLUE 1 CAP2 C 2 RED TRA NS1 COMP BLACK Y/G R RED 1 XT2 RED BLACK CT CN 8 CN 6 CN 3 CAP1 BLACK BLACK XT1 B LACK CN 5 FUSE 3.
GD Midea Refrigerant Equipment Co. Ltd Service manual for Electrolux split Series 4.2.
GD Midea Refrigerant Equipment Co. Ltd Service manual for Electrolux split Series 4.2.
GD Midea Refrigerant Equipment Co. Ltd Service manual for Electrolux split Series 4.2.11 For models: AU-KF61GW/Y-A(B) KM1 M F AN 2 BLACK RED W HITE RED BLUE C 2 1 CAP2 Y EL LOW Y EL LOW S OF T S TA RTE R XT 2 CT UNIT1 GRAY GRAY CAP3 1 Y/G 1 2(N) S L R ED 2 RS XT 1 B LA CK CN 5 CAP1 1 2 BLA CK BLAC K BLACK RED RED W HITE RED CN 6 CN 3 FU SE 3.
GD Midea Refrigerant Equipment Co. Ltd Service manual for Electrolux split Series 4.2.13 For models: AU-KF70GW/Y-A(B) KM1 M FAN2 BLACK RED C 2 B LUE CN 1 UNIT1 CN 3 CN 5 CAP1 1 2 BLACK BL ACK BLACK RED RED WHITE CT FU SE 3.
GD Midea Refrigerant Equipment Co. Ltd Service manual for Electrolux split Series 4.2.15 For models: AU-KF85GW/Y-A(B) 4.2.
GD Midea Refrigerant Equipment Co. Ltd Service manual for Electrolux split Series 5 EXPLODED VIEWS (See attached files.) 6 REPLACEMENT PARTS LIST (See attached files.) 7 SPECIFICATIONS (See attached files.
GD Midea Refrigerant Equipment Co.