FEH50P2 EN COOKER USER MANUAL
www.electrolux.com CONTENTS 1. SAFETY INFORMATION...................................................................................... 3 2. SAFETY INSTRUCTIONS.....................................................................................4 3. PRODUCT DESCRIPTION................................................................................... 7 4. BEFORE FIRST USE............................................................................................ 8 5. HOB - DAILY USE.....................
ENGLISH 1. 3 SAFETY INFORMATION Before the installation and use of the appliance, carefully read the supplied instructions. The manufacturer is not responsible if an incorrect installation and use causes injuries and damages. Always keep the instructions with the appliance for future reference. 1.1 Children and vulnerable people safety WARNING! Risk of suffocation, injury or permanent disability.
www.electrolux.com • • • • • • • • • • Metallic objects such as knives, forks, spoons and lids should not be placed on the hob surface since they can get hot. Remove any spillage from the lid before opening. Let the hob surface cool down before closing the lid. Internally the appliance becomes hot when in operation. Do not touch the heating elements that are in the appliance. Always use oven gloves to remove or put in accessories or ovenware. Before maintenance cut the power supply.
ENGLISH • Parts of the appliance carry current. Close the appliance with furniture to prevent touching the dangerous parts. • The sides of the appliance must stay adjacent to appliances or to units with the same height. • Do not install the appliance on a platform. • Do not install the appliance adjacent to a door or under a window. This prevents hot cookware to fall from the appliance when the door or the window is opened.
www.electrolux.com WARNING! Risk of damage to the appliance. • To prevent damage or discoloration to the enamel: – do not put ovenware or other objects in the appliance directly on the bottom. – do not put water directly into the hot appliance. – do not keep moist dishes and food in the appliance after you finish the cooking. – be careful when you remove or install the accessories. • Discoloration of the enamel has no effect on the performance of the appliance.
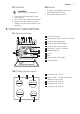
ENGLISH 2.7 Disposal 7 2.8 Service WARNING! Risk of injury or suffocation. • Disconnect the appliance from the mains supply. • Cut off the mains cable and discard it. • Remove the door catch to prevent children and pets to get closed in the appliance. • To repair the appliance contact an Authorised Service Centre. • Use original spare parts only. 3. PRODUCT DESCRIPTION 3.
www.electrolux.com 3.3 Accessories • Wire shelf For cookware, cake tins, roasts. • Baking tray For cakes and biscuits. • Optional telescopic runners For shelves and trays. You can order them separately. • Storage drawer The storage drawer is below the oven cavity. 4. BEFORE FIRST USE WARNING! Refer to Safety chapters. 4.1 Initial Cleaning Remove all accessories and removable shelf supports from the appliance. Refer to "Care and cleaning" chapter. Clean the appliance before first use.
ENGLISH Use the residual heat to decrease energy consumption. Deactivate the cooking zone approximately 5 - 10 minutes before the cooking process is completed. Turn the knob to a necessary heat setting. The hob control indicator comes on. To complete the cooking process, turn the knob to the off position. 9 If all cooking zones are deactivated, the hob control indicator goes out. 5.2 Using the rapid hot plate A red dot in the middle of the plate shows a rapid hot plate.
www.electrolux.com 8. OVEN - DAILY USE WARNING! Refer to Safety chapters. 8.1 Activating and deactivating the appliance It depends on the model if your appliance has knob symbols, indicators or lamps: • The indicator comes on when the oven heats up. • The lamp comes on when the appliance operates. • The symbol shows whether the knob controls one of the cooking zones, the oven functions or the temperature. 1. Turn the knob for the oven functions to select an oven function. 2.
ENGLISH 11 9. OVEN - CLOCK FUNCTIONS 9.1 Minute Minder Use it to set a countdown time. This function has no effect on the operation of the appliance. 1. Set an oven function and the temperature. 2. Turn the knob for the timer as far as it goes, then turn it to necessary time period. After the time period is completed, an acoustic signal sounds. 10. OVEN - USING THE ACCESSORIES WARNING! Refer to Safety chapters. 10.
www.electrolux.com aluminium foil on the components when you cook. This can change the baking results and cause damage to the enamel. 11.2 Baking • Your oven can bake or roast differently to the appliance you had before. Adapt your usual settings (temperature, cooking times) and shelf positions to the values in the tables. • The manufacturer recommends that you use the lower temperature the first time. • If you cannot find the settings for a special recipe, look for the one that is almost the same.
ENGLISH 13 Food Quantity (g) Temperature (°C) Time (min) Fatless sponge cake 1) 350 160 - 170 25 - 30 1 1 round aluminized tray (diameter: 26 cm) Drip pan cake 1500 160 - 170 45 - 55 3) 2 baking tray Chicken, whole 1350 200 - 220 60 - 70 2 wire shelf 1 baking tray 3 wire shelf 1 baking tray 3 Wire shelf 1 baking tray Chicken, half 1300 190 - 210 190 - 210 35 + 30 30 - 35 Shelf Accessories position Pork roast cutlet 600 Flan bread 4) 800 230 - 250 10 - 15 2 bak
www.electrolux.com Food Quantity (g) Temperature (°C) Time (min) Meringue 400 100 - 120 40 - 50 2 baking tray Crumble cake 5) 1500 180 - 190 25 - 35 3 baking tray Sponge cake 1) 600 160 - 170 25 - 35 3 baking tray Buttered cake 1) 180 - 200 20 - 25 2 baking tray 600 Shelf Accessories position 1) Preheat the oven for 10 minutes. 2) Preheat the oven for 15 minutes. 3) After you switch off the appliance, leave the cake in the oven for 7 minutes.
ENGLISH Food Quantity (g) Temperature (°C) Time (min) Drip pan cake 1200 150 - 160 30 - 35 2) 2 baking tray Chicken, whole 1400 180 55 2 wire shelf 1 baking tray 2 wire shelf 1 baking tray Pork roast 800 170 - 180 45 - 50 15 Shelf Accessories position Stuffed yeast cake 1200 150 - 160 20 - 30 2 baking tray Pizza 1000 + 1000 200 - 210 30 - 40 1+3 baking tray Pizza 1000 190 - 200 25 - 35 2 baking tray Cheese cake 2600 160 - 170 40 - 50 1 baking tray Swiss a
www.electrolux.com Food Quantity (g) Temperature (°C) Time (min) Crumble cake 1500 160 - 170 25 - 35 3 baking tray Sponge cake 1) 600 150 - 160 25 - 35 2 baking tray Buttered cake 1) 160 - 170 25 - 35 1+3 baking tray 600 + 600 Shelf Accessories position 1) Preheat the oven for 10 minutes. 2) After you switch off the appliance, leave the cake in the oven for 7 minutes. 3) Preheat the oven for 10 - 15 minutes.
ENGLISH • Clean all accessories after each use and let them dry. Use a soft cloth with warm water and a cleaning agent. • If you have nonstick accessories, do not clean them using aggressive agents, sharp-edged objects or a dishwasher. It can cause damage to the nonstick coating. 12.2 Stainless steel or aluminium appliances Clean the oven door with a wet sponge only. Dry it with a soft cloth. Do not use steel wool, acids or abrasive materials as they can damage the oven surface.
www.electrolux.com WARNING! When you take out the glass panels the oven door tries to close. 4. Hold the top edge of the door glass panels and pull them up one by one. 5. Clean the glass panel with water and soap. Dry the glass panel carefully. When the cleaning is complete, install the glass panels and the oven door. Do the above steps in the opposite sequence. Install the smaller panel first, then the larger.
ENGLISH 19 13.1 What to do if... Problem Possible cause Remedy You cannot activate the ap- The appliance is not conpliance. nected to an electrical supply or it is connected incorrectly. Check if the appliance is correctly connected to the electrical supply. You cannot activate or op- The fuse is released. erate the hob. The oven does not heat up. Make sure that the fuse is the cause of the malfunction. If the fuse releases again and again, contact a qualified electrician.
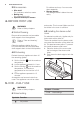
www.electrolux.com Keep a distance of about 1 cm between the appliance and the back wall to make sure that the lid opens. 14.3 Levelling of the appliance For minimal distances for fitting check the table. B C A Use small feet on the bottom of appliance to set the appliance top surface level with other surfaces. 14.4 Anti-tilt protection Set the correct height and area for the appliance before you attach the anti-tilt protection.
ENGLISH 21 CAUTION! If the space between the bench cupboards is larger than the width of the appliance, you must adjust the side measurement to the centre of the appliance. 14.5 Electrical installation 1. Install the anti-tilt protection 317 - 322 mm down from the top surface of the appliance and 80 - 85 mm from the side of the appliance into the circular hole on a bracket. Screw it into the solid material or use applicable reinforcement (wall).
www.electrolux.com 15. ENERGY EFFICIENCY 15.1 Hob - Energy saving You can save energy during everyday cooking if you follow below hints. • When you heat up water, use only the amount you need. • If it is possible, always put the lids on the cookware. • Before you activate the cooking zone put the cookware on it. • The cookware bottom should have the same diameter as the cooking zone. • Put the smaller cookware on the smaller cooking zones. • Put the cookware directly in the centre of the cooking zone.
ENGLISH • Keep food warm - if you want to use the residual heat to keep the meal 16. CH 23 warm, choose the lowest possible temperature setting. GUARANTEE Customer Service Centres Point of Service Industriestrasse 10 5506 Mägenwil Le Trési 6 1028 Préverenges Via Violino 11 6928 Manno Morgenstrasse 131 3018 Bern Zürcherstrasse 204E 9000 St. Gallen Seetalstrasse 11 6020 Emmenbrücke St.
867313579-B-472014 www.electrolux.