FGH50K3101 ................................................ .............................................
www.electrolux.com CONTENTS 1. 2. 3. 4. 5. 6. 7. 8. 9. 10. 11. 12. 13. 14. SAFETY INFORMATION . . . . . . . . . . . . . . . . . . . . . . . . . . . . . . . . . . . . . . . . . . . . . . . . . . . 3 SAFETY INSTRUCTIONS . . . . . . . . . . . . . . . . . . . . . . . . . . . . . . . . . . . . . . . . . . . . . . . . . . 4 PRODUCT DESCRIPTION . . . . . . . . . . . . . . . . . . . . . . . . . . . . . . . . . . . . . . . . . . . . . . . . . 7 BEFORE FIRST USE . . . . . . . . . . . . . . . . . . . . . . . . .
ENGLISH 3 1. SAFETY INFORMATION Before the installation and use of the appliance, carefully read the supplied instructions. The manufacturer is not responsible if an incorrect installation and use causes injuries and damages. Always keep the instructions with the appliance for future reference. 1.1 Children and vulnerable people safety WARNING! Risk of suffocation, injury or permanent disability.
www.electrolux.com • Never try to extinguish a fire with water, but switch off the appliance and then cover flame e.g. with a lid or a fire blanket. • Do not store items on the cooking surfaces. • Do not use a steam cleaner to clean the appliance. • Metallic objects such as knives, forks, spoons and lids should not be placed on the hob surface since they can get hot. • Be careful, when you touch the storage drawer. It can get hot. • Remove any spillage from the lid before opening.
ENGLISH • Do not let mains cables to come in touch with the appliance door, specially when the door is hot. • The shock protection of live and insulated parts must be fastened in such a way that it cannot be removed without tools. • Connect the mains plug to the mains socket only at the end of the installation. Make sure that there is access to the mains plug after the installation. • If the mains socket is loose, do not connect the mains plug. • Do not pull the mains cable to disconnect the appliance.
www.electrolux.com • Do not put flammable products or items that are wet with flammable products in, near or on the appliance. • Do not let sparks or open flames to come in contact with the appliance when you open the door. • Open the appliance door carefully. The use of ingredients with alcohol can cause a mixture of alcohol and air. • Clean the lid regularly. • Do not open the lid, when there are spills on the surface. • Before you close the lid turn all burners off.
ENGLISH • Do not clean the burners in the dishwasher. • Only use lamps with the same specifications. 2.4 Internal light 2.5 Disposal • The type of light bulb or halogen lamp used for this appliance, is only for household appliances. Do not use it for house lighting. WARNING! Risk of electrical shock. • Before replacing the lamp, disconnect the appliance from the power supply. WARNING! Risk of injury or suffocation. • Disconnect the appliance from the mains supply.
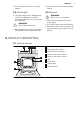
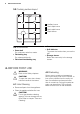
www.electrolux.com 3.2 Cooking surface layout 1 2 1 Auxiliary burner 2 Semi-rapid burner 3 Semi-rapid burner 4 Rapid burner 4 3 3.3 Accessories • Oven shelf For cookware, cake tins, roasts. • Flat baking tray For cakes and biscuits. • Flat aluminized baking tray For cakes and biscuits. • Grill deflector To protect the knobs when you use the grill. • Storage drawer Below the oven cavity is the storage drawer. 4. BEFORE FIRST USE WARNING! Refer to the Safety chapters.
ENGLISH 9 5. HOB - DAILY USE WARNING! Refer to the Safety chapters. 5.1 Ignition of the burner WARNING! Be very careful when you use open fire in the kitchen environment. The manufacturer declines any responsibility in case of misuse of the flame. Always light the burner before you put cookware on it. To light the burner: Push and hold the spark generator button . 2. At the same time turn the knob counterclockwise to the maximum position and push it down to light the burner. 3.
www.electrolux.com 6. HOB - HELPFUL HINTS AND TIPS 6.1 Energy savings Use cookware with the bottom as thick and flat as possible. • If possible, always put the lids on the pans. • When the liquid starts to boil, turn down the flame to barely simmer the liquid. WARNING! Use pots and pans with bottom applicable to the dimension of burner. Do not use cooking vessels on the hotplate that overlap its edges.
ENGLISH 11 8.1 Oven Functions Oven function 0 Off position 1-8 Range of temperature levels adjustment Application To switch off the appliance. Range of temperature levels adjustment for conventional cooking. (1 - 145 °C; 2 - 160 °C; 3 - 175 °C; 4 - 190 °C; 5 205 °C; 6 - 220 °C; 7 - 235 °C; 8 - 250 °C) Grill To grill flat food in the middle of the grill. To make toasts. Oven lamp To light up the oven interior without any cooking function. To use this function, press the oven lamp button. 8.
www.electrolux.com WARNING! Never use the grill with closed door. There is a risk of fire. 1. 2. Open the oven door. Put grill deflector A into position above the door. A Do not put the meat directly in the tray or pan. 8. Keep the door slightly open. 9. When the first side is roasted, turn the meat over with a fork to avoid losing its juice. 10. When the second side is also ready, remove the meat from the oven. If the grill does not come on or if it accidentally goes out: 1.
ENGLISH 13 WARNING! Do not push the baking tray all the way to the rear wall of the oven cavity. This prevents the heat from circulating around the tray. The food may be burnt, especially in the rear part of the tray. 10. OVEN - HELPFUL HINTS AND TIPS CAUTION! Use a deep baking tray for very moist cakes. Fruit juices can cause permanent stains on the enamel. • The appliance has four shelf levels. Count the shelf levels from the bottom of the appliance floor.
www.electrolux.com 10.
ENGLISH Food Tray type and shelf level 15 Preheating time (minutes) Thermostat position Cooking / baking time (minutes) Romanian sponge cake (600 + 600 g) 2 round aluminized trays (diameter: 25 cm) at level 3 10 2-3 50 - 60 Romanian sponge cake - traditional (600 + 600 g) 2 round aluminized trays (diameter: 25 cm) at level 3 10 2-3 40 - 50 Swiss roll (500 g) aluminized / enamelled tray at level 3 10 2-3 20 - 30 Meringue (400 g) aluminized / enamelled tray at level 3 - 1-2 40 - 50
www.electrolux.com WARNING! When the door glass panels are damaged or have scratches, the glass becomes weak and can break. To prevent this you must replace them. For more instructions, contact your local Service Centre. 11.1 Cleaning the oven door The oven door has two panels of glass installed one behind the other. To make the cleaning easier remove the oven door. WARNING! The oven door can close if you try to remove the internal panel of glass when the door is still assembled.
ENGLISH 17 3. Close the oven door to the first opening position (halfway). Then pull forward and remove it from its seat. 4. Place the door on a stable surface protected by a soft cloth. Use a screwdriver to remove 2 screws from bottom edge of door. Do not lose the screws. 1 1 5. 3 2 2 Clean the glass panel with water and soap. Dry it carefully. 6. 7. Use a spatula made of wood or plastic or equivalent to open the inner door.
www.electrolux.com Inserting the door and the glass panel When the cleaning procedure is completed, insert the oven door. To do so, do the steps in opposite way. 4 4 6 5 5 11.2 Removing the drawer 11.3 Oven lamp WARNING! Be careful when you change the oven lamp. There is a risk of electrical shock. The drawer below the oven can be removed for cleaning. Before you change the oven lamp: • Deactivate the oven. • Remove the fuses in the fuse box or deactivate the circuit breaker.
ENGLISH 19 12. WHAT TO DO IF… Problem Possible cause Remedy There is no spark when lighting the gas There is no electrical supply Make sure that the unit is connected and the electrical supply is switched on. There is no spark when lighting the gas There is no electrical supply Examine the house electrical installation fuse. There is no spark when lighting the gas Burner cap and crown are placed uneven Make sure that the burner cap and crown are in correct positions.
www.electrolux.com 13.1 Location of the appliance A B A C C Dimensions Width 500 mm Depth 600 mm Total electricity power 15,6 W Voltage 230 V Frequency 50 Hz Gas Category Gas Supply II2H3B/P G20 (2H) 20 mbar G30/G31 (3B/P) 50/50 mbar Minimal distances Dimension mm A 690 B 150 C 20 By-pass diameters 13.2 Technical Data Dimensions Height Burner Ø By-pass in 1/100 mm.
ENGLISH BURNER Oven Grill NORMAL POWER REDUCED POWER kW kW 3,00 0,72 2,60 Type of gas 21 Pressure Injector diameter Usage mbar mm g/h Butane G30 50 0,77 218,14 0,63 Propane G31 50 0,77 185,68 2,70 0,90 Natural gas G20 20 1,20 - 2,50 0,90 Butane G30 50 0,63 181,78 2,15 0,78 Propane G31 50 0,63 156,33 1,90 - Natural gas G20 20 1,08 - 2,00 - Butane G30 50 0,60 - 1,70 - Propane G31 50 0,60 - 13.
www.electrolux.com WARNING! Before gas connection disconnect the mains plug from the mains socket or switch off the fuse in the fuse box. Close the primary valve of the gas supply. A B C E D A) Gas connection point (only one point B) C) D) E) is applicable for appliance) Gasket Adjustable connection Natural Gas pipe holder LPG pipe holder The appliance is set to default gas, to change the setting choose pipe holder from the list. Always use the gasket sealing 13.
ENGLISH 23 13.8 Oven injector replacement B A 1. Remove the bottom plate of the oven cavity (A) to get access to the oven burner (B). 2. Release the screw (C) which keeps the burner in position. 3. Carefully move the burner off the injector support (D). Slowly move it to the left side. Make sure that the burner bush stays on the burner mouthpiece. Do not apply force to the wire of the spark plug connector (E) and to the thermocouple conductor (F).
www.electrolux.com A A 2. Change of the type of gas Adjustment of the adjustment screw From natural gas to liquid gas Fully tighten the adjustment screw in. From liquid gas to natural gas Release the adjustment screw approximately 3/4 of a turn. 3. Attach the knob for the oven functions. 4. Light the oven burner. Refer to the section "Gas oven cooking: Ignition of the oven gas burner". 5. Turn the knob for the oven functions to the maximum position and let the oven heat for 10 minutes. 6.
ENGLISH 25 The power cable must not touch the part of the appliance shown in the illustration. 14. CH GARANTIE, GARANZIA, GUARANTEE 14.1 Kundendienst, service-clientèle, Servizio clienti, Customer Service Centres Servicestellen Points de Service Servizio dopo vendita Point of Service 5506 Mägenwil/Zürich Industriestrasse 10 3018 Bern Morgenstrasse 131 1028 Préver6928 Manno enges Le Trési 6 Via Violino 11 9000 St. Gallen Zürcherstrasse 204e 4052 Basel St.
www.electrolux.com certificato di garanzia o dello scontrino d’acquisto) Nella garanzia sono comprese le spese di manodopera, di viaggio e del materiale. Dalla copertura sono esclusi il logoramento ed i danni causati da agenti esterni, intervento di terzi, utilizzo di ricambi non originali o dalla inosservanza delle prescrizioni d’istallazione ed istruzioni per l’uso.
ENGLISH 27
892953764-A-352012 www.electrolux.