FQV741XEV IT Forno a vapore Istruzioni per l’uso
www.electrolux.com INDICE 1. INFORMAZIONI DI SICUREZZA........................................................................3 2. ISTRUZIONI DI SICUREZZA............................................................................. 4 3. DESCRIZIONE DEL PRODOTTO......................................................................7 4. PRIMA DI UTILIZZARE L'ELETTRODOMESTICO............................................ 8 5. UTILIZZO QUOTIDIANO.................................................................
ITALIANO 1. 3 INFORMAZIONI DI SICUREZZA Leggere attentamente le istruzioni fornite prima di installare e utilizzare l'apparecchiatura. I produttori non sono responsabili di eventuali lesioni o danni derivanti da un'installazione o un uso scorretti. Conservare sempre le istruzioni in un luogo sicuro e accessibile per poterle consultare in futuro. 1.
www.electrolux.com 1.2 Avvertenze di sicurezza generali • • • • • • • • • L'installazione dell'apparecchiatura e la sostituzione dei cavi deve essere svolta unicamente da personale qualificato. AVVERTENZA: L'apparecchiatura e le parti accessibili si riscaldano molto durante l'uso. Abbiate cura di non toccare gli elementi riscaldanti. Servirsi sempre degli appositi guanti da forno per estrarre o inserire accessori o pentole resistenti al calore.
ITALIANO • • • • • Non tirare l’apparecchiatura per la maniglia. È necessario rispettare la distanza minima dalle altre apparecchiature. Installare l'apparecchiatura in un luogo sicuro e idoneo che soddisfi i requisiti di installazione. I lati dell'apparecchiatura devono restare adiacenti ad apparecchiature o unità con la stessa altezza. L'apparecchiatura è dotata di un sistema elettrico di raffreddamento. Questo deve essere alimentato elettricamente. • • • 2.
www.electrolux.com • all'apparecchiatura quando si apre la porta. Non appoggiare o tenere liquidi o materiali infiammabili, né oggetti facilmente incendiabili sull'apparecchiatura, al suo interno o nelle immediate vicinanze. AVVERTENZA! Vi è il rischio di danneggiare l'apparecchiatura. • • • • • • Per evitare danni o scolorimento dello smalto: – Non mettere pentole resistenti al calore o altri oggetti direttamente sulla superficie inferiore dell'apparecchiatura.
ITALIANO 2.6 Illuminazione interna • AVVERTENZA! Pericolo di scosse elettriche. • • • Le lampadine utilizzate in questa apparecchiatura sono lampade speciali per elettrodomestici. Non usarle per l'illuminazione di casa. Prima di sostituire la lampadina, scollegare l’apparecchiatura dalla rete elettrica. Servirsi unicamente di lampadine con le stesse specifiche tecniche . 2.8 Smaltimento AVVERTENZA! Rischio di lesioni o soffocamento. • • • 2.
www.electrolux.com 4. PRIMA DI UTILIZZARE L'ELETTRODOMESTICO AVVERTENZA! Fare riferimento ai capitoli sulla sicurezza. Per l'impostare l'Ora del giorno rimandiamo al capitolo "Funzioni orologio". 4.1 Prima pulizia Togliere gli accessori e i supporti ripiano amovibili dal forno. Fare riferimento al capitolo "Pulizia e cura". Pulire il forno e gli accessori prima di utilizzarli per la prima volta. Sistemare gli accessori e i supporti ripiano rimovibili nella posizione iniziale. 1.
ITALIANO Funzione forno Applicazione Questa funzione è pro‐ gettata per risparmiare Cottura Eco‐ energia in fase di cottu‐ ra. Per istruzioni di cot‐ ventilata tura rimandiamo al capi‐ tolo "Consigli e suggeri‐ menti", Cottura Ecoven‐ tilata. La porta del forno dovrebbe essere chiusa in fase di cottura, di mo‐ do che la funzione non venga interrotta. Ciò ga‐ rantisce inoltre che il forno funzioni con la più elevata efficienza ener‐ getica possibile.
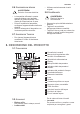
www.electrolux.com 5.4 Display A B C A. Spie funzione B. Display Ora C. Spia funzione 5.5 Pulsanti Pulsante Funzione Descrizione MENO Per impostare l'ora. CLOCK Per impostare una funzione orologio. PIÙ Per impostare l'ora. 5.6 Cottura a vapore Utilizzare solo acqua. Non utilizzare acqua filtrata (demineralizzata) o distillata. Non utilizzare altri liquidi. Non versare liquidi infiammabili o alcolici nella vaschetta dell’acqua. 1. Impostare la funzione . 2.
ITALIANO 5.9 Svuotamento del serbatoio dell'acqua ATTENZIONE! Prima di iniziare a svuotare il serbatoio dell'acqua, controllare che il forno sia freddo. 1. Preparare il tubo di scarico (C) incluso nel sacchetto contenente il libretto istruzioni. Collegare il connettore (B) ad una delle estremità del tubo di scarico. 2. Sistemare l'altra estremità del tubo di scarico (C) in un recipiente. Posizionarla in modo tale che risulti più bassa della valvola di scarico (A). 11 3.
www.electrolux.com 6.2 Impostazione del tempo. Modifica del tempo È necessario impostare l'ora prima di mettere in funzione il forno. lampeggia quando si collega La l'apparecchiatura all'alimentazione elettrica dopo un'interruzione di corrente o se il timer non è stato impostato. o per impostare Premere il tasto l'ora corretta. Dopo circa cinque secondi, la spia smette di lampeggiare e il display mostra l'ora impostata. Per modificare l'ora del giorno, toccare nuovamente fino a che a lampeggiare.
ITALIANO 4. Ruotare la manopola delle funzioni del forno e la manopola della temperatura in posizione spento. 13 2. Tenere premuto . La funzione dell'orologio si spegne dopo alcuni secondi. 6.7 Annullamento delle funzioni orologio 1. Premere ripetutamente il tasto finché la spia della funzione desiderata non inizia a lampeggiare. 7. UTILIZZO DEGLI ACCESSORI AVVERTENZA! Fare riferimento ai capitoli sulla sicurezza.
www.electrolux.com Recipiente di vetro (A) Coperchio (B) Iniettore per la cottura a vapore diretto (D) Griglia in acciaio (E) Iniettore e tubicino dell'iniettore • Non poggiare una teglia calda su superfici fredde/bagnate. • Non versare liquidi freddi nella teglia calda. • Non utilizzare la teglia su una superficie di cottura calda. C D "C" rappresenta il tubicino dell'iniettore per la cottura a vapore, "D" l'iniettore per la cottura a vapore diretto.
ITALIANO • 15 Non pulire la teglia con pagliette e polveri abrasive. Assicurarsi di non schiacciare il tubicino dell'iniettore e che non entri in contatto con la resistenza sulla parete superiore del forno. 4. Impostare la funzione di cottura a vapore. 7.4 Cottura a vapore diretto 7.3 Cottura a vapore in teglia dietetica Sistemare il cibo nella griglia in acciaio all'interno della teglia e posizionare il coperchio. 1. Introdurre il tubicino dell'iniettore nell'apposito foro sulla teglia dietetica.
www.electrolux.com Nel caso di cotture di polli, anatre, tacchini, capretti o pesci grossi, inserire l'iniettore (D) direttamente nella parte vuota delle carni. Assicurarsi di non ostruire i fori. 2. Sistemare la teglia sul primo o secondo livello a partire dal basso. Assicurarsi di non schiacciare il tubicino dell'iniettore e che non entri in contatto con la resistenza sulla parete superiore del forno. 3. Impostare la funzione di cottura a vapore.
ITALIANO Qualora non si trovino le impostazioni per una ricetta speciale, cercarne una simile. Il forno è dotato di un sistema speciale che fa circolare l'aria e ricicla costantemente il vapore. Con questo sistema è possibile cucinare in un ambiente pieno di vapore, mantenendo il cibo soffice all'interno e croccante all'esterno. Riduce sia il tempo di cottura che il consumo energetico. Cottura di dolci Non aprire la porta del forno prima che siano trascorsi 3/4 del tempo di cottura.
www.electrolux.com Alimenti Cottura Tradizionale Cottura Ventilata Tempo (min.
ITALIANO Alimenti Cottura Tradizionale Cottura Ventilata Tempéra‐ ture (°C) Posizio‐ ne della griglia Tempéra‐ Posizio‐ ture (°C) ne della griglia Meringhe - due livel‐ li1) - 120 Panini dolci1) 190 3 Eclair - un 190 livello Eclair due livelli 19 Tempo (min.
www.electrolux.com Alimenti Cottura Tradizionale Cottura Ventilata Tempéra‐ Posizione Tempéra‐ Posizione ture (°C) della gri‐ ture (°C) della gri‐ glia glia Tempo (min.) Commen‐ ti Pizza1) 230 - 250 1 230 - 250 1 10 - 20 In una la‐ miera dol‐ ci o in una leccarda Focacci‐ ne1) 200 3 190 3 10 - 20 In una la‐ miera dol‐ ci Tempo (min.) Commen‐ ti 1) Preriscaldare il forno per 10 minuti.
ITALIANO Alimenti Cottura Tradizionale Cottura Ventilata Tempéra‐ Posizione Tempéra‐ Posizione ture (°C) della gri‐ ture (°C) della gri‐ glia glia Vitello 21 Tempo (min.) Commen‐ ti 190 2 175 2 90 - 120 Su un ri‐ piano a fi‐ lo Roastbeef 210 inglese, al sangue 2 200 2 50 - 60 Su un ri‐ piano a fi‐ lo Roastbeef 210 inglese, cott.
www.electrolux.com 9.3 Grill Impostare la temperatura massima. Preriscaldare il forno per 3 minuti. Usare il quarto livello griglia. Alimenti Mennyiség Tempo (min.) Pezzi Quantità (kg) 1° lato 2° lato Bistecche di filetto 4 0.8 12 - 15 12 - 14 Bistecche di manzo 4 0.6 10 - 12 6-8 Salsiccia 8 - 12 - 15 10 - 12 Braciole di maiale 4 0.6 12 - 16 12 - 14 Pollo (tagliato a metà) 2 1 30 - 35 25 - 30 Kebab 4 - 10 - 15 10 - 12 Petto di pollo 4 0.
ITALIANO Vitello Tempo (min.) Alimenti Tempéra‐ ture (°C) Tempo (min.) Arrosto di vi‐ 160 - 180 tello, 1 kg 90 - 120 35 - 50 Stinco di vi‐ tello, 1,5 - 2 kg 160 - 180 120 - 150 Mezzo pollo, 190 - 210 0.4 - 0.5 cia‐ scuno Pollo, polla‐ me, 1- 1,5 kg 50 - 70 Tempéra‐ ture (°C) Tempo (min.) Alimenti Tempéra‐ ture (°C) Agnello Alimenti Cosciotto di 150 - 170 agnello, agnello arro‐ sto, 1 - 1.
www.electrolux.com Alimenti Accessori Base pan di Spagna pirottino base soufflé su 180 ripiano a filo 2 35 - 45 Pasticcini per il piatto di cottura su ripia‐ 170 tea no a filo 2 35 - 50 Pesce cotto in bianco, 0.3 kg lamiera dolci o leccarda 180 2 35 - 45 Pesce intero, 0,2 kg lamiera dolci o leccarda 180 3 25 - 35 Filetto di pe‐ sce, 0,3 kg teglia pizza su ripiano a filo 170 3 30 - 40 Carne bollita, 0.25 kg lamiera dolci o leccarda 180 3 35 - 45 Šašlyk, 0.
ITALIANO 25 9.6 Scongelamento Alimenti Quantità (kg) Tempo di scongela‐ mento (min.) Tempo di scon‐ Commenti gelamento ulte‐ riore (min.) Pollo 1.0 100 - 140 20 - 30 Sistemare il pollo su un piattino rovesciato so‐ pra un piatto grande. Girare a metà tempo. Carne 1.0 100 - 140 20 - 30 Girare a metà tempo. Carne 0.5 90 - 120 20 - 30 Girare a metà tempo. Trota 1.50 25 - 35 10 - 15 - Fragole 3.0 30 - 40 10 - 20 - Burro 2.
www.electrolux.com Frutta Alimenti Température (°C) Tempo (h) Prugne 60 - 70 Albicocche Posizione della griglia 1 posizione 2 posizioni 8 - 10 3 1/4 60 - 70 8 - 10 3 1/4 Fette di mela 60 - 70 6-8 3 1/4 Pere 60 - 70 6-9 3 1/4 9.8 Cottura ventilata + vapore Torte e dolci Alimenti Températu‐ Tempo re (°C) (min.
ITALIANO Alimen‐ Tempé‐ ti rature (°C) Tempo (min.) 27 Posi‐ zione della griglia Pane bianco, 2x 0.5 kg cia‐ scuno 180 - 190 45 - 60 2 Panini, 6 - 8, 0.5 kg 190 - 210 20 - 30 2 (2 e 4) Pizza 200 - 220 20 - 30 2 Flan Preparare nello stampo per le torte. Alimenti Température (°C) Tempo (min.) Posizione della griglia Verdure ripiene 170 - 180 30 - 40 1 Lasagne 170 - 180 40 - 50 2 Patate gratinate 160 - 170 50 - 60 1 (2 e 4) Carne Usare il secondo livello griglia.
www.electrolux.com Pesce Usare il secondo livello griglia. Alimenti Tempéra‐ ture (°C) Tempo (min.) Trota, 3 - 4 pesce, 1.5 kg 180 25 - 35 Tonno , 4 6 filetti, 1.2 kg 175 Fermo 200 35 - 50 20 - 30 Riscaldare al vapore Riscaldare il piatto. Preriscaldare il forno per 10 minuti. Usare il secondo livello griglia. Alimenti Tempéra‐ ture (°C) Tempo (min.) Sformati/ Gratinati 130 15 - 25 Pasta e salsa 130 Alimenti Tempo (min.
ITALIANO Alimenti Tempo (min.) Patate bollite, in quarti 35 - 45 Polenta 40 - 45 29 9.10 Informazioni per gli istituti di prova Test conformemente alla norma IEC 60350-1. Alimenti Funzione Acces‐ sori Posi‐ Tem‐ Tempo (min.) Commenti zione pératu‐ della re (°C) gri‐ glia Torta piccola Cottura convenzio‐ nale Lamiera dolci 3 170 20 - 30 Sistemare 20 tor‐ tine su una la‐ miera dolci.
www.electrolux.com Alimenti Funzione Acces‐ sori Posi‐ Tem‐ Tempo (min.) Commenti zione pératu‐ della re (°C) gri‐ glia Torta Cottura con lievi‐ Ventilata to in pol‐ vere sen‐ za grassi Ripiano a filo 2e4 160 40 - 60 Utilizzare uno stampo per torte (26 cm di diame‐ tro). Posizionare in diagonale. Preriscaldare il forno per 10 mi‐ nuti.
ITALIANO 31 Non pulire gli accessori antiaderenti con detergenti aggressivi, oggetti appuntiti o in lavastoviglie. Potrebbe danneggiare il rivestimento antiaderente. L'umidità può condensarsi all'interno del forno o sui pannelli di vetro. Per ridurre la condensa, far funzionare il forno per 10 minuti prima della cottura.Pulire l'umidità dalla cavità dopo ogni uso. 10.2 Forni in acciaio inox o in alluminio Pulire la porta del forno esclusivamente con un panno umido. Asciugarla con un panno morbido.
www.electrolux.com Durante la procedura di pulizia, dell’acqua potrebbe fuoriuscire dal foro di entrata vapore nella cavità del forno. Sistemare una leccarda sul livello del ripiano direttamente al di sotto del foro di entrata vapore per evitare che l’acqua fluisca sul fondo della cavità del forno. generano vapore. Svuotare il serbatoio dopo ogni cottura a vapore. Tipi d'acqua • • • Dopo qualche istante è possibile notare dei residui di calcare all’interno del forno.
ITALIANO 33 La porta del forno potrebbe richiudersi se si tenta di rimuovere i pannelli in vetro prima di togliere la porta del forno. ATTENZIONE! Non utilizzare il forno senza i pannelli in vetro. 1. Aprire completamente la porta e individuare la cerniera sul lato destro della stessa. 2. Usare un cacciavite per sollevare e ruotare completamente il lato cerniera del lato destro. 5. Chiudere la porta del forno fino alla prima posizione di apertura circa metà.
www.electrolux.com 9. Tenere i pannelli in vetro della porta per l'estremità superiore ed estrarli con attenzione, uno alla volta. Iniziare dal pannello superiore. Verificare che il vetro scorra completamente fino a uscire dai supporti. Accertarsi di installare il pannello intermedio in vetro nelle sedi corrette. A B 10.8 Sostituzione della lampadina 10. Pulire i pannelli in vetro con acqua e sapone. Asciugare i pannelli di vetro facendo attenzione. Non pulire i pannelli in vetro in lavastoviglie.
ITALIANO 35 11.1 Cosa fare se... Problema Possibile causa Rimedio Il forno non si scalda. Il forno è spento. Accendere il forno. Il forno non si scalda. L'ora non è impostata. Impostare l'ora. Il forno non si scalda. Non sono state effettuate Accertarsi che le imposta‐ le impostazioni necessarie. zioni siano corrette. Il forno non si scalda. È scattato il fusibile. Il display indica "12.00". Si è verificata un'interruzio‐ Reimpostare l'orologio. ne di corrente. La lampada non si accen‐ de.
www.electrolux.com 11.2 Dati Assistenza Qualora non sia possibile trovare una soluzione al problema, contattare il rivenditore o il Centro di Assistenza Autorizzato. Le informazioni necessarie per il Centro di Assistenza si trovano sulla targhetta dei dati. La targhetta si trova sul telaio anteriore del forno. Non rimuovere la targhetta dei dati dalla cavità del forno. Consigliamo di annotarli in questo spazio: Modello (MOD.) ......................................... Codice Prodotto (PNC) ........
ITALIANO 12.3 Installazione dell'impianto elettrico Il produttore non è responsabile qualora non vengano applicate le precauzioni del capitolo "Informazioni per la sicurezza". L'apparecchiatura è provvista solo di cavo di collegamento alla rete. 12.4 Cavo Tipi di cavi disponibili per l'installazione o la sostituzione: Potenza totale (W) Sezione del cavo (mm²) massimo 1.380 3 x 0.75 massimo 2.300 3x1 massimo 3.680 3 x 1.
www.electrolux.com Suggerimenti generali Verificare che la porta del forno sia chiusa correttamente quando lo stesso è in funzione. Non aprire la porta con eccessiva frequenza in fase di cottura. Tenere pulita la guarnizione della porta e verificare che sia saldamente fissata in posizione. Utilizzare piatti in metallo per aumentare il risparmio di energia. Ove possibile, non pre-riscaldare il forno prima di collocare alimenti al suo interno.
ITALIANO 39
867347041-A-172018 www.electrolux.