freezer INSTRUCTION BOOKLET EUU 1172 / EUU 6174 2222 740-55 UK
CONTENTS Instructions for the User Instructions for the Installer Important Safety Instructions 3 Technical Specifications 13 Operation 5 Installation 13 Before use Freezer controls Starting your appliance Temperature control Warning light (red) Temperature acoustic alarm Freezing fresh food Frozen food storage Thawing Ice making 5 5 5 5 5 5 5 6 6 6 Positioning 13 Electrical Connection 14 Building-in Instructions 15 Grid preparation Door reversal Building the appliance in under a worktop F
IMPORTANT SAFETY INSTRUCTIONS These warnings are provided in the interests of your safety. Ensure that you understand them all before installing or using this appliance. Your safety is of paramount importance. If you are unsure about any of the meanings of these warnings contact the Customer Care Department. Prior to Installation General Safety ¥ Check the appliance for transport damage. Under no circumstance should a damaged appliance be installed. In the event of damage please contact your retailer.
Servicing ¥ This product should be serviced by an authorised engineer and only genuine spare parts should be used. ¥ Under no circumstances should you attempt to repair the appliance yourself. Repairs carried out by inexperienced persons may cause injury or serious malfunctioning. Contact your local Service Force Centre. At the end of the Appliance Life ¥ When disposing of your appliance use an authorised disposal site.
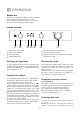
OPERATION Before use Remove all securing tapes. Wash inside the appliance with lukewarm water and bicarbonate of soda (5 ml to 0.5 litre of water). Do not use soap or detergent as the smell may linger. Dry thoroughly.
fresh food, the yellow light ➄ illuminates. This time can be shortened, depending on the quantity of food to be frozen. After the time has elapsed place the food to be frozen in the two top compartments of the freezer as this is the coldest part; if freezing only a small amount of food, always use the top compartment. Once the food is completely frozen (which could take up to 24 hours) press the fast freeze switch to deactivate the fast freeze mode; the yellow light ➄ goes off.
HEALTH AND SAFETY GUIDELINES Because of consumer demand, preservatives have been removed from many pre-prepared foods. This together with the changes in shopping habits to a once-a-week shop, mean that safe handling and storage of food is even more important than ever. The following tips should help you to ensure that the food in your home is in as perfect condition as possible. ¥ Keep the freezer door closed as much as possible.
DEFROSTING The freezer compartment will become progressively covered with frost. This should be removed with the special plastic scraper provided, whenever the thickness of the frost exceeds 1/4". Important In the event of a power failure causing t h e temperature within your freezer to rise, do not re-freeze the food without checking its condition. The following guidelines should assist you: During this operation it is not necessary to switch off the power supply or to remove the foodstuffs.
MAINTENANCE AND CLEANING Warning Before any maintenance or cleaning work is carried out, DISCONNECT the appliance from the ELECTRICITY supply. Important This appliance contains hydrocarbons in its cooling unit maintenance and recharging must therefore only be carried out by authorised technicians. Internal cleaning Clean the inside and accessories with warm water and bicarbonate of soda (5ml to 0.5 litre of water). Rinse and dry thoroughly.
SOMETHING NOT WORKING? Before contacting your local Service Force Centre check the following points. IMPORTANT: If you call out an engineer to a fault listed below, or to repair a fault caused by incorrect use or installation, a charge will be made even if the appliance is under guarantee. Symptom Solution No power to the appliance - Check there is power at the socket. - Check there is not a power cut by checking the household lights. - Check the fuse has not blown.
SERVICE AND SPARE PARTS In the event of your appliance requiring service, or if you wish to purchase spare parts, please contact your local Service Force Centre by telephoning:- When you contact the Service Force Centre you will need to give the following details: 1. Your name, address and post code 2. Your telephone number 3. Clear and concise details of the fault 4. The model and serial number of the appliance (found on the rating plate) 5.
GUARANTEE CONDITIONS Standard guarantee conditions We, Electrolux, undertake that if within 12 months of the date of purchase this Electrolux appliance or any part thereof is proved to be defective by reason only of faulty workmanship or materials, we will, at our option repair or replace the same FREE OF CHARGE for labour, materials or carriage on condition that: • The appliance has been correctly installed and used only on the electricity supply stated on the rating plate.
TECHNICAL SPECIFICATIONS DIMENSIONS Height Width Depth 81,5 59,6 54 POWER SUPPLY VOLTAGE AND FREQUENCY TOTAL POWER ABSORBED AVERAGE DAILY UNITS ELECTRICITY(*) 220-240 V / 50 Hz 90 W 0,78 kWh GROSS CAPACITY 108 l NET CAPACITY 100 l cm cm cm STAR RATING (*)This figure is based on standard test results in accordance with European Standard EN153. Actual consumption will depend on how the appliance is used and where it is located.
ELECTRICAL CONNECTION If you fit your own plug, the colours of the wires in the mains lead of your appliance, may not correspond with the markings identifying the terminals in your plug, proceed as follows: Connect the Green and the Yellow (earth) wire to the terminal in the plug which is marked with the letter WARNING THIS APPLIANCE MUST BE EARTHED. The manufacturer declines any liability should this safety measure not be observed.
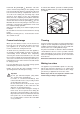
BUILDING-IN INSTRUCTIONS Before carrying out any work, remove the plug from the power socket. Grid preparation Left door opening: A Remove the left side (A) of the grid cutting it from the rear (see figure). B Right door opening: Remove the right side (B) of the grid cutting it from the rear (see figure). DO002/2 To position the grid on the appliance proceed as follows: Apply the grid to the base of the appliance by pushing on to the clasps (a) until they click.
Attention After completion of the door reversing operation, check that the door gasket adheres to the cabinet. If the ambient temperature is cold (i.e. in Winter), the gasket may not fit perfectly to the cabinet. In that case, wait for the natural fitting of the gasket or accelerate this process by heating up the part involved with a normal hairdryer on a low setting. 10 13 9 12 11 3 Building the appliance in under a worktop 1.
3. Two cabinet securing brackets are supplied with the installation pack. They need to be assembled onto the cabinet prior to cabinet being pushed into the Kitchen aperture. - To fit these brackets remove the two screws at the top left and right hand front corners of the cabinet. - Position the two brackets as shown in the figure and replace the two securing screws. Right hand bracket Left hand bracket 1/a 4. Push the appliance into place.
7. Screw appliance into place and retain the cabinet with screws through the securing brackets into the worktop or adjacent woodwork as necessary. 5 8.
UPPER PART OF KITCHEN FURNITURE PANEL 1 a = = LOWER PART OF KITCHEN FURNITURE PANEL 2 275 275 x ma b 9 1 45 ° 9/a 2 = 3 10 = 11 10 12 19 100
9. Refit the covering strip. A 13 Fitting the plinth Important For the efficient operation of the appliance, it is important that the original ventilation grid is used. a = 100 b = 150 A = 820 B = 870 ¥ For an opening height dimension A=820 mm and a plinth height dimension a=100 mm, the plinth may be fitted without adjustments. The same applies to an opening height dimension B=870 mm and a plinth height dimension b=150 mm.
ELECTROLUX HOME PRODUCTS OPERATIONS EUROPE 922 822 666 / 922 822 667 © Electrolux Household Appliances Limited 2003