SANTO 70318 KG Fridge-Freezer Operating Instructions AEG Addington Way LUTON Bedfordshire LU4 9QQ http://www.aeg.co.
Dear customer, Before switching on your new refrigerator/freezer please read read these operating instructions carefully. They contain important information for safe use, for installation and for care of the appliance. Please keep these operating instructions for future reference. Pass them on to possible new owners of the appliance.
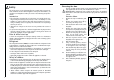
12 Unscrew the top handle bracket from the handle rod (1). Unscrew the bottom handle bracket from the door (2). 13. Unscrew the top handle bracket from the door (3) and screw onto the bottom righthand side of the door (4). 14. Turn the handle bracket with the handle rod 180° and screw them to the door (5) and the fitted handle bracket (6). 15. Move the small plug from right to left. Attention! Do not overtighten the screws (max. 2 Nm) as you may damage the door handles.
Safety Reversing the door The side at which the door hangs can be changed from the right side (factory supplied) to the left side, if the installation site requires. Warning! When changing the side at which the door opens, the appliance must not be connected to the mains. Remove plug from the mains beforehand. The safety aspects of our refrigerators/freezers comply with accepted technical standards and the German Appliance Safety Law.
Positioning Daily Operation Rear spacers Fit the rear spacers contained in the documentation bag to ensure escape of heat generated during operation. Proceed in the sequence illustrated in figures. 24 10 mm 10 mm 100 mm This appliance should only be installed at a location where the ambient temperature corresponds to the climate classification indicated on the rating plate, which is located at the left on the inside of the appliance.
• The symbol on the product or on its packaging indicates that this product may not be treated as household waste. Instead it shall be handed over to the applicable collection point for the recycling of electrical and electronic equipment. By ensuring this product is disposed of correctly, you will help prevent potential negative consequences for the environment and human health, which could otherwise be caused by inappropriate waste handling of this product.
GUARANTEE CONDITIONS Operation and control panel - Fridge Standard guarantee conditions We, AEG, undertake that if within 12 months of the date of the purchase this AEG appliance or any part thereof is proved to be defective by reason only of faulty workmanship or materials, we will, at our discretion repair or replace the same FREE OF CHARGE for labour, materials or carriage on condition that: · The appliance has been correctly installed and used only on the electricity or gas supply stated on the rating
• • During normal operation, the temperature currently present in the fridge (ACTUAL temperature) is displayed. When the temperature is being adjusted a flashing display indicates the fridge temperature currently set (DESIRED temperature). Starting Up - Setting the Temperature 1. 2. 3. 4. 5. Plug the mains plug into the mains socket. Press ON/OFF button. The green mains pilot indicator illuminates. The appliances start. Press either the “C“ or”E“ button.
Malfunction Possible Cause Appliance is not level. Unusual noises. Remedy Readjust the feet. The appliance is touching the Move the appliance slightly. wall or other objects. The compressor does not start This is normal, no error has immediately after changing occurred. the temperature setting. The compressor starts after a period of time. Water on the floor or on stoWater drain hole is blocked. rage shelves. See the "Cleaning and Care" section. Changing the light bulb 1. 2. 3. 4. 5. 6.
Drawer The drawer is suitable for storing fruit and vegetables. There is a separator inside the drawer that can be placed in different positions to allow for the subdivision best suited to personal needs. There is a grille on the bottom of the drawer to separate the fruit and vegetables from any humidity that may form on the bottom surface. To remove the drawer, use the side handles (as shown in the drawing). All parts inside the drawer can be removed for cleaning purposes.
5. 6. 7. After cleaning wipe with fresh water and rub dry. Accumulation of dust at the condenser increases energy consumption. For this reason carefully clean the condenser at the back of the appliance once a year with a soft brush or a vacuum cleaner. Check the water drain hole on the rear wall of the fridge. Clear a blocked drain hole with the aid of the green peg in the pack of accessories included with the appliance. After everything is dry place appliance back into service.
DESIRED temperature means: Cleaning and Care The temperature that has been selected for inside the freezer. The DESIRED temperature is indicated by flashing numbers. ACTUAL temperature means: Outside of the appliance Important: Do not use cleaning agents for stainless steel or other aggressive or abrasive cleaning agents. The protective coat of lacquer on the stainless steel surface can be damaged by these.
Defrosting 1. 2. 3. 4. 5. 6. Refrigerator Frost is automatically eliminated from the evaporator of the refrigerator compartment every time the motor compressor stops, during normal use. The defrost water drains out through a trough into a special container at the back of the appliance, over the motor compressor, where it evaporates. Freezer The freezer compartment, however, will become progrssively covered with frost.
Freezing and storing frozen food You can use your freezer for freezing fresh food yourself. Preparation of Ice Cubes 1. Important! 1. 2. 3. 14 • The temperature in the freezer compartment must be –18 °C or colder before freezing food. • Please observe the freezing capacity given on the rating plate. The freezing capacity is the maximum quantity of fresh food that can be frozen within a period of 24 hours.
Freezing and storing frozen food You can use your freezer for freezing fresh food yourself. Preparation of Ice Cubes 1. Important! 1. 2. 3. 14 • The temperature in the freezer compartment must be –18 °C or colder before freezing food. • Please observe the freezing capacity given on the rating plate. The freezing capacity is the maximum quantity of fresh food that can be frozen within a period of 24 hours.
Defrosting 1. 2. 3. 4. 5. 6. Refrigerator Frost is automatically eliminated from the evaporator of the refrigerator compartment every time the motor compressor stops, during normal use. The defrost water drains out through a trough into a special container at the back of the appliance, over the motor compressor, where it evaporates. Freezer The freezer compartment, however, will become progrssively covered with frost.
DESIRED temperature means: Cleaning and Care The temperature that has been selected for inside the freezer. The DESIRED temperature is indicated by flashing numbers. ACTUAL temperature means: Outside of the appliance Important: Do not use cleaning agents for stainless steel or other aggressive or abrasive cleaning agents. The protective coat of lacquer on the stainless steel surface can be damaged by these.
5. 6. 7. After cleaning wipe with fresh water and rub dry. Accumulation of dust at the condenser increases energy consumption. For this reason carefully clean the condenser at the back of the appliance once a year with a soft brush or a vacuum cleaner. Check the water drain hole on the rear wall of the fridge. Clear a blocked drain hole with the aid of the green peg in the pack of accessories included with the appliance. After everything is dry place appliance back into service.
Drawer The drawer is suitable for storing fruit and vegetables. There is a separator inside the drawer that can be placed in different positions to allow for the subdivision best suited to personal needs. There is a grille on the bottom of the drawer to separate the fruit and vegetables from any humidity that may form on the bottom surface. To remove the drawer, use the side handles (as shown in the drawing). All parts inside the drawer can be removed for cleaning purposes.
Malfunction Possible Cause Appliance is not level. Unusual noises. Remedy Readjust the feet. The appliance is touching the Move the appliance slightly. wall or other objects. The compressor does not start This is normal, no error has immediately after changing occurred. the temperature setting. The compressor starts after a period of time. Water on the floor or on stoWater drain hole is blocked. rage shelves. See the "Cleaning and Care" section. Changing the light bulb 1. 2. 3. 4. 5. 6.
• • During normal operation, the temperature currently present in the fridge (ACTUAL temperature) is displayed. When the temperature is being adjusted a flashing display indicates the fridge temperature currently set (DESIRED temperature). Starting Up - Setting the Temperature 1. 2. 3. 4. 5. Plug the mains plug into the mains socket. Press ON/OFF button. The green mains pilot indicator illuminates. The appliances start. Press either the “C“ or”E“ button.
GUARANTEE CONDITIONS Operation and control panel - Fridge Standard guarantee conditions We, AEG, undertake that if within 12 months of the date of the purchase this AEG appliance or any part thereof is proved to be defective by reason only of faulty workmanship or materials, we will, at our discretion repair or replace the same FREE OF CHARGE for labour, materials or carriage on condition that: · The appliance has been correctly installed and used only on the electricity or gas supply stated on the rating
• The symbol on the product or on its packaging indicates that this product may not be treated as household waste. Instead it shall be handed over to the applicable collection point for the recycling of electrical and electronic equipment. By ensuring this product is disposed of correctly, you will help prevent potential negative consequences for the environment and human health, which could otherwise be caused by inappropriate waste handling of this product.
Positioning Daily Operation Rear spacers Fit the rear spacers contained in the documentation bag to ensure escape of heat generated during operation. Proceed in the sequence illustrated in figures. 24 10 mm 10 mm 100 mm This appliance should only be installed at a location where the ambient temperature corresponds to the climate classification indicated on the rating plate, which is located at the left on the inside of the appliance.
Safety Reversing the door The side at which the door hangs can be changed from the right side (factory supplied) to the left side, if the installation site requires. Warning! When changing the side at which the door opens, the appliance must not be connected to the mains. Remove plug from the mains beforehand. The safety aspects of our refrigerators/freezers comply with accepted technical standards and the German Appliance Safety Law.
12 Unscrew the top handle bracket from the handle rod (1). Unscrew the bottom handle bracket from the door (2). 13. Unscrew the top handle bracket from the door (3) and screw onto the bottom righthand side of the door (4). 14. Turn the handle bracket with the handle rod 180° and screw them to the door (5) and the fitted handle bracket (6). 15. Move the small plug from right to left. Attention! Do not overtighten the screws (max. 2 Nm) as you may damage the door handles.
Dear customer, Before switching on your new refrigerator/freezer please read read these operating instructions carefully. They contain important information for safe use, for installation and for care of the appliance. Please keep these operating instructions for future reference. Pass them on to possible new owners of the appliance.
SANTO 70318 KG Fridge-Freezer Operating Instructions AEG Addington Way LUTON Bedfordshire LU4 9QQ http://www.aeg.co.